Instructions
- Preheat your oven to 350°F (175°C). Lightly grease and flour a 9-inch round cake pan or springform pan. Line the bottom with parchment paper for easy removal.
- Peel, core, and thinly slice the apples. Toss them gently in a bowl with the 2 tablespoons of granulated sugar and 2 tablespoons of lemon juice. Set aside. The lemon juice prevents browning and adds a bright flavor.
- In a medium bowl, whisk together the all-purpose flour, baking powder, ground cinnamon, and salt. Set aside.
- In a large bowl, using an electric mixer, beat the softened unsalted butter and 1 cup of granulated sugar together on medium speed until light and fluffy, about 2-3 minutes.
- Add the eggs one at a time, beating well after each addition. Stir in the vanilla extract. Scrape down the sides of the bowl as needed to ensure everything is well combined.
- Gradually add the dry ingredients to the wet ingredients in three additions, alternating with the milk. Begin and end with the dry ingredients. Mix on low speed until just combined, being careful not to overmix. Overmixing can lead to a tough cake.
- Pour the cake batter into the prepared cake pan and spread it evenly with a spatula. The batter will be relatively thick.
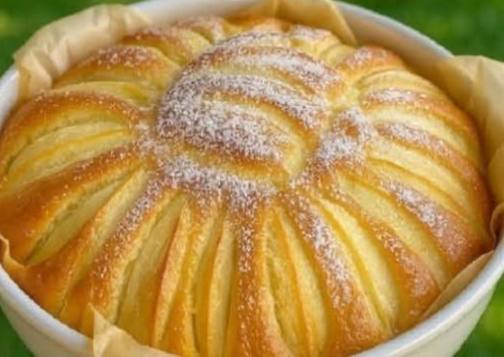
- Arrange the apple slices decoratively on top of the batter. You can create a spiral pattern starting from the outside and working your way in, or simply overlap them slightly in neat rows. Gently press the apple slices into the batter slightly.
- Bake for 45-55 minutes, or until a wooden skewer or toothpick inserted into the center of the cake comes out clean. The top should be golden brown and the apples tender.
- Remove the cake from the oven and let it cool in the pan on a wire rack for 15-20 minutes before carefully inverting it onto the wire rack to cool completely. If using a springform pan, simply release the sides and let cool.
- Once the cake has cooled to room temperature, generously dust with powdered sugar just before serving.
Cooking Tips and Variations
To achieve the perfect Soft Apple Cake, selecting the right apples is crucial. For a balance of sweetness and tartness, and to ensure the apples hold their shape beautifully during baking, opt for varieties like Honeycrisp, Fuji, Braeburn, or the classic Granny Smith. Avoid apples that become too mushy when cooked. For an extra layer of flavor, consider adding a pinch of nutmeg or allspice to your dry ingredients alongside the cinnamon. A teaspoon of orange or lemon zest mixed into the batter can also brighten the overall taste, complementing the apples wonderfully. When arranging the apples, try to overlap them slightly to create a visually appealing pattern, and don’t be afraid to gently press them into the batter—this helps them adhere and cook evenly without drying out.
For variations, this cake is incredibly versatile. If you’re a fan of nuts, a sprinkle of chopped walnuts or pecans over the top of the apples before baking adds a delightful crunch and nutty flavor. For a richer, more indulgent treat, a drizzle of warm caramel sauce over each slice just before serving is absolutely divine. You can also experiment with different spices; a touch of cardamom or ginger can introduce an exotic warmth. If you prefer a slightly denser cake, you can reduce the milk by a tablespoon or two, though the current recipe aims for a truly soft crumb. Always ensure your butter and eggs are at room temperature, as this helps them emulsify better with the sugar, creating a smoother, more uniform batter and a finer-textured cake. When testing for doneness, rely on the toothpick test, but also observe the cake’s edges—they should be golden brown and slightly pulled away from the pan.
Storage and Reheating
To keep your Soft Apple Cake fresh and delicious, store it in an airtight container at room temperature for up to 3 days. If you live in a particularly warm or humid climate, or if you want to extend its shelf life, you can store it in the refrigerator for up to 5 days. Just be aware that refrigeration can sometimes slightly alter the texture, making the cake a little firmer. To prevent the cake from drying out, you can place a slice of bread or a piece of apple in the container with the cake; it sounds unusual, but it helps maintain moisture.
For reheating, if stored at room temperature, the cake is perfectly enjoyable as is. However, if you prefer it warm, or if it has been refrigerated, you can gently reheat individual slices. For a quick warm-up, place a slice in the microwave for 15-30 seconds, or until just warm to the touch. Be careful not to overheat, as this can dry out the cake. Alternatively, you can warm slices in a preheated oven at 300°F (150°C) for about 5-10 minutes, which will also help to slightly re-crisp the apples. Reheating is especially lovely if you plan to serve it with ice cream or a warm sauce, as it enhances the overall experience.
Frequently Asked Questions
What kind of apples are best for this cake?
For this Soft Apple Cake, varieties like Honeycrisp, Fuji, Braeburn, or Granny Smith are ideal. These apples hold their shape well during baking and offer a good balance of sweetness and tartness, ensuring the cake has a pleasant texture and flavor. Avoid softer apples that tend to turn mushy when cooked.
Can I make this cake ahead of time?
Yes, this Soft Apple Cake is an excellent make-ahead dessert. It tastes wonderful on the day it’s baked, but its flavors actually deepen and meld beautifully overnight. Store it in an airtight container at room temperature, and it will remain fresh and delicious for up to 3 days. If you plan to serve it warm, a quick reheat will bring it back to life.
How do I prevent the apples from sinking to the bottom of the cake?
The batter for this cake is designed to be thick enough to support the apples, so sinking is less of a concern than with lighter batters. However, a good tip is to ensure your apple slices are not too wet after tossing them with lemon juice and sugar; gently pat them dry if they seem excessively moist. Also, arranging them decoratively on top and gently pressing them into the batter rather than burying them will help them stay in place and bake beautifully on the surface.
Can I use gluten-free flour for this recipe?
While this recipe was developed with all-purpose flour, you can often substitute a good quality 1:1 gluten-free baking flour blend. Look for blends that contain xanthan gum, as this helps with the cake’s structure and texture. The baking time might vary slightly, so keep an eye on it and use the toothpick test for doneness.