Introduction
Prepare your taste buds for an unforgettable culinary journey as we dive into the world of Sticky Honey Garlic Ribs! Imagine tender, fall-off-the-bone pork ribs, enveloped in a thick, glossy, and irresistibly sweet and savory glaze. This isn’t just a meal; it’s a sensory experience – the rich aroma filling your kitchen, the satisfying stickiness on your fingers, and the explosion of balanced flavors with every succulent bite. These ribs are a true crowd-pleaser, effortlessly bridging the gap between a comforting weeknight dinner and an impressive centerpiece for any gathering. Forget complicated techniques or endless hours in the kitchen; our simple method promises incredibly flavorful results, making you a rib master in no time.
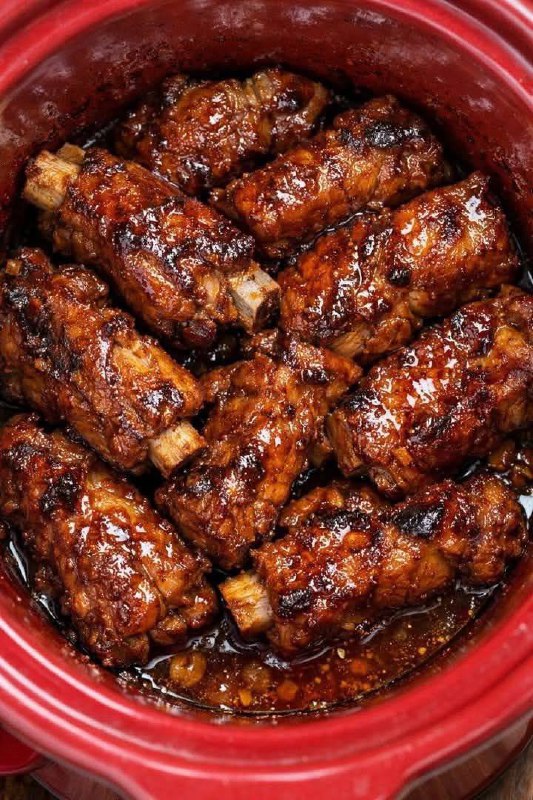
What makes these Sticky Honey Garlic Ribs truly special is the magical transformation that occurs during the cooking process. We’re talking about pork ribs that are slow-cooked to absolute perfection, allowing the meat to become so tender it practically melts in your mouth. But the real star of the show is that phenomenal sauce – a harmonious blend of golden honey, pungent garlic, savory soy, and a hint of tang that reduces down to a glorious, caramelized glaze. This isn’t just any sauce; it’s the kind that clings to every crevice of the rib, creating a beautiful sheen and an explosion of umami-rich sweetness that will have everyone reaching for seconds, and probably thirds!
Whether you’re a seasoned chef or a kitchen novice, this recipe for Sticky Honey Garlic Ribs is designed for success. We’ll guide you through each step, from preparing the ribs to achieving that signature sticky glaze, ensuring your creation is nothing short of culinary perfection. Get ready to impress your family and friends with a dish that looks as amazing as it tastes, proving that truly delicious food doesn’t have to be difficult. So, tie on your apron, gather your ingredients, and let’s get ready to make some magic happen in your kitchen!
Nutritional Information
Per serving (approximate values):
- Calories: 550kcal
- Protein: 45g
- Carbohydrates: 35g
- Fat: 25g
- Fiber: 1g
- Sodium: 1100mg
Ingredients
- 3-4 pounds pork ribs (baby back or spare ribs), cut into 2-3 bone sections
- 1 tablespoon olive oil
- 1 teaspoon salt
- 1/2 teaspoon black pepper
- 1 cup honey
- 1/2 cup soy sauce (low sodium preferred)
- 1/4 cup apple cider vinegar (or rice vinegar)
- 6-8 cloves garlic, minced
- 1 tablespoon fresh ginger, grated
- 1 tablespoon brown sugar (packed)
- 1 teaspoon red pepper flakes (optional, for a kick)
- 1/2 cup chicken broth (or water)
- 2 tablespoons cornstarch
- 2 tablespoons cold water (for cornstarch slurry)
- Fresh chopped cilantro or sliced green onions, for garnish (optional)
Instructions
- Prepare the Ribs: Begin by preparing your pork ribs. If using baby back ribs, locate the thin membrane on the underside (bony side) of the rack. Using a knife, gently pry up a corner of the membrane. Grip it firmly with a paper towel and pull it off completely. This step is crucial for achieving truly tender ribs. Once the membrane is removed, pat the ribs dry thoroughly with paper towels. Cut the full racks into individual rib sections or 2-3 bone portions, as desired.
- Season the Ribs: In a large bowl or directly on a clean surface, drizzle the rib sections with olive oil. Season generously on all sides with salt and black pepper. Take your time to ensure each piece is well coated.
- Sear the Ribs (Optional but Recommended): For an extra layer of flavor and color, heat a large, heavy-bottomed pot or Dutch oven over medium-high heat. Working in batches if necessary to avoid overcrowding, sear the seasoned rib sections for 2-3 minutes per side, until beautifully browned. This step creates a delicious crust and locks in moisture. Remove the seared ribs and set them aside.
- Prepare the Sticky Honey Garlic Sauce: In the same pot (or a clean pot if you skipped searing), reduce the heat to medium. Add the minced garlic and grated ginger. Sauté for about 1 minute until fragrant, being careful not to burn the garlic.
- Combine Sauce Ingredients: Pour in the honey, soy sauce, apple cider vinegar, brown sugar, red pepper flakes (if using), and chicken broth. Whisk everything together until the brown sugar is dissolved and the sauce is well combined. Bring the mixture to a gentle simmer.
- Slow Cook the Ribs: Return the seared (or unseared) rib sections to the pot, ensuring they are mostly submerged in the sauce. If using a Dutch oven, cover the pot tightly with a lid. If using a slow cooker, transfer the ribs and sauce to the slow cooker insert.
- Cook for Tenderness:
- Dutch Oven/Oven Method: Place the covered Dutch oven in a preheated oven at 300°F (150°C) and cook for 2.5 to 3.5 hours, or until the ribs are incredibly tender and the meat easily pulls away from the bone.
- Slow Cooker Method: Cook on low for 6-8 hours or on high for 3-4 hours, until the ribs are fall-off-the-bone tender.
- Achieve the Sticky Glaze: Once the ribs are tender, carefully remove them from the pot and set them aside on a baking sheet lined with parchment paper or foil. The sauce will still be quite thin.
- Thicken the Sauce: Return the pot with the remaining sauce to the stovetop over medium-high heat. In a small bowl, whisk together the cornstarch and cold water to create a slurry. Slowly pour the cornstarch slurry into the simmering sauce, whisking constantly, until the sauce thickens to a glossy, syrupy consistency. This should take about 2-5 minutes. Taste the sauce and adjust seasonings if needed (add a pinch more salt or a splash more vinegar to balance).
- Glaze and Caramelize: Preheat your oven broiler to high. Brush a generous amount of the thickened honey garlic glaze over the cooked ribs. Place the baking sheet under the broiler for 3-5 minutes, watching carefully, until the glaze is bubbling, caramelized, and slightly charred in spots. This step is crucial for achieving that signature sticky, dark, and glossy finish. Be very vigilant, as the honey can burn quickly.
- Serve: Once beautifully glazed, remove the ribs from the broiler. Let them rest for a few minutes before serving. Garnish with fresh chopped cilantro or sliced green onions, if desired. Serve immediately and prepare for rave reviews!
Cooking Tips and Variations
Achieving the perfect balance of tender meat and sticky, caramelized glaze is the key to truly exceptional Sticky Honey Garlic Ribs. Here are some essential tips and exciting variations to elevate your culinary creation.
Achieving Maximum Tenderness: The secret to fall-off-the-bone ribs lies in patience and proper cooking technique. First and foremost, always remember to remove the membrane from the back of the ribs. This thin, silverskin layer becomes tough and chewy when cooked, preventing the meat from becoming as tender as possible and hindering sauce absorption. Use a paper towel for a better grip when pulling it off. Secondly, don’t rush the cook time. Whether you’re using a slow cooker or an oven, the low and slow approach is non-negotiable for breaking down the tough connective tissues in the ribs. The ribs are truly done when the meat easily pulls away from the bone with minimal effort. If they still feel resistant, give them more time. Overcooking is rare with ribs cooked in moisture, but undercooking will result in chewy, disappointing meat.
Perfecting the Glaze: That gorgeous, sticky, and slightly charred glaze is what sets these ribs apart. After slow cooking, the sauce will likely be thinner than you desire for an ultimate glaze. The cornstarch slurry is your best friend here; it thickens the sauce beautifully into a shiny, syrupy consistency. However, the final magic happens under the broiler. Brushing the thickened sauce generously over the cooked ribs and then briefly broiling them is essential for caramelization. The high heat of the broiler causes the sugars in the honey and brown sugar to caramelize and slightly char, creating a deeper flavor and that irresistible sticky texture. Watch them like a hawk during this stage, as honey can burn very quickly. A few minutes is usually all it takes to transform them from succulent to spectacularly glazed.
Serving Suggestions: These Sticky Honey Garlic Ribs are incredibly versatile and pair well with a variety of sides. For a complete and balanced meal, consider serving them with fluffy white rice or brown rice to soak up every last drop of that delicious sauce. A simple side of steamed or roasted vegetables, such as broccoli, asparagus, or green beans, adds a fresh contrast and some healthy greens. A crisp Asian-inspired coleslaw or a light cucumber salad can also cut through the richness of the ribs beautifully. For a touch of starch, creamy mashed potatoes or even some crispy roasted potatoes would be a delightful accompaniment.
Flavor Variations: Don’t be afraid to experiment with the sauce to tailor it to your taste preferences.
- Spicy Kick: For those who love a bit of heat, increase the amount of red pepper flakes in the sauce. You could also add a dash of Sriracha or a few drops of sesame chili oil during the last few minutes of cooking or as a garnish.
- Tangy Twist: If you prefer a more pronounced tang, increase the amount of apple cider vinegar or rice vinegar. A squeeze of fresh lime juice at the end can also brighten the flavors.
- Herb-Infused: While not traditional for this specific flavor profile, finely chopped fresh rosemary or thyme could be added to the sauce during the slow cooking phase for an earthy, aromatic twist. For an Asian-inspired herb boost, consider adding a stalk of lemongrass (bruised) to the sauce while it simmers, removing it before serving.
- Smoky Depth: A teaspoon of smoked paprika or a dash of liquid smoke can add a subtle smoky undertone to the ribs, complementing the sweet and savory notes.
- Sesame Infusion: A tablespoon of toasted sesame oil added to the sauce right before thickening can provide a wonderful nutty aroma and flavor. Garnishing with toasted sesame seeds also adds texture and visual appeal.
- Orange Zest Brightness: For a citrusy lift, add the zest of one orange to the sauce along with the honey and soy sauce. The orange pairs beautifully with honey, garlic, and ginger.
Storage and Reheating
Proper storage and reheating are key to enjoying your Sticky Honey Garlic Ribs long after they’re first cooked. These ribs often taste even better the next day as the flavors have more time to meld and deepen, making them an excellent meal prep option or a fantastic way to enjoy leftovers.
Storage: Once the ribs have cooled completely to room temperature (this is important to prevent condensation and bacterial growth), transfer them to an airtight container. You can store the ribs either as individual pieces or in small sections, along with any remaining sauce. Store them in the refrigerator for up to 3-4 days. For longer storage, the ribs can be frozen. Place cooled ribs in a freezer-safe bag or airtight container, ensuring as much air as possible is removed to prevent freezer burn. They can be frozen for up to 2-3 months. If freezing, it’s often best to store the ribs and sauce separately if you have a lot of sauce, or ensure the ribs are well coated in sauce before freezing.
Reheating: Reheating Sticky Honey Garlic Ribs properly ensures they retain their tenderness and delicious glaze.
- Oven Method (Recommended for best results): This method is ideal for bringing back that caramelized texture. Preheat your oven to 300-325°F (150-160°C). Place the ribs (and any extra sauce) in an oven-safe dish or on a baking sheet, ideally in a single layer. Cover the dish loosely with aluminum foil to prevent drying out. Reheat for 15-25 minutes, or until heated through. For an extra touch of crispness and stickiness, remove the foil for the last 5 minutes and optionally brush with a little more fresh sauce or glaze if you have it.
- Stovetop Method (for individual ribs/smaller portions): If you’re reheating just a few ribs, you can use a skillet. Place the ribs in a non-stick skillet over medium-low heat with a tablespoon or two of water or extra sauce. Cover the skillet and heat gently for 5-10 minutes, flipping occasionally, until warmed through. This method keeps them moist.
- Microwave Method (Quickest, but can affect texture): While the quickest option, microwaving can sometimes make the ribs less tender and the glaze less sticky. Place a few ribs on a microwave-safe plate. Cover with a damp paper towel to help retain moisture. Heat on medium power for 1-2 minutes, checking and flipping halfway, until thoroughly heated. Be careful not to overheat, as this can make them tough.
No matter which reheating method you choose, always ensure the ribs are heated to an internal temperature of 165°F (74°C) for food safety.
Frequently Asked Questions
Can I make these ribs in an Instant Pot?
Absolutely! The Instant Pot is fantastic for incredibly tender ribs in a fraction of the time. To adapt this recipe for an Instant Pot, you would sear the ribs in the Instant Pot on the “Sauté” function. Then, add all the sauce ingredients, ensuring the liquid reaches at least 1 cup (you might need to add a bit more broth). Cook on high pressure for 25-30 minutes for baby back ribs, or 35-40 minutes for spare ribs, followed by a natural pressure release for 10-15 minutes, then quick release any remaining pressure. Remove the ribs, thicken the sauce on the “Sauté” setting, and then proceed with the broiling step for the glaze.
Do I have to remove the membrane from the ribs?
While technically optional, removing the membrane is highly recommended for the best results. The membrane, also known as the silverskin, is a tough, chewy layer on the underside of the ribs. If left on, it prevents the meat from becoming truly tender and can make the ribs feel rubbery. It also acts as a barrier, preventing the delicious sauce from fully penetrating the meat. Taking a few extra minutes to remove it will significantly improve the texture and overall enjoyment of your ribs.
My sauce isn’t thickening. What should I do?
If your sauce isn’t thickening after adding the cornstarch slurry, there are a few common reasons. First, ensure your cornstarch slurry is made with cold water; hot water can cause the cornstarch to clump. Second, make sure the sauce is at a steady simmer when you add the slurry and continue whisking. The heat is necessary to activate the thickening properties of the cornstarch. If it’s still too thin, you can make another small slurry (1 tablespoon cornstarch with 1 tablespoon cold water) and slowly whisk it into the simmering sauce until the desired consistency is reached. Remember, the sauce will also thicken slightly as it cools.
Can I prepare these ribs ahead of time?
Yes, these Sticky Honey Garlic Ribs are an excellent make-ahead dish! You can prepare and cook the ribs through the slow-cooking stage (Step 7), allowing them to cool completely. Store the cooked ribs and the un-thickened sauce separately in airtight containers in the refrigerator for up to 2-3 days. When ready to serve, gently reheat the ribs in the oven (covered with foil), then thicken the sauce on the stovetop. Once the sauce is thick, brush it over the warm ribs and finish with the broiling step to achieve that fresh, sticky glaze. This method is perfect for entertaining, as it reduces last-minute stress.