Instructions
- Begin by preparing your creamy pudding mixture. In a large mixing bowl, using an electric hand mixer or stand mixer, beat the softened cream cheese until it is light and fluffy, about 2-3 minutes. Make sure there are no lumps.
- Gradually add the sweetened condensed milk to the cream cheese, beating on low speed until fully incorporated and smooth. Scrape down the sides of the bowl as needed to ensure everything is well combined.
- In a separate medium bowl, whisk together the instant vanilla pudding mix and the cold milk for 2-3 minutes, or until the pudding begins to thicken significantly. It should be quite thick and creamy.
- Gently fold the prepared vanilla pudding into the cream cheese and condensed milk mixture. Mix until just combined; do not overmix.
- Now, carefully fold in about half of the thawed whipped topping into the pudding mixture. Reserve the other half for the top layer. Fold until no streaks of whipped topping remain, creating a light and airy cream.
- Prepare your fruit: Slice the bananas into approximately ¼-inch thick rounds. Hull and slice the strawberries. If you want to prevent bananas from browning, you can gently toss them with a teaspoon of lemon juice, but this is optional as they will be encased in pudding.
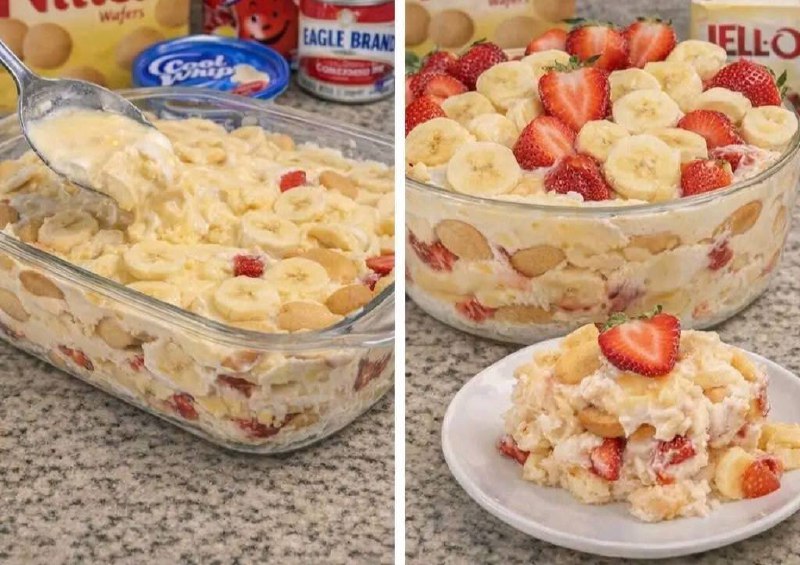
- Get ready to assemble! Choose a large (approximately 9×13 inch) clear glass baking dish or a large trifle bowl to showcase the beautiful layers.
- Start with a single layer of vanilla wafers on the bottom of your dish. Cover the entire bottom.
- Next, arrange a layer of sliced bananas over the wafers.
- Follow with a layer of sliced strawberries over the bananas.
- Spoon about one-third of the creamy pudding mixture evenly over the fruit and wafers, spreading it gently to cover.
- Repeat the layers: vanilla wafers, then bananas, then strawberries, then another third of the pudding mixture.
- For the final layers, place the remaining vanilla wafers, followed by the last of the banana and strawberry slices.
- Spread the remaining pudding mixture evenly over the top layer of fruit and wafers.
- Finally, spread the remaining half of the thawed whipped topping over the entire surface of the pudding, creating a smooth, fluffy top.
- Cover the dish tightly with plastic wrap and refrigerate for at least 4-6 hours, or preferably overnight. This chilling time is crucial for the pudding to set properly, for the flavors to meld, and for the vanilla wafers to soften to a delightful cake-like consistency.
- Before serving, you can garnish with a few whole vanilla wafers, fresh strawberry slices, or a few banana slices on top for an attractive presentation.
- Serve chilled and enjoy your delightful Strawberry Banana Pudding!
Cooking Tips and Variations
For the best Strawberry Banana Pudding experience, here are some tips and ideas to make it truly your own.
Bananas are Key: Use ripe but firm bananas – not green, but not overly soft or bruised. They should have a few brown spots for optimal sweetness. To prevent browning, especially if making ahead, you can lightly toss the banana slices in a tiny amount of lemon juice or pineapple juice before layering. Don’t overdo it, as it can subtly alter the flavor.
Pudding Perfection: Ensure your instant pudding mix is fresh and hasn’t expired. For a thicker, richer pudding, you can use whole milk. If you prefer a slightly lighter texture, 2% milk works fine. Whisk the pudding and milk vigorously until it starts to thicken; don’t skimp on this step.
Cream Cheese Consistency: Make sure your cream cheese is truly softened to room temperature. This prevents lumps and ensures a silky-smooth pudding base. Take it out of the fridge at least an hour before you start.
Chilling is Crucial: Do not rush the chilling process! The 4-6 hours (or overnight) is essential for the wafers to absorb moisture and become tender, and for the pudding layers to fully set and for the flavors to deepen. This is what transforms individual ingredients into a cohesive, irresistible dessert.
Wafers Softening: The vanilla wafers will soften as they sit in the pudding. If you prefer a bit more crunch, you can add a layer of fresh wafers right before serving, or crush some and sprinkle them on top.
Flavor Variations:
- Tropical Twist: Add a layer of sliced kiwi or mango along with the strawberries and bananas.
- Chocolate Lover’s Dream: Substitute vanilla wafers with chocolate wafers and drizzle with chocolate syrup before serving.
- Different Pudding Flavors: Experiment with instant cheesecake pudding, white chocolate pudding, or even coconut cream pudding for a new spin.
- Berry Bliss: Incorporate other berries like raspberries or blueberries alongside or in place of some strawberries.
- Nutty Crunch: Sprinkle finely chopped pecans or walnuts between layers for an added textural element, though this deviates from the classic.
Presentation Matters: Using a clear glass dish or trifle bowl truly highlights the beautiful layers of this dessert. For individual servings, you can layer the pudding in small clear glasses or mason jars.
Storage and Reheating
This Strawberry Banana Pudding is best enjoyed chilled and fresh. Here’s how to store it properly to maintain its deliciousness:
Storage:
Once assembled, cover the dish tightly with plastic wrap or an airtight lid. Store the pudding in the refrigerator. It will last for 2-3 days. After this time, the bananas may start to brown more noticeably, and the wafers might become too soft. While still safe to eat, the texture and appearance might not be at their peak.
Reheating:
This is a cold, no-bake dessert and is not meant to be reheated. Reheating would melt the whipped topping and alter the texture of the pudding and fruit. Always serve it chilled, directly from the refrigerator.
Frequently Asked Questions
Can I make this pudding ahead of time for a party?
Absolutely! In fact, making it ahead is highly recommended. For the best flavor and texture, prepare the pudding at least 6 hours in advance, or ideally, the night before. This allows ample time for the layers to meld, the pudding to set, and the vanilla wafers to soften perfectly.
What can I do to prevent the bananas from turning brown?
While some browning is inevitable over time, you can slow it down by lightly tossing the sliced bananas in a very small amount of lemon juice or pineapple juice (about 1 teaspoon per 3-4 bananas). Be careful not to use too much, as it can impart a tart flavor. Once the bananas are covered by the pudding layers, they are also less exposed to air, which helps.
Can I use homemade whipped cream instead of Cool Whip?
Yes, you can! For an even richer flavor, you can substitute homemade whipped cream for the thawed whipped topping. Just be aware that homemade whipped cream tends to be less stable than Cool Whip and may not hold its shape as long, especially for the top layer. If using homemade, make sure it’s stiffly whipped.
My pudding mixture seems too thin. What went wrong?
There are a few reasons this might happen. Ensure you used instant pudding mix, not cook-and-serve. Make sure your milk was cold, as this helps instant pudding set. Also, ensure you whisked the pudding and milk for the full 2-3 minutes until it thickened before folding it into the cream cheese mixture. If it’s still a bit thin, chilling it longer will usually help it firm up.