Introduction
Get ready to discover your new favorite weeknight dinner! This Teriyaki Chicken Casserole is a culinary hug in a dish, bringing together the irresistible flavors of sweet and savory teriyaki with tender chicken and fluffy rice. It’s the kind of meal that promises comfort, satisfies cravings, and effortlessly becomes a family favorite. Imagine succulent pieces of chicken, bathed in a rich, glossy teriyaki glaze, nestled among perfectly cooked rice, all baked together in one convenient casserole. It’s an ideal solution for busy evenings when you want maximum flavor with minimal fuss.
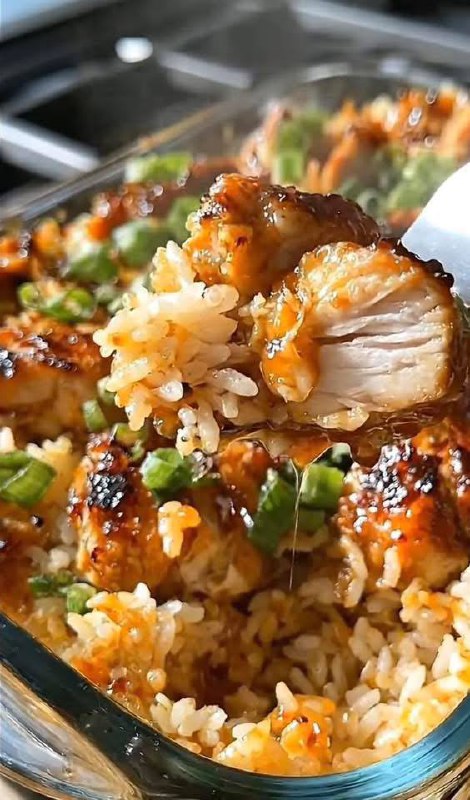
What makes this Teriyaki Chicken Casserole truly special is its incredible balance of flavors and textures. Each bite offers a delightful combination of umami-rich sauce, the slight chewiness of the chicken, and the comforting softness of the rice. The vibrant green onions sprinkled on top not only add a pop of color but also a fresh, aromatic counterpoint to the deep, caramelized notes of the teriyaki. This dish isn’t just a meal; it’s an experience that transports your taste buds straight to a cozy, flavor-filled evening, proving that delicious home-cooked food doesn’t have to be complicated.
Beyond its fantastic taste, this casserole shines as a practical choice for any home cook. It’s largely a one-pan wonder, meaning less time spent on cleanup and more time enjoying your delicious creation. Whether you’re feeding a hungry family, preparing for potlucks, or simply looking for satisfying leftovers, this Teriyaki Chicken Casserole delivers on all fronts. Get ready to dive into a recipe that’s easy to follow, incredibly rewarding, and guaranteed to earn rave reviews from everyone at your table.
Nutritional Information
Per serving (approximate values):
- Calories: 480
- Protein: 35g
- Carbohydrates: 50g
- Fat: 15g
- Fiber: 2g
- Sodium: 850mg
Ingredients
- 1.5 pounds boneless, skinless chicken thighs or breasts, cut into 1-inch cubes
- 2 cups uncooked white rice (such as Jasmine or long-grain)
- 3 cups low-sodium chicken broth
- 1/2 cup soy sauce (low-sodium preferred)
- 1/4 cup mirin (sweet rice wine)
- 2 tablespoons rice vinegar
- 1/4 cup light brown sugar, packed
- 1 tablespoon fresh ginger, grated
- 2 cloves garlic, minced
- 1 tablespoon cornstarch
- 2 tablespoons cold water
- 1 tablespoon sesame oil
- 1/4 cup green onions, chopped, for garnish
- 1 tablespoon sesame seeds, for garnish (optional)
- 1 cup frozen broccoli florets (optional, for adding vegetables)
- 1 tablespoon olive oil (for searing chicken, if desired)
Instructions
- Preheat your oven to 375°F (190°C). Lightly grease a 9×13-inch baking dish.
- In a medium bowl, whisk together the soy sauce, mirin, rice vinegar, brown sugar, grated ginger, and minced garlic.
- In a small bowl, whisk together the cornstarch and cold water to create a slurry. Add the slurry to the teriyaki sauce mixture and whisk until well combined. This will help thicken the sauce as it cooks.
- Place the cubed chicken pieces in a separate bowl. Pour about 1/2 cup of the prepared teriyaki sauce over the chicken, tossing to coat evenly. Let it marinate for at least 15 minutes while you prepare other ingredients.
- In the prepared 9×13-inch baking dish, spread the uncooked white rice evenly across the bottom.
- Carefully pour the chicken broth over the rice.
- Arrange the marinated chicken pieces evenly over the rice and broth. Try to spread them out so they are not too clumped together.
- Pour the remaining teriyaki sauce (the larger portion) evenly over the chicken and rice.
- If adding frozen broccoli, scatter the florets evenly over the top of the chicken and rice at this point.
- Cover the baking dish tightly with aluminum foil.
- Bake for 45 minutes.
- After 45 minutes, carefully remove the foil. Stir the casserole gently to ensure the rice is cooking evenly and absorbing the liquid.
- Return the uncovered casserole to the oven and bake for another 15-20 minutes, or until the rice is tender, the liquid is absorbed, and the chicken is cooked through (internal temperature of 165°F or 74°C). The sauce should be thick and glossy.
- For a slightly caramelized top, you can turn on the broiler for the last 2-3 minutes, watching carefully to prevent burning.
- Once baked, remove the casserole from the oven. Drizzle with sesame oil and let it rest for 5-10 minutes before serving. This resting period allows the flavors to meld and the rice to finish absorbing any remaining moisture.
- Garnish generously with chopped green onions and a sprinkle of sesame seeds before serving.
Cooking Tips and Variations
To ensure your Teriyaki Chicken Casserole is always a showstopper, consider these expert tips. For perfectly cooked chicken, avoid over-baking. Chicken thighs tend to stay more moist in a casserole, but if using breasts, ensure they are cut into uniform 1-inch pieces to cook evenly. You can quickly sear the chicken cubes in a hot pan with a tablespoon of olive oil for 2-3 minutes before adding them to the casserole. This step isn’t strictly necessary but adds a lovely depth of flavor and a slightly firmer exterior to the chicken, creating more texture in the final dish. When it comes to the rice, the type you choose matters. Jasmine and long-grain white rice work beautifully here, but if you prefer brown rice, be aware that it will require more liquid (typically an additional 1/2 to 1 cup of broth) and a longer baking time, often an extra 20-30 minutes, so adjust accordingly.
The teriyaki sauce is the heart of this dish, and while a good quality store-bought sauce can be convenient, making your own offers unparalleled freshness and control over the flavor profile. If you opt for store-bought, choose a low-sodium version and taste it before adding extra salt to the dish. Feel free to adjust the sweetness of the sauce by adding a little more or less brown sugar to suit your preference. For those who love a bit of heat, a pinch of red pepper flakes or a dash of sriracha can be added to the sauce mixture. To achieve that beautiful, glossy, and slightly caramelized finish, don’t skip the step of removing the foil for the last 15-20 minutes of baking. For an even deeper caramelization and a hint of crispiness, a quick broil for the final 2-3 minutes, while keeping a close eye on it, can make all the difference.
One of the best things about casseroles is their versatility, and this Teriyaki Chicken Casserole is no exception. Incorporating more vegetables is an excellent way to boost nutrition and flavor. Besides broccoli, consider adding diced carrots, bell peppers (red or yellow work well), snap peas, or sliced mushrooms. If using harder vegetables like carrots, you might want to add them at the beginning. Softer vegetables like bell peppers or snap peas can be added halfway through the baking process to prevent them from becoming too mushy. For a different textural element, a sprinkle of toasted cashews or peanuts can be added just before serving. Experiment with different garnishes too; finely chopped cilantro or a squeeze of fresh lime juice can brighten the flavors beautifully. This recipe is a fantastic canvas for your culinary creativity!
Storage and Reheating
This Teriyaki Chicken Casserole makes for excellent leftovers, often tasting even better the next day as the flavors have more time to meld. To store, allow the casserole to cool completely to room temperature. Once cool, transfer any remaining portions to an airtight container. It can be stored in the refrigerator for up to 3-4 days. For longer storage, the casserole can be frozen. Place cooled portions in freezer-safe containers or heavy-duty freezer bags, removing as much air as possible. It will keep well in the freezer for up to 2-3 months. Thaw frozen casserole overnight in the refrigerator before reheating.
When reheating, there are a few options to ensure your casserole remains delicious and doesn’t dry out. For individual servings, the microwave is the quickest method. Place a portion in a microwave-safe dish, cover loosely with a lid or microwave-safe plastic wrap, and heat on high for 2-3 minutes, stirring halfway through, until heated through. If the rice seems a bit dry, you can add a tablespoon or two of chicken broth or water before microwaving to restore moisture. For larger portions or to reheat the entire casserole, the oven is recommended. Preheat your oven to 300°F (150°C). Place the casserole in an oven-safe dish, cover it tightly with aluminum foil to prevent drying, and bake for 20-30 minutes, or until heated through. You can remove the foil for the last few minutes if you prefer a slightly crisper top. Avoid over-reheating, as this can dry out the chicken and rice.
Frequently Asked Questions
What kind of rice is best for this casserole?
Long-grain white rice, such as Jasmine or Basmati, is highly recommended for this casserole. These types of rice cook up fluffy and absorb the teriyaki sauce beautifully without becoming too sticky or mushy. Short-grain rice can work but may result in a slightly gummier texture. If using brown rice, note that it will require more liquid and a longer baking time (typically an additional 20-30 minutes).
Can I use pre-cooked chicken in this recipe?
While this recipe is designed for raw chicken to cook directly in the casserole, you can adapt it for pre-cooked chicken. If using cooked chicken, reduce the initial baking time with foil to about 30-35 minutes (just enough for the rice to cook) and then add the cooked chicken for the final 15-20 minutes of uncovered baking. Be sure to cut the cooked chicken into bite-sized pieces and toss it with some of the teriyaki sauce before adding it to the casserole to ensure it’s well-coated and flavorful. This method is great for using up leftover rotisserie chicken.
How can I make this casserole spicier?
To add a kick to your Teriyaki Chicken Casserole, you have several options. You can incorporate a teaspoon or two of red pepper flakes into the teriyaki sauce mixture. For a deeper heat, add a tablespoon of sriracha or other chili garlic sauce to the sauce. Alternatively, offer these spicy condiments on the side, allowing individual diners to customize their level of heat. A dash of ground white pepper can also provide a subtle warmth.
Can I make this casserole ahead of time?
Yes, you can prepare parts of this casserole ahead of time. You can whisk together the teriyaki sauce components (without the cornstarch slurry) and store it in the refrigerator for up to 3 days. The chicken can also be cut and marinated in a portion of the sauce for up to 24 hours in the refrigerator. However, for the best texture, it’s generally best to assemble and bake the casserole fresh. If you need to fully prepare it in advance, assemble the casserole as directed, cover it tightly, and refrigerate for up to 24 hours before baking. You may need to add an extra 10-15 minutes to the baking time if baking from cold.