Instructions
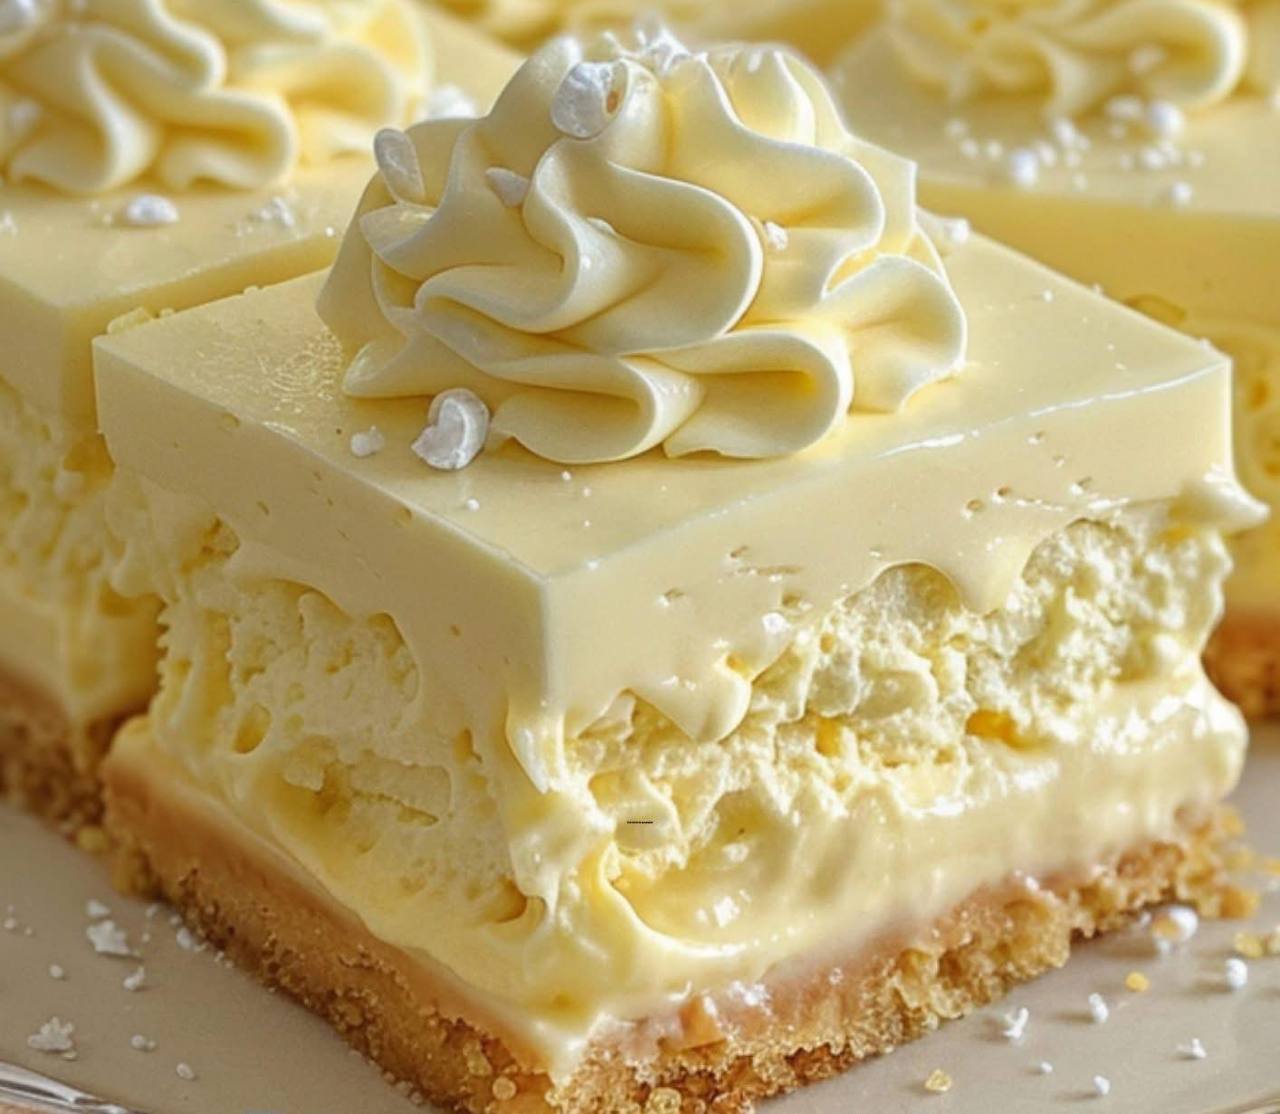
Prepare the Biscuit Crust:
- Preheat your oven to 350°F (175°C). Lightly grease a 9×9 inch (23×23 cm) square baking pan and line it with parchment paper, leaving an overhang on two sides to easily lift out the squares later.
- In a medium bowl, combine the biscuit crumbs, melted butter, and 2 tablespoons of granulated sugar. Stir until well combined and the crumbs are evenly moistened.
- Press the crumb mixture firmly and evenly into the bottom of the prepared baking pan. Use the back of a spoon or the bottom of a flat glass to compact it tightly.
- Bake the crust for 10-12 minutes, or until lightly golden brown and fragrant.
- Remove from the oven and let it cool completely on a wire rack while you prepare the custard.
Prepare the Vanilla Custard Filling:
- In a medium saucepan, whisk together the whole milk and heavy cream over medium heat. Bring the mixture just to a simmer, stirring occasionally, until small bubbles form around the edges. Do not boil.
- In a separate medium bowl, whisk together the 1/2 cup granulated sugar, cornstarch, egg yolks, and salt until smooth and pale yellow.
- Once the milk mixture is simmering, slowly and gradually temper the egg yolk mixture by whisking about half of the hot milk mixture into the egg yolks. This prevents the eggs from scrambling.
- Pour the tempered egg yolk mixture back into the saucepan with the remaining hot milk mixture.
- Return the saucepan to medium-low heat and cook, whisking constantly, for 5-7 minutes, or until the custard thickens significantly and coats the back of a spoon. It should be thick enough to hold its shape when stirred.
- Remove the saucepan from the heat. Stir in the vanilla extract and the 2 tablespoons of unsalted butter until the butter is fully melted and incorporated, and the custard is smooth and glossy.
- Pour the hot custard immediately over the cooled biscuit crust in the prepared pan.
- Gently tap the pan on the counter a few times to release any air bubbles and ensure an even layer.
- Place a piece of plastic wrap directly onto the surface of the custard to prevent a skin from forming.
- Refrigerate for at least 4 hours, or preferably overnight, until the custard is completely set and thoroughly chilled.
Prepare the Whipped Cream Topping:
- Once the custard is fully chilled and set, remove the plastic wrap.
- In a large, chilled bowl, using an electric mixer with a whisk attachment, beat the very cold heavy cream, confectioners’ sugar, and vanilla extract on medium-high speed until stiff peaks form. Be careful not to overbeat, or it will turn into butter.
- Spread the whipped cream evenly over the chilled custard layer. For a decorative touch, you can pipe the whipped cream using a pastry bag fitted with a star tip.
- If desired, sprinkle white sprinkles over the top for garnish.
- Return the squares to the refrigerator for at least 30 minutes to allow the topping to set slightly before slicing.
Slice and Serve:
- Using the parchment paper overhangs, carefully lift the entire slab of squares out of the pan and onto a cutting board.
- Dip a sharp knife into hot water and wipe it clean between each cut to ensure neat slices. Cut the slab into 16 or 20 even squares.
- Serve chilled and enjoy!
Cooking Tips and Variations
For the best results with your Vanilla Custard Cream Squares, always use high-quality ingredients, especially for the vanilla extract, as it’s the star flavor here. When making the custard, whisking continuously is key to preventing lumps and achieving that silky smooth texture. If, despite your best efforts, you find a few lumps, simply pass the custard through a fine-mesh sieve before pouring it over the crust for a perfectly smooth finish. Chilling time is non-negotiable for this dessert; a well-chilled custard not only tastes better but also holds its shape beautifully when sliced. Rushing this step will result in a messy, unset dessert.
To prevent your biscuit crust from becoming soggy, ensure it’s fully cooled before adding the warm custard. A slightly underbaked crust can also contribute to sogginess, so make sure it’s golden brown. For an extra firm crust, you can press it into the pan and then chill it for 15-20 minutes before baking. When it comes to the whipped cream topping, starting with very cold cream and a chilled bowl and whisk attachment will help it whip up faster and hold its shape longer. If you’re making these ahead for a party, consider stabilizing the whipped cream with a tiny bit of unflavored gelatin or a spoonful of cream cheese to ensure it stays firm for hours.
Want to experiment with variations? For a chocolate twist, add 1/4 cup of cocoa powder to the biscuit crust mixture, or drizzle melted chocolate over the top once the cream has set. Citrus lovers might enjoy adding a teaspoon of lemon or orange zest to the custard for a bright, refreshing note. You could also swap out the vanilla extract in the custard for almond extract, or even a touch of rum or bourbon for an adult-friendly version. For a fruitier square, gently press fresh berries (like raspberries or sliced strawberries) onto the top of the chilled custard before adding the whipped cream. Another delicious option is to add a thin layer of caramel sauce or a berry compote between the custard and the whipped cream for an added layer of flavor and texture. For a richer crust, consider using shortbread cookies instead of digestive biscuits. If you’re looking for a gluten-free option, simply use gluten-free biscuits for the crust. The possibilities are endless, so feel free to get creative and make these squares truly your own!
Storage and Reheating
Vanilla Custard Cream Squares are best enjoyed chilled. Store any leftovers in an airtight container in the refrigerator for up to 3-4 days. It’s best to cover them loosely with plastic wrap or foil if they are in a pan, or place individual squares in an airtight container to prevent them from absorbing odors from other foods in the fridge. The biscuit crust may soften slightly over time, but the flavors of the custard and cream will remain delightful.
Due to the nature of the ingredients (custard and whipped cream), these squares do not freeze well, as freezing and thawing can alter the texture of both layers, making them watery or grainy. Therefore, it’s not recommended to freeze these squares. They are designed to be a fresh, chilled dessert. There is no reheating required or recommended for this dessert; it is intended to be served cold directly from the refrigerator.
Frequently Asked Questions
Can I make these squares ahead of time?
Absolutely! These Vanilla Custard Cream Squares are an excellent make-ahead dessert. In fact, they require significant chilling time for the custard to set properly, so preparing them the day before serving is ideal. Store them covered in the refrigerator, and add the whipped cream topping a few hours before serving for the freshest taste and best texture.
Why did my custard turn out lumpy?
Lumpy custard often occurs if the egg yolks are not tempered properly, if the heat is too high, or if the mixture isn’t stirred constantly while cooking. To avoid lumps, always whisk a small amount of hot milk into the egg yolk mixture first to gradually raise its temperature before adding it back to the saucepan. Cook over medium-low heat, stirring continuously with a whisk or rubber spatula, ensuring you scrape the bottom and sides of the pan. If lumps still appear, you can push the warm custard through a fine-mesh sieve for a perfectly smooth result.
Can I use a different type of crust?
Yes, you can certainly experiment with different crusts! While digestive biscuits or graham crackers are classic choices, you could also use shortbread cookies, vanilla wafers, or even a simple flour-based shortcrust pastry. If using a pastry, you would pre-bake it according to the recipe’s instructions before adding the custard. Just ensure that whatever crust you choose complements the delicate vanilla flavor of the custard.
How do I prevent the whipped cream from deflating?
To keep your whipped cream topping firm and fluffy, start with very cold heavy cream, and ideally, a chilled mixing bowl and whisk attachment. Beat only until stiff peaks form; overbeating can cause it to become grainy or separate. For extra stability, especially if serving outdoors or making ahead, you can add a stabilizer like a small amount of unflavored gelatin (dissolved and cooled) or a tablespoon of powdered milk or cream cheese to the cream before whipping. Always keep the finished squares refrigerated until serving.