Introduction
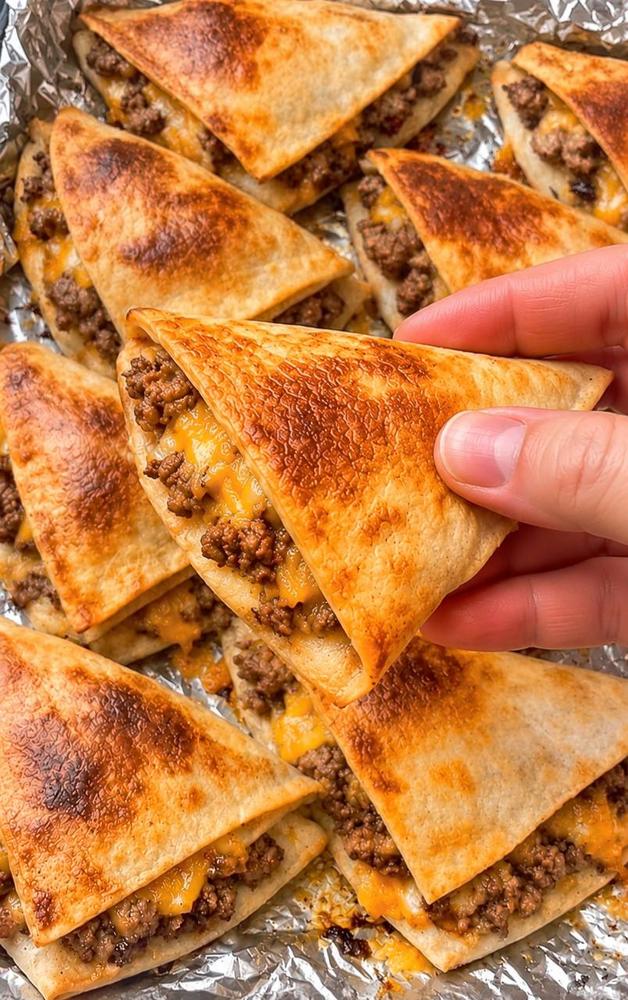
Get ready to meet your new favorite snack, appetizer, or even a fun, fuss-free meal: Cheesy Beef Tortilla Triangles! These irresistible bites are everything you could want in a comfort food – crispy, savory, and loaded with gooey, melted cheese and perfectly seasoned ground beef, all tucked inside a golden-brown tortilla. Imagine biting into that warm, crunchy exterior, followed by the explosion of rich, meaty flavor perfectly complemented by stretchy, delicious cheese. They’re a guaranteed crowd-pleaser, disappearing faster than you can say “more, please!”
What makes these triangles truly special is their incredible versatility and ease of preparation. Whether you’re hosting a game day party, looking for a quick after-school snack for the kids, or simply craving something satisfying and delicious for dinner, these Cheesy Beef Tortilla Triangles fit the bill. They come together in a flash, making them perfect for those busy weeknights when you need a tasty meal without spending hours in the kitchen. Plus, they’re incredibly customizable, allowing you to easily adjust the flavors to suit your family’s preferences, making them a staple in your recipe rotation.
Beyond their deliciousness and simplicity, these triangles offer a delightful textural contrast that keeps you coming back for more. The exterior of the tortilla is toasted to a beautiful golden crispness, sometimes even developing a slightly blistered, satisfying crunch. This perfectly complements the soft, savory, and incredibly cheesy interior, where the seasoned ground beef mingles with vibrant, melted cheese. Served warm, fresh off the pan or out of the oven, they are a handheld delight that promises a burst of flavor in every single bite. Prepare to fall in love with these golden, cheesy pockets of joy!
Nutritional Information
Per serving (approximate values, based on 1 triangle):
- Calories: 210
- Protein: 14g
- Carbohydrates: 15g
- Fat: 11g
- Fiber: 1g
- Sodium: 350mg
Ingredients
- 1 tablespoon olive oil or vegetable oil
- 1 pound lean ground beef (80/20 or 90/10)
- 1 small onion, finely diced (optional)
- 2 cloves garlic, minced
- 1 teaspoon chili powder
- 1/2 teaspoon ground cumin
- 1/4 teaspoon smoked paprika (optional, for extra flavor)
- 1/4 teaspoon salt, or to taste
- 1/8 teaspoon black pepper, or to taste
- 1/4 cup water or beef broth
- 1 cup shredded cheddar cheese, Colby Jack, or a Mexican blend
- 8-10 small (6-inch) flour tortillas
- 2 tablespoons vegetable oil or cooking spray, for cooking the tortillas
- Optional for serving: salsa, sour cream, guacamole, chopped fresh cilantro
Instructions
- Prepare the Ground Beef: Heat 1 tablespoon of olive oil in a large skillet or pan over medium-high heat. Add the ground beef and cook, breaking it up with a spoon, until it is fully browned and no longer pink. If using, add the finely diced onion during the last 5 minutes of cooking the beef and sauté until softened. Drain any excess grease from the pan.
- Season the Beef: Reduce the heat to medium. Add the minced garlic, chili powder, ground cumin, smoked paprika (if using), salt, and black pepper to the cooked ground beef. Stir well to combine and cook for another minute until fragrant. Pour in the 1/4 cup of water or beef broth, stirring it into the beef mixture. This helps to create a slightly moist, flavorful filling. Simmer for 2-3 minutes until most of the liquid has evaporated, ensuring the beef is well-seasoned and moist, but not watery. Remove the skillet from the heat and set aside.
- Prepare the Tortillas: Lay one flour tortilla flat on a clean work surface.
- Fill the Tortilla: Spoon about 2-3 tablespoons of the seasoned ground beef mixture onto one quarter of the tortilla, towards the edge. Sprinkle about 1-2 tablespoons of shredded cheese over the beef.
- Fold into a Triangle:
- Fold the tortilla in half over the filling, creating a semi-circle. Gently press down on the edges to seal.
- Now, take one end of the semi-circle and fold it towards the center, creating the first side of your triangle.
- Take the other end of the semi-circle and fold it over the first fold, completing the triangle shape and enclosing the filling. Press gently to seal all edges. You should have a neat, compact triangle. Repeat this process with the remaining tortillas, beef, and cheese.
- Cook the Triangles (Pan-Frying Method – Recommended for Crispness): Heat 2 tablespoons of vegetable oil in a large non-stick skillet or griddle over medium heat. Once the oil is shimmering, carefully place a few of the prepared tortilla triangles into the hot skillet, ensuring not to overcrowd the pan.
- Achieve Golden Crispness: Cook for 2-4 minutes per side, or until the tortillas are golden brown and crispy, and the cheese inside is fully melted and gooey. You may need to adjust the heat to prevent burning while ensuring thorough cooking. Use a spatula to gently press down on the triangles as they cook to help with browning and sealing.
- Cook in Batches: Remove the cooked triangles from the skillet and place them on a plate lined with paper towels to absorb any excess oil. Repeat with the remaining triangles, adding more oil to the skillet if needed.
- Serve Immediately: Serve the Cheesy Beef Tortilla Triangles hot, straight from the pan. Offer with your favorite dipping sauces such as salsa, sour cream, or guacamole, and a sprinkle of fresh cilantro if desired.
Cooking Tips and Variations
To ensure your Cheesy Beef Tortilla Triangles are absolutely perfect every time, consider these helpful tips and exciting variations:
- Achieving Maximum Crispness: For the crispiest exterior, pan-frying is generally the best method. Don’t overcrowd the pan, as this can lower the oil temperature and lead to soggy tortillas. Cook in batches, adding a little more oil if needed. For a slightly healthier but still crispy option, you can air fry them at 375°F (190°C) for 6-8 minutes, flipping halfway, after lightly brushing with oil. Baking at 400°F (200°C) for 10-15 minutes, flipping halfway, also works but may yield a slightly less crispy result unless you use parchment paper and a light brush of oil.
- Preventing Soggy Tortillas: Ensure your beef filling isn’t too wet. After simmering with the broth, let any excess liquid evaporate. A slightly drier filling helps keep the tortillas from getting soggy. Using slightly older tortillas (not freshly soft) can also help them crisp up better.
- Even Browning: Make sure your pan is evenly heated before adding the triangles. Use a medium heat setting to allow the tortillas to brown slowly and evenly without burning, giving the cheese time to melt thoroughly. Pressing gently with a spatula helps ensure good contact with the pan.
- Cheese Choices: While cheddar or a Mexican blend is classic, feel free to experiment! Monterey Jack, Pepper Jack (for a spicy kick), or even a combination of cheeses would be delicious. Ensure you use a good melting cheese for that desirable gooey factor.
- Spice It Up: If you love heat, add a pinch of cayenne pepper or a dash of hot sauce to your ground beef mixture. Diced jalapeños (fresh or pickled) can also be added to the filling for an extra layer of flavor and spice.
- Add Vegetables: Finely diced bell peppers, corn, or black beans can be added to the beef mixture for extra flavor, texture, and nutrition. Just make sure they are cooked down and any excess moisture is removed. Sautéing the bell peppers with the onion and garlic is ideal.
- Herb Infusion: Fresh cilantro, oregano, or even a touch of dried parsley can elevate the flavor of the beef filling. Add fresh herbs at the very end of cooking the beef.
- Gluten-Free Option: Simply swap out the flour tortillas for your favorite gluten-free tortillas. Ensure they are small enough to fold easily.
- Vegetarian Version: Replace the ground beef with seasoned black beans, refried beans, or a plant-based ground “meat” substitute. Sautéed mushrooms and onions can also make a fantastic savory filling.
- Kid-Friendly Adjustments: If making these for picky eaters, keep the seasoning mild. A simple beef and cheese filling is usually a winner. You can even let them help with the folding!
Storage and Reheating
Cheesy Beef Tortilla Triangles are best enjoyed fresh and hot, but they can certainly be stored and reheated for later enjoyment.
Storage:
- Refrigeration: Allow any leftover triangles to cool completely to room temperature. This prevents condensation from forming and making them soggy. Once cooled, place them in an airtight container or a resealable bag. They will keep well in the refrigerator for up to 2-3 days.
- Freezing (Uncooked): You can prepare the triangles and freeze them uncooked. Arrange the folded, uncooked triangles in a single layer on a baking sheet lined with parchment paper. Freeze until solid (about 1-2 hours). Once frozen, transfer them to a freezer-safe airtight container or freezer bag. They can be stored for up to 1 month. When ready to cook, you can cook them from frozen, adding a few extra minutes to the cooking time, or thaw them in the refrigerator first.
- Freezing (Cooked): While not ideal for crispness, cooked triangles can also be frozen. Cool completely, then arrange in a single layer on a parchment-lined baking sheet and freeze until solid. Transfer to a freezer bag or container. They will last for about 1 month. The texture may be softer upon reheating.
Reheating:
The key to reheating is to try and restore some of that lovely crispness without drying them out.
- Oven/Toaster Oven (Recommended): This is the best method for bringing back crispiness. Preheat your oven or toaster oven to 350°F (175°C). Place the triangles on a baking sheet (you can line it with foil or parchment paper). Reheat for 8-12 minutes, or until heated through and crispy. Flip halfway if desired.
- Air Fryer: For quick and efficient crisping, reheat in an air fryer at 350°F (175°C) for 3-5 minutes, or until hot and crispy. Keep an eye on them to prevent burning.
- Skillet/Pan: You can reheat them in a dry non-stick skillet over medium heat for 2-4 minutes per side, until warmed through and re-crisped. Add a tiny bit of oil if you prefer, but it’s not strictly necessary.
- Microwave (Least Recommended): While you can microwave them, this method will make the tortillas soft and potentially chewy, losing all crispness. Only use the microwave if you’re in a hurry and don’t mind the texture change. Heat for 30-60 seconds, or until warmed through.
Frequently Asked Questions
What kind of tortillas are best for these triangles?
Small (6-inch) flour tortillas are ideal for this recipe. Their flexibility makes them easy to fold into neat triangles, and they crisp up beautifully when cooked. Corn tortillas can also be used for a different flavor and texture, but they tend to be a bit more fragile and may crack during folding, so handle them gently or briefly warm them to increase pliability.
Can I make the beef filling ahead of time?
Absolutely! Preparing the seasoned ground beef filling in advance is a fantastic time-saver. Cook the beef as directed, let it cool completely, and then store it in an airtight container in the refrigerator for up to 3-4 days. When you’re ready to assemble, simply warm the beef mixture slightly before filling the tortillas; this helps the cheese melt more efficiently when cooked.
How do I prevent the triangles from falling apart while cooking?
The key is in the folding and not overfilling. Don’t put too much filling in each tortilla, as this makes it harder to seal. When folding, press gently along the edges of each fold to create a good seal. If you find the edges are not sticking, you can lightly dampen them with a tiny bit of water before pressing. Cooking them seam-side down first in the pan can also help “seal” the edges as they crisp up.
Can I bake or air fry these instead of pan-frying?
Yes, you definitely can! For baking, preheat your oven to 400°F (200°C). Place the triangles on a baking sheet lined with parchment paper, lightly brush with oil, and bake for 10-15 minutes, flipping halfway, until golden and crispy. For air frying, preheat your air fryer to 375°F (190°C), lightly brush the triangles with oil, and cook for 6-8 minutes, flipping halfway, until they are golden brown and crisp. Both methods offer a delicious alternative to pan-frying, often with less oil.