Introduction
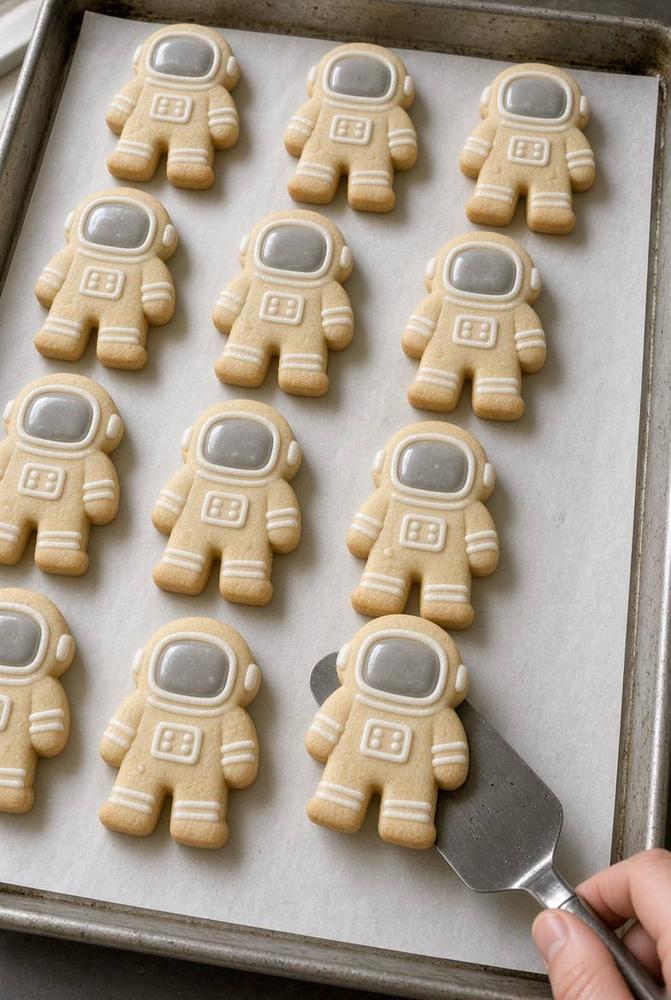
Prepare for a launch into deliciousness with our out-of-this-world Astronaut Sugar Cookies! These aren’t just any sugar cookies; they’re edible odes to space exploration, designed to capture the wonder and excitement of venturing beyond our atmosphere. Imagine biting into a perfectly tender, sweet cookie adorned with a brave little astronaut in a gleaming white suit, complete with a reflective grey visor. They’re a cosmic treat that’s as delightful to look at as they are to eat, perfect for inspiring dreams of the stars.
Whether you’re planning a space-themed birthday party, looking for a unique gift that’s truly “one small bite for man, one giant leap for your taste buds,” or simply seeking a fun and engaging baking project to do with kids, these Astronaut Sugar Cookies are your ticket to an unforgettable culinary adventure. They transform a classic sugar cookie recipe into a canvas for creative expression, blending the comforting familiarity of homemade cookies with the intricate artistry of royal icing decoration. Get ready to impress everyone with these stellar confections that are sure to be the star of any gathering.
This recipe guides you through creating the ideal “no-spread” sugar cookie base, ensuring your astronaut shapes remain crisp and defined after baking. Then, we’ll dive into the magical world of royal icing, teaching you how to achieve the perfect consistencies for outlining and flooding, bringing your little space explorers to life with precision and vibrant detail. It’s a journey from mixing bowl to decorated masterpiece, promising a rewarding experience and a batch of cookies that are truly out of this world.
Nutritional Information
Per serving (approximate values):
- Calories: 220
- Protein: 2g
- Carbohydrates: 35g
- Fat: 8g
- Fiber: 0.5g
- Sodium: 80mg
Ingredients
- For the Sugar Cookies:
- 3 cups all-purpose flour, plus more for dusting
- 1 teaspoon baking powder
- 1/2 teaspoon salt
- 1 cup (2 sticks) unsalted butter, softened
- 1 1/2 cups granulated sugar
- 2 large eggs
- 2 teaspoons vanilla extract
- For the Royal Icing:
- 4 cups powdered sugar, sifted
- 3 tablespoons meringue powder
- 1/2 cup warm water, plus more as needed
- 1 teaspoon vanilla extract (or almond extract for a different flavor)
- White gel food coloring (optional, to intensify white)
- Black or grey gel food coloring (for the visor)
Instructions
- Prepare the Cookie Dough: In a medium bowl, whisk together the flour, baking powder, and salt. Set aside.
- In a large bowl, using an electric mixer, cream together the softened butter and granulated sugar until light and fluffy, about 2-3 minutes.
- Beat in the eggs one at a time, mixing well after each addition. Stir in the vanilla extract.
- Gradually add the dry ingredients to the wet ingredients, mixing on low speed until just combined. Be careful not to overmix. The dough will be thick.
- Divide the dough into two equal portions. Flatten each portion into a disk, wrap tightly in plastic wrap, and refrigerate for at least 1-2 hours, or preferably overnight. Chilling is crucial to prevent the cookies from spreading.
- Roll and Cut the Cookies: Preheat your oven to 375°F (190°C). Line baking sheets with parchment paper.
- On a lightly floured surface, roll out one disk of chilled dough to an even 1/4-inch thickness. If the dough is too stiff, let it sit at room temperature for a few minutes to soften slightly.
- Use an astronaut-shaped cookie cutter to cut out shapes. Carefully transfer the cut-out cookies to the prepared baking sheets, leaving about 1 inch between each cookie. Re-roll any dough scraps and cut additional cookies until all dough is used.
- Bake the Cookies: Bake for 8-10 minutes, or until the edges are lightly golden. Do not overbake; the cookies should still be pale in the center.
- Remove from the oven and let the cookies cool on the baking sheets for 5 minutes before transferring them to a wire rack to cool completely. Cookies must be completely cool before decorating with royal icing.
- Prepare the Royal Icing: In a large bowl, combine the sifted powdered sugar and meringue powder.
- Gradually add the warm water and vanilla extract, mixing on low speed with an electric mixer until combined. Increase speed to medium-high and beat for 5-7 minutes, or until the icing is very thick, glossy, and holds stiff peaks. This is your “outline” consistency icing.
- Separate about 1/3 of the white royal icing into a small bowl. Add a few drops of white gel food coloring if desired to make it a brighter white, mixing well. This will be for outlining the astronaut suit and details.
- To the remaining larger portion of white icing, add small amounts of warm water (1/2 teaspoon at a time) and stir until it reaches a “flood” consistency. When you lift the spoon, the icing should flow smoothly back into the bowl and disappear within 10-15 seconds. This is for filling in the main body of the astronaut.
- To create the grey icing for the visor, take a small amount of the outline consistency white icing and transfer it to a separate small bowl. Add a tiny drop of black or grey gel food coloring and mix until you achieve a light to medium grey color. If needed, thin a small portion of this grey icing with a few drops of water to create a flood consistency for the visor.
- Decorate the Astronaut Cookies: Prepare piping bags by fitting them with small round tips (like PME #1.5 or #2) or by simply snipping a tiny corner off the bag. Fill separate bags with the white outline icing, white flood icing, grey outline icing, and grey flood icing.
- Outline the Astronaut: Using the white outline icing, carefully pipe an outline around the entire astronaut shape.
- Flood the Body: Immediately after outlining (or within a few minutes), use the white flood icing to fill in the entire body of the astronaut (everything except where the visor will be). Use a scribe tool or toothpick to gently spread the icing to the edges and pop any air bubbles.
- Allow the white flood icing to dry for at least 1-2 hours, or until it forms a crust, before adding the visor. For best results, let it dry completely for 4-6 hours or overnight.
- Add the Visor: Once the white body is dry, use the grey outline icing to draw the shape of the helmet visor.
- Fill in the visor area with the grey flood icing, again using a scribe tool or toothpick to smooth it out.
- Allow the grey visor icing to dry completely for at least 2-4 hours, or overnight, to prevent colors from bleeding when adding final details.
- Add Final Details: Once all base layers are dry, use the white outline icing to add details such as the “control panel” square on the chest, stripes on the arms, and stripes on the legs. You can also add a small white line to define the helmet’s edge.
- Allow all decorated cookies to dry completely on a wire rack for at least 8-12 hours, or overnight, before stacking or storing. The icing should be hard to the touch.
Cooking Tips and Variations
Cookie Dough Troubleshooting:
- Too Sticky: If your dough is too sticky after chilling, you can knead in a tablespoon or two of extra flour until it’s workable. Ensure your butter wasn’t too soft to begin with.
- Too Crumbly: If the dough is too crumbly, it might be over-floured or under-hydrated. You can try adding a teaspoon of milk or water at a time and kneading it in until the dough comes together.
- Preventing Spread: The most crucial tip is to chill your dough thoroughly! Warm dough will spread in the oven, losing your astronaut shapes. Also, avoid using too much baking powder; 1 teaspoon for this recipe is just right for a slight lift without excessive spreading.
- Even Thickness: Roll your dough to an even 1/4-inch thickness. This ensures consistent baking and prevents some cookies from burning while others are undercooked. You can use rolling pin guides for perfect thickness.
- Clean Cuts: Dip your cookie cutter in flour before each cut to prevent sticking and ensure clean, sharp edges.
Royal Icing Troubleshooting:
- Too Thick: If your royal icing is too thick for outlining or flooding, add warm water 1/4 teaspoon at a time, mixing well until the desired consistency is reached.
- Too Thin: If your flood icing is too thin and runs off the cookie, add more sifted powdered sugar, 1 tablespoon at a time, mixing until it thickens.
- Craters/Pinholes: These often occur when flood icing is too thin or when air bubbles are trapped. Use a scribe tool or toothpick to gently spread the icing and pop any visible air bubbles immediately after flooding. A slightly thicker flood consistency can also help.
- Bleeding Colors: This happens when wet icing touches other wet icing. Always allow each color or layer of icing to dry completely (to the touch) before adding the next adjacent color or detail. This is especially important for the grey visor against the white suit.
- Crusting in the Bag/Bowl: Royal icing dries quickly when exposed to air. Always cover your royal icing bowls with plastic wrap directly touching the surface, and place a damp paper towel over the tip of your piping bags when not in use.
Flavor Variations for Cookies:
- Almond: Substitute vanilla extract with almond extract for a delicate, nutty flavor.
- Lemon Zest: Add 1-2 teaspoons of finely grated lemon zest to the cookie dough for a bright, citrusy note.
- Orange Blossom: A few drops of orange blossom water (instead of vanilla) can give a unique, floral aroma.
- Spiced: Add 1/2 teaspoon of ground cinnamon or a pinch of nutmeg for a warmer, cozier cookie.
Decoration Variations:
- Edible Glitter: Before the icing fully dries, sprinkle a tiny bit of edible silver or white glitter on the visor or suit for an extra sparkly, space-like effect.
- Different Suit Colors: Feel free to experiment with different gel food colorings for the astronaut suits! Bright blue, orange, or even purple suits would be fun and vibrant.
- Metallic Accents: Use edible silver or gold paint (available in specialty baking stores) to paint small details on the suit for a metallic sheen.
- Stars and Planets: If you have tiny star or planet cookie cutters, you could bake and decorate miniature accompanying cookies to go with your astronauts.
- Custom Faces: For advanced decorators, you could attempt to pipe tiny facial features inside the visor before flooding it with grey, then flood the grey over it to create a subtle “face behind the glass” effect.
Storage and Reheating
Once your Astronaut Sugar Cookies are fully decorated and the royal icing has completely hardened (this can take 8-12 hours or even overnight, depending on humidity), they can be stored in an airtight container at room temperature. Layer the cookies between sheets of parchment paper to prevent them from sticking or damaging the delicate icing. Stored this way, the cookies will remain fresh and delicious for up to 1-2 weeks. It is not recommended to refrigerate decorated sugar cookies, as condensation can cause the royal icing to become sticky or bleed colors.
For longer storage, you can freeze undecorated sugar cookie dough or baked, undecorated cookies. Wrap the dough tightly in plastic wrap and then in foil, and it can be frozen for up to 3 months. Thaw in the refrigerator before rolling and baking. Baked, undecorated cookies can be frozen in an airtight container for up to 3 months; thaw at room temperature before decorating. Reheating is not typically necessary or recommended for decorated sugar cookies, as they are best enjoyed at room temperature. Reheating would likely melt or damage the royal icing.
Frequently Asked Questions
Can I make the cookie dough ahead of time?
Absolutely! Making the cookie dough ahead of time is highly recommended. You can prepare the dough, wrap it tightly in plastic, and refrigerate it for up to 3-4 days. This chilling period is crucial for developing flavor and preventing the cookies from spreading during baking, ensuring your astronaut shapes stay perfectly defined. You can also freeze the dough for up to 3 months; just thaw it in the refrigerator overnight before rolling and cutting.
What if I don’t have meringue powder for the royal icing?
Meringue powder is highly recommended for royal icing as it provides stability, shine, and a safe, shelf-stable alternative to raw egg whites. It also helps the icing harden properly. While some recipes use fresh egg whites, meringue powder is generally preferred for its consistency and safety, especially when making cookies that will be sitting out. If you absolutely cannot find meringue powder, you might find recipes using pasteurized egg whites, but the results in terms of stability and drying time may vary.
How long does it take for the royal icing to dry completely?
The drying time for royal icing can vary significantly depending on humidity, icing consistency, and the thickness of the application. For a light crust to form on flood icing, it usually takes 1-2 hours. However, for the icing to be completely hard and ready for stacking or packaging, it typically requires 8-12 hours, or even overnight (up to 24 hours) in humid conditions. It’s best to allow ample drying time between layers of different colors to prevent bleeding and ensure a perfect finish.
Can I use regular frosting instead of royal icing?
While you can certainly use regular buttercream or cream cheese frosting on sugar cookies, it will not give you the same crisp, detailed, and hard-drying finish as royal icing. Regular frostings remain soft and are not suitable for intricate piping work or stacking, as they will smudge and get messy. Royal icing is specifically chosen for decorated cut-out cookies because it dries hard, allowing for precise designs and easy handling and storage.