Introduction
There’s something undeniably comforting about the aroma of warm apples and cinnamon wafting through the kitchen. It evokes memories of crisp autumn days, cozy gatherings, and perhaps even a visit to a bustling fairground. While traditional apple fritters, deep-fried to golden perfection, hold a special place in our hearts, they often come with a side of guilt and a whole lot of mess. But what if you could capture all that delightful flavor and tender texture without the oil bath? Enter our Baked Apple Fritters – a healthier, easier, and equally delicious alternative that will quickly become a cherished family favorite.
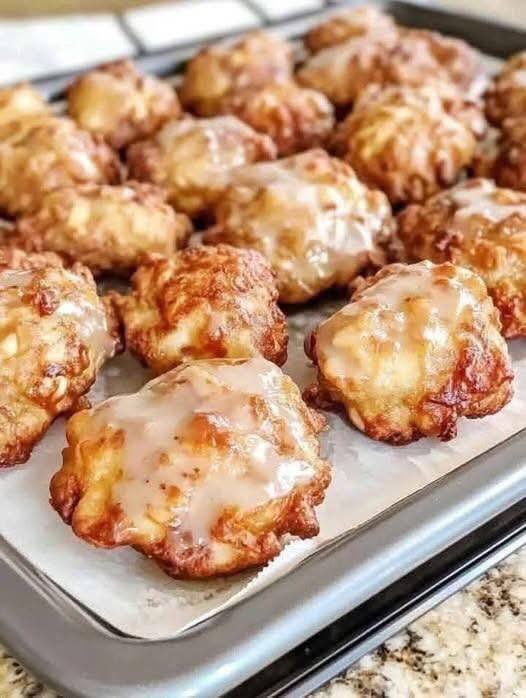
These baked beauties offer the best of both worlds: the irresistible taste of classic apple fritters coupled with the convenience of oven baking. Imagine crisp, golden-brown edges giving way to a soft, cake-like interior, studded with tender pieces of sweet-tart apple, all enveloped in a delicate ribbon of sweet, vanilla-scented glaze. They’re lighter, less greasy, and significantly simpler to prepare, making them perfect for a leisurely weekend breakfast, an impressive brunch centerpiece, a comforting after-dinner treat, or even a delightful afternoon snack. Get ready to fall in love with a truly delightful, easy-to-make indulgence.
Nutritional Information
Per serving (approximate values):
- Calories: 280
- Protein: 4g
- Carbohydrates: 48g
- Fat: 10g
- Fiber: 2g
- Sodium: 200mg
Ingredients
- For the Fritters:
- 2 medium apples (about 1.5 cups diced), such as Granny Smith, Honeycrisp, or Fuji, peeled, cored, and finely diced
- 1 ½ cups all-purpose flour
- ½ cup granulated sugar
- 1 teaspoon baking powder
- ½ teaspoon baking soda
- 1 teaspoon ground cinnamon
- ½ teaspoon ground nutmeg
- ¼ teaspoon ground allspice (optional)
- ¼ teaspoon salt
- 1 large egg, lightly beaten
- ½ cup milk (whole or 2%)
- 1 teaspoon vanilla extract
- ¼ cup unsalted butter, melted and slightly cooled
- For the Glaze:
- 1 cup powdered sugar (confectioners’ sugar)
- 2-3 tablespoons milk, apple cider, or water
- ½ teaspoon vanilla extract (optional)
- Pinch of ground cinnamon (optional)
Instructions
- Prepare for Baking: Preheat your oven to 400°F (200°C). Line a large baking sheet with parchment paper or a silicone baking mat. This will prevent sticking and make cleanup a breeze.
- Prepare the Apples: Peel, core, and finely dice your chosen apples. Aim for pieces about ¼-inch to ½-inch in size, ensuring they cook through evenly within the fritters.
- Combine Dry Ingredients: In a large mixing bowl, whisk together the all-purpose flour, granulated sugar, baking powder, baking soda, ground cinnamon, ground nutmeg, optional allspice, and salt until well combined.
- Combine Wet Ingredients: In a separate medium bowl, whisk together the lightly beaten egg, milk, vanilla extract, and melted butter until smooth.
- Combine Wet and Dry: Pour the wet ingredients into the dry ingredients. Stir gently with a spoon or spatula until just combined. Be careful not to overmix the batter; a few lumps are perfectly fine and will result in a more tender fritter. Overmixing can lead to tough fritters.
- Fold in Apples: Gently fold the diced apples into the batter until they are evenly distributed.
- Scoop and Bake: Using a spoon or a 1.5-inch ice cream scoop, drop generous spoonfuls of batter onto the prepared baking sheet, leaving about 1-2 inches of space between each fritter. The fritters will spread slightly. You should get about 12-15 fritters.
- Bake: Bake for 12-16 minutes, or until the fritters are golden brown around the edges, puffed up, and a toothpick inserted into the center comes out clean. The baking time may vary slightly depending on the size of your fritters and your oven.
- Cool Slightly: While the fritters are baking, prepare the glaze. Once baked, remove the fritters from the oven and let them cool on the baking sheet for 5 minutes before transferring them to a wire rack.
- Make the Glaze: In a small bowl, whisk together the powdered sugar, 2 tablespoons of milk (or apple cider/water), and optional vanilla extract and cinnamon until smooth. If the glaze is too thick, add more liquid ½ teaspoon at a time until it reaches a pourable but still opaque consistency. If it’s too thin, add a little more powdered sugar.
- Glaze the Fritters: While the fritters are still warm (but not hot), drizzle the glaze generously over them using a spoon or fork. For a thicker coating, you can gently dip the tops of the fritters into the glaze. Let the glaze set for a few minutes before serving.
- Serve: Serve your Baked Apple Fritters warm and enjoy!
Cooking Tips and Variations
To achieve the absolute best Baked Apple Fritters, attention to a few key details can make all the difference. First and foremost, when it comes to apples, your choice matters. While many varieties work, for a balance of sweetness and tartness that holds up well during baking, we recommend a mix of Granny Smith for its tartness and firm texture, and a sweeter apple like Honeycrisp, Fuji, or Gala for their flavor and slight crispness. Make sure to dice your apples finely, about ¼ to ½ inch. This ensures they soften and meld seamlessly into the fritter batter without being too chunky or creating raw spots.
One of the most crucial tips for any baked good, especially fritters, is to avoid overmixing the batter. Once you combine the wet and dry ingredients, stir just until the flour streaks disappear – a few lumps are actually desirable. Overmixing develops the gluten in the flour, leading to a tough, bready texture rather than the tender, cake-like interior we’re aiming for. For uniform fritters that bake evenly, consider using an ice cream scoop (a 1.5-inch scoop works perfectly) to drop the batter onto your baking sheet. This also helps in achieving consistent cooking times.
The glaze consistency is another element you can fine-tune. If your glaze seems too thick to drizzle, add liquid (milk, apple cider, or water) half a teaspoon at a time until it reaches your desired pourable yet opaque consistency. If it’s too runny, whisk in extra powdered sugar a tablespoon at a time. Glazing the fritters while they are still warm (but not piping hot) allows the glaze to melt slightly and adhere beautifully, creating that signature delicate coating. Once glazed, let them sit on the wire rack for a few minutes to allow the glaze to set before serving.
Variations & Substitutions:
- Spice It Up: For an even warmer flavor profile, consider adding a pinch of ground ginger or cardamom to the dry ingredients along with the cinnamon and nutmeg. These spices complement apples beautifully.
- Different Fruits: While these are apple fritters, the base recipe is adaptable. You could try substituting pears or peaches (fresh or well-drained canned) for a seasonal twist. Just be mindful that softer fruits might release more moisture, so you might need to adjust the baking time slightly.
- Brown Butter Glaze: For an extra layer of nutty, caramelized flavor, try making a brown butter glaze. Melt the butter until it turns a light golden-brown and smells nutty, then cool it slightly before whisking it with powdered sugar and milk.
- Nutty Crunch: Add some texture and flavor by folding ½ cup of finely chopped pecans or walnuts into the batter along with the apples. You can also sprinkle them over the wet glaze for a decorative and crunchy topping.
- Dairy-Free/Vegan Options: To make these fritters dairy-free, use a non-dairy milk alternative (like almond or oat milk) and a plant-based butter substitute. For a vegan option, you can replace the egg with a “flax egg” (1 tablespoon ground flaxseed mixed with 3 tablespoons water, let sit for 5 minutes).
- Zest Appeal: For a brighter flavor, add 1 teaspoon of lemon zest or orange zest to the batter. The citrus notes pair wonderfully with apples and spices.
Storage and Reheating
Baked Apple Fritters are best enjoyed fresh and warm, ideally on the day they are made, when their texture is at its peak with crisp edges and a tender interior. However, if you find yourself with leftovers, they can be stored quite effectively to enjoy later.
To store, allow the glazed fritters to cool completely to room temperature. Once cooled, place them in an airtight container. You can store them at room temperature for up to 2 days. If you need to keep them longer, or if your kitchen is particularly warm, they can be stored in the refrigerator for up to 3-4 days. Placing a piece of parchment paper between layers of fritters can prevent them from sticking together, especially if they are heavily glazed.
When it comes to reheating, you want to bring back some of that comforting warmth and tenderness. The microwave is the quickest option: heat individual fritters for 15-30 seconds, or until just warm. Be careful not to overheat, as this can make them rubbery. For a slightly crisper exterior, you can reheat them in a toaster oven or a conventional oven preheated to 300°F (150°C) for about 5-10 minutes, or until warmed through. This method is particularly good for refreshing the texture. Avoid reheating in a skillet, as this can easily burn the glaze. If the fritters were stored in the refrigerator, they might require a minute or two longer to warm up.
Frequently Asked Questions
What kind of apples are best for these baked fritters?
For the best balance of flavor and texture, we recommend using a combination of sweet and tart apples that hold their shape well during baking. Granny Smith apples are excellent for their tartness and firmness, while Honeycrisp, Fuji, or Gala apples offer a lovely sweetness and good texture. Using a mix ensures a more complex apple flavor in your fritters.
Can I make the fritter batter ahead of time?
While you can prepare some components in advance, it’s generally best to mix the wet and dry ingredients just before baking. Apples tend to brown when exposed to air, and the leavening agents (baking powder and baking soda) start to activate once they come into contact with wet ingredients. For best results, prepare the dry ingredients and dice the apples, then combine everything and bake fresh.
Why are my baked fritters tough?
The most common reason for tough fritters is overmixing the batter. When you overmix, you develop the gluten in the flour, which leads to a dense, chewy, and tough texture. To avoid this, mix the wet and dry ingredients until just combined, stopping as soon as no dry streaks of flour remain. A few small lumps in the batter are perfectly normal and actually desirable for a tender fritter.
Can I freeze baked apple fritters?
Yes, you can freeze baked apple fritters! It’s best to freeze them before glazing. Allow the baked fritters to cool completely, then place them in a single layer on a baking sheet and freeze until solid (about 1-2 hours). Once frozen, transfer them to an airtight freezer-safe bag or container. They can be stored for up to 2-3 months. To reheat, you can warm them directly from frozen in a preheated oven at 350°F (175°C) for 10-15 minutes, or until heated through. Then, prepare and apply the fresh glaze.