Introduction
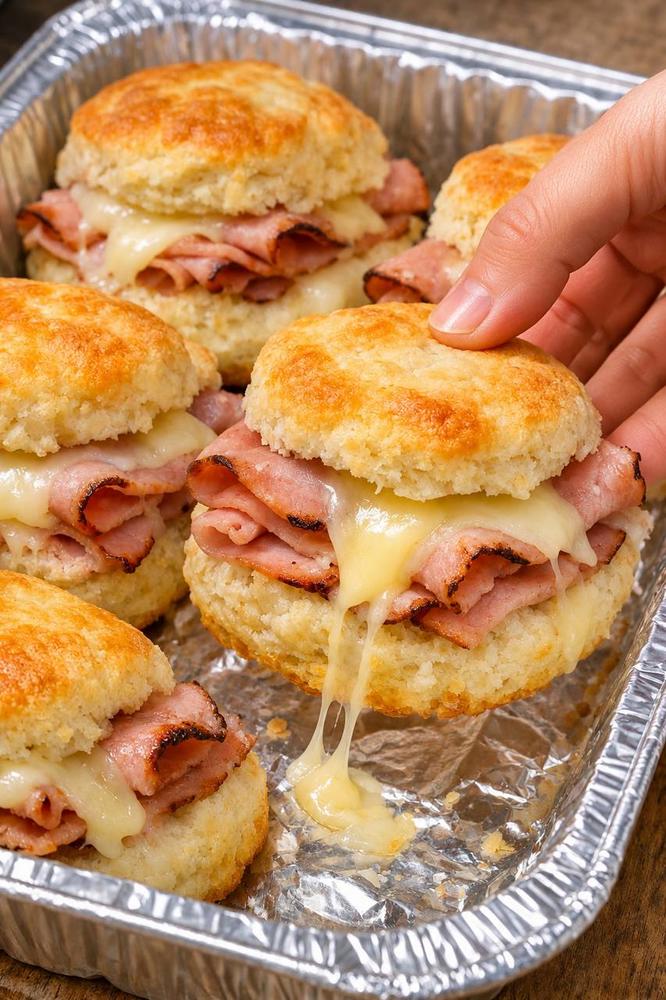
There are few things as universally comforting and undeniably delicious as a warm ham and cheese sandwich. But elevate that classic combination by tucking it inside a golden, flaky biscuit, and you’ve got something truly special: our Baked Ham & Cheese Biscuit Sandwiches! These aren’t just any sandwiches; they’re a handheld hug, a savory delight that brings a smile to every face. Imagine sinking your teeth into a perfectly baked biscuit, its buttery layers giving way to a generous filling of thinly sliced, savory ham and gloriously melted, gooey cheese. It’s the kind of simple pleasure that makes mornings brighter, brunches more inviting, and quick lunches utterly satisfying.
What makes these biscuit sandwiches so irresistible? It’s the harmonious blend of textures and flavors. The soft, slightly crumbly biscuit provides the ideal canvas for the salty, tender ham, which gets just a touch of crispness around its edges from the oven’s warmth. Then there’s the star of the show: the cheese, transformed into a molten, stretchy dream that binds everything together in a symphony of savory goodness. The beauty of this recipe lies in its elegant simplicity and incredible versatility. Whether you’re whipping up a quick breakfast for the family, preparing a crowd-pleasing brunch spread, packing a hearty lunch, or needing a delightful snack to tide you over, these baked ham and cheese biscuit sandwiches are always the perfect answer.
Best of all, they’re surprisingly easy to make, especially when you leverage the convenience of store-bought biscuits. With minimal effort, you can transform a handful of humble ingredients into a spectacular treat that tastes like it came from your favorite bakery. The gentle baking process ensures the biscuits are warmed through and the cheese is impeccably melted, creating that coveted cheese pull that signals pure deliciousness. Get ready to experience the ultimate in comfort food, reimagined in a perfect, portable package that will have everyone asking for more.
Nutritional Information
Per serving (approximate values, based on 1 sandwich using canned buttermilk biscuits, deli ham, and cheddar cheese):
- Calories: 350-400
- Protein: 15-20g
- Carbohydrates: 30-35g
- Fat: 18-22g
- Fiber: 1-2g
- Sodium: 800-1000mg
Ingredients
- 1 (16.3-ounce) can refrigerated flaky layer biscuits (8 biscuits) OR 8 homemade buttermilk biscuits
- 8 slices deli ham (such as Black Forest, honey, or smoked), thinly sliced
- 8 slices American, mild cheddar, or provolone cheese (or 1 cup shredded cheese)
- 2 tablespoons unsalted butter, melted (optional, for brushing)
- 1 teaspoon Dijon mustard (optional, for spreading)
- 1/2 teaspoon garlic powder (optional, for garlic butter)
- 1/2 teaspoon poppy seeds (optional, for topping)
Instructions
- Preheat your oven to the temperature specified on your biscuit package (usually 350-375°F / 175-190°C). If using homemade biscuits, preheat to 375°F (190°C). Lightly grease a baking sheet or line with parchment paper, or use an aluminum baking pan for easy transport and cleanup.
- Prepare the Biscuits: If using raw refrigerated biscuits, separate them and place them on the prepared baking sheet. Bake according to package directions until golden brown and cooked through. Once baked, remove from the oven and let cool slightly on a wire rack for 5-10 minutes. If using pre-baked biscuits (homemade or store-bought), proceed directly to the next step.
- Once the biscuits are cool enough to handle, carefully slice each biscuit horizontally through the middle using a serrated knife, creating a top and bottom half. Be gentle to avoid crumbling.
- Optional Flavor Boost: If desired, lightly spread a thin layer of Dijon mustard on the inside of both halves of each biscuit. For a garlic butter flavor, mix the melted butter with garlic powder and brush this mixture onto the cut sides of the biscuits.
- Assemble the Sandwiches: On the bottom half of each biscuit, place one slice of ham, folding it if necessary to fit neatly within the biscuit’s circumference. Top the ham with one slice of cheese. Place the remaining ham slice on top of the cheese, and then finish with another slice of cheese. Finally, place the top half of the biscuit over the cheese and ham layers, gently pressing down to secure.
- Arrange the assembled biscuit sandwiches in your prepared baking pan or on the baking sheet. They can be placed close together, but avoid overcrowding to ensure even heating.
- Optional Topping: If desired, brush the tops of the assembled biscuit sandwiches with any remaining melted butter (plain or garlic butter mixture). Sprinkle with poppy seeds for an extra touch of flavor and visual appeal.
- Bake to Golden Perfection: Place the baking pan or sheet with the sandwiches into the preheated oven. Bake for 10-15 minutes, or until the cheese is thoroughly melted and gooey, the ham is warmed through, and the biscuits are golden brown and heated to perfection. The exact time will depend on whether you started with raw or pre-baked biscuits and the thickness of your fillings.
- Serve Warm: Carefully remove the pan from the oven. For the ultimate melty cheese pull and best flavor, serve these Baked Ham & Cheese Biscuit Sandwiches immediately while they are still warm and the cheese is wonderfully molten.
Cooking Tips and Variations
These Baked Ham & Cheese Biscuit Sandwiches are wonderfully versatile, offering plenty of room for customization and ensuring perfect results every time. Here are some tips and variations to make them truly your own:
- Biscuit Choice is Key:
- Store-Bought Convenience: Refrigerated canned biscuits (like Pillsbury Grands!) are a fantastic shortcut. Flaky layer biscuits work exceptionally well as they create distinct layers that hold the fillings beautifully. Ensure they are fully baked and cooled slightly before slicing to avoid sogginess.
- Homemade Goodness: For an extra special touch, make your own buttermilk biscuits from scratch. They offer unparalleled flavor and texture. Just be sure they are cooled enough to handle before slicing.
- Raw Biscuit Assembly: For a truly effortless approach, you can assemble the sandwiches with raw, unbaked biscuit dough. Simply separate the raw biscuits, flatten each into a slightly larger oval or circle, place the ham and cheese on one half, fold the other half over to create a crescent or sandwich, and then bake according to the biscuit package directions. This method bakes the fillings right into the biscuit, creating a truly unified sandwich.
- Cheese Options Galore: While American, mild cheddar, or provolone provide that classic melty goodness, don’t limit yourself!
- Sharp Cheddar: For a bolder, more pungent flavor.
- Swiss Cheese: Offers a nutty, slightly sweet counterpoint to the ham.
- Monterey Jack: Super melty and mild, perfect for a creamy texture.
- Pepper Jack: If you like a little heat!
- Gruyere: A sophisticated choice that melts beautifully and adds depth.
- Cheese Blend: A mix of a few different melty cheeses can create a complex flavor profile.
- Ham Varieties: The type of ham can greatly influence the flavor.
- Deli Ham: Thinly sliced Black Forest, honey ham, smoked ham, or even simple cooked ham are all excellent.
- Leftover Holiday Ham: This is a fantastic way to repurpose holiday leftovers. Dice or shred the ham for a different texture, or slice it thinly if you have a larger piece.
- Crispy Ham: For added texture, lightly pan-fry the ham slices in a skillet for a minute or two until slightly crisped at the edges before assembling.
- Flavor Boosters and Add-Ins: Elevate your sandwiches with these simple additions:
- Mustard Magic: A thin spread of Dijon mustard or whole grain mustard on the inside of the biscuit adds a tangy kick that pairs perfectly with ham and cheese.
- Garlic Butter Glaze: Melt butter with a pinch of garlic powder and brush it on the cut sides of the biscuits before assembling, or on top before baking, for an aromatic, savory crust.
- Everything Bagel Seasoning: Sprinkle this on top of the biscuits before baking for a savory, crunchy crust.
- Poppy Seeds or Sesame Seeds: Adds a subtle nutty flavor and visual appeal, especially when brushed with a little melted butter or egg wash.
- Pickled Jalapeños: For a touch of heat and tang, add a few thin slices inside.
- Caramelized Onions: A spoonful of sweet, savory caramelized onions would be a gourmet addition.
- Herbs: A sprinkle of fresh chives or dried parsley can brighten the flavors.
- Preventing Dry Biscuits: If you’re concerned about your biscuits drying out during the second bake, a light brush of melted butter, milk, or even an egg wash (egg beaten with a tablespoon of water) on the tops before baking will help them brown beautifully and stay moist.
- Achieving the Best Cheese Pull: The secret is to serve them immediately! The cheese is at its most molten and stretchy right out of the oven. If they sit too long, the cheese will firm up.
Storage and Reheating
These Baked Ham & Cheese Biscuit Sandwiches are truly best enjoyed fresh and warm, right out of the oven when the cheese is perfectly melted and gooey. However, they can be prepared ahead or stored if you have leftovers. Here’s how:
Make-Ahead Instructions:
These sandwiches are excellent for meal prep or for entertaining. You have a couple of options for making them ahead:
- Assemble and Refrigerate (Unbaked): Prepare the biscuits (bake and cool if using raw refrigerated, or simply slice if pre-baked). Assemble the sandwiches with ham and cheese as instructed, but do not bake them. Arrange them in an airtight container or cover the baking pan tightly with plastic wrap. Refrigerate for up to 1-2 days. When ready to serve, remove from the refrigerator and let sit at room temperature for 15-20 minutes while your oven preheats. Then, bake as directed until golden and heated through. You might need to add an extra 5-10 minutes to the baking time since they are starting cold.
- Bake and Refrigerate: Bake the sandwiches completely as directed. Let them cool completely on a wire rack. Once cooled, store them in an airtight container in the refrigerator for up to 3 days. This is great for quick grab-and-go meals.
Storage of Leftovers:
If you have any leftover baked sandwiches, allow them to cool completely to room temperature. Store them in an airtight container or a resealable freezer bag in the refrigerator for up to 3 days. Proper cooling before storage prevents condensation, which can make the biscuits soggy.
Reheating Instructions:
Reheating is best done gently to ensure the biscuits don’t dry out and the cheese melts nicely again.
- Oven Reheating (Recommended for Best Quality):
- Preheat your oven or toaster oven to 300-325°F (150-160°C).
- Place the cold sandwiches on a baking sheet.
- Heat for 10-15 minutes, or until the biscuits are warmed through and the cheese is re-melted. If you cover them loosely with foil for the first 5-7 minutes, it can help prevent the biscuits from drying out, then remove the foil to crisp them up.
- Microwave Reheating (Quickest, but Biscuits may be Softer):
- Place one or two sandwiches on a microwave-safe plate.
- Heat on medium power for 30-60 seconds, or until warmed through and the cheese is melted. Be careful not to overheat, as this can make the ham tough and the biscuits rubbery. The biscuits will likely be softer, not crispy.
- Air Fryer Reheating:
- Preheat your air fryer to 300°F (150°C).
- Place the sandwiches in a single layer in the air fryer basket.
- Heat for 5-8 minutes, checking periodically, until warmed through and the cheese is bubbly. This method can help crisp up the biscuits nicely.
No matter how you reheat them, enjoy your delicious ham and cheese biscuit sandwiches all over again!
Frequently Asked Questions
What kind of biscuits are best for these sandwiches?
For convenience, refrigerated flaky layer biscuits (like Pillsbury Grands!) work wonderfully as they create distinct, buttery layers perfect for holding the ham and cheese. If you have more time, homemade buttermilk biscuits offer an unparalleled tender texture and rich flavor. You can also use pre-baked store-bought biscuits or even frozen biscuit dough that you bake yourself. The key is to have a biscuit that is sturdy enough to hold the fillings but still soft and tender.
Can I use shredded cheese instead of sliced cheese?
Absolutely! Shredded cheese works just as well and melts beautifully. You’ll want about 1 cup of shredded cheese for 8 sandwiches, or roughly 2 tablespoons per sandwich. If using shredded cheese, consider mixing a small amount of cream cheese or a pinch of cornstarch with it before assembling to help it melt more smoothly and prevent it from drying out. Just layer it generously between the ham slices, or directly on the biscuit, and it will become a gooey, cheesy delight.
Can I make these ahead of time for a party or meal prep?
Yes, these are fantastic for making ahead! You have a couple of options. You can assemble the sandwiches (either with raw biscuit dough or pre-baked biscuits) and then refrigerate them unbaked for up to 1-2 days. Then, bake them just before serving. Alternatively, you can bake the sandwiches completely, let them cool, and then store them in an airtight container in the refrigerator for up to 3 days. Reheat them in the oven or air fryer for the best results, ensuring the cheese melts again and the biscuits crisp up slightly.
What are some good dipping sauces or side dishes to serve with these?
These Baked Ham & Cheese Biscuit Sandwiches are delicious on their own, but they also pair well with a variety of accompaniments. For dipping, consider a simple honey mustard sauce, a tangy hot sauce, or even a creamy ranch dressing. As for side dishes, they’re excellent with a fresh fruit salad for breakfast or brunch, a light green salad for lunch, or a bowl of tomato soup for a comforting meal. A side of crispy hash browns or roasted potatoes would also be a fantastic complement.