Instructions
- Prepare the Pudding: In a large mixing bowl, combine the instant vanilla pudding mix with the 4 cups of cold milk. Whisk vigorously for about 2 minutes until the mixture thickens. Place the pudding in the refrigerator to chill and set further while you prepare the other components, about 10-15 minutes.
- Prepare the Cream Cheese Mixture: In a separate large bowl, using an electric mixer, beat the softened cream cheese until it is light and fluffy, about 2-3 minutes. Gradually add the sweetened condensed milk to the cream cheese, beating until well combined and smooth, scraping down the sides of the bowl as needed.
- Combine Mixtures: Gently fold about half of the thawed whipped topping into the cream cheese mixture until just combined. Then, fold in the chilled vanilla pudding until no streaks remain and the mixture is smooth and uniform. Be careful not to overmix, as this can deflate the whipped topping.
- Prepare Bananas: If using, lightly toss the sliced bananas with 1 teaspoon of lemon juice. This step is optional but helps to prevent the bananas from browning too quickly.
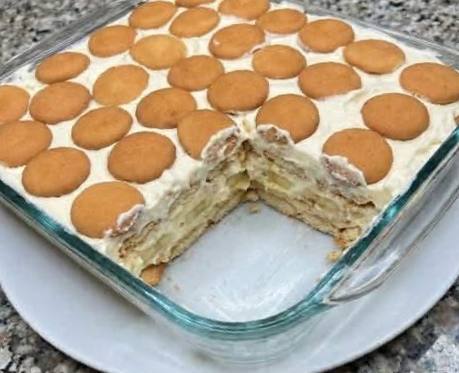
- First Layer of Wafers: Arrange a single layer of Nilla Wafers in the bottom of a 9×13-inch baking dish. You may need to break some wafers to fit them snugly and cover the entire bottom surface.
- First Layer of Bananas: Place about one-third of the sliced bananas evenly over the layer of Nilla Wafers.
- First Layer of Pudding Mixture: Carefully spread about one-third of the pudding and cream cheese mixture over the bananas, gently smoothing it with a spatula to ensure even coverage.
- Repeat Layers: Repeat the layering process: add another layer of Nilla Wafers, followed by another one-third of the sliced bananas, and then another one-third of the pudding mixture.
- Final Layers: Place the remaining Nilla Wafers, then the remaining sliced bananas, and finally, spread the last of the pudding mixture evenly over the top.
- Top with Whipped Topping: Gently spread the remaining half of the thawed whipped topping over the entire top surface of the cake.
- Chill: Cover the baking dish tightly with plastic wrap and refrigerate for at least 4 hours, or preferably overnight. Chilling is crucial for the wafers to soften and for the cake to set properly.
- Garnish and Serve: Before serving, if desired, garnish with additional Nilla Wafers (whole or crushed) and fresh banana slices. Serve chilled.
Cooking Tips and Variations
For the best Banana Pudding Cake experience, paying attention to a few details can make all the difference. Firstly, ensure your cream cheese is truly at room temperature. This will help it beat up smoothly without lumps, creating a much silkier pudding base. If your cream cheese is too cold, you’ll end up with a lumpy mixture that won’t incorporate well. Take it out of the fridge at least an hour before you plan to start assembling. Secondly, don’t rush the chilling process. While 4 hours is the minimum, an overnight chill is truly ideal. This extended time allows the Nilla Wafers to fully absorb the moisture from the pudding, transforming them from crispy cookies into a soft, cake-like texture that is essential for this dessert’s charm. If you cut into it too early, the wafers might still be a bit too firm, and the cake won’t hold its shape as well. Patience is a virtue when it comes to this no-bake delight!
When it comes to variations, the possibilities are delicious! For an extra layer of flavor, consider using banana-flavored instant pudding instead of vanilla, or even a blend of both. Some people enjoy adding a touch of rum extract or vanilla bean paste to the pudding mixture for a more complex aroma. If you prefer a homemade whipped topping, you can easily make your own by whipping heavy cream with a bit of powdered sugar and vanilla extract until stiff peaks form. This offers a richer, fresher taste. For those who love a bit of crunch, a sprinkle of toasted pecans or walnuts between the layers can add a delightful textural contrast. You could also drizzle a thin layer of caramel or chocolate sauce over the top before serving for an indulgent twist. For a more sophisticated presentation, assemble individual servings in small glass jars or parfait glasses, layering the wafers, bananas, and pudding mixture, then topping with whipped cream and a wafer. This makes for an elegant single-serving dessert that’s perfect for parties.
To prevent your bananas from browning, which can happen quickly once they are sliced and exposed to air, a quick toss in a small amount of lemon juice (as mentioned in the instructions) is highly effective. You won’t taste the lemon in the final dessert, but it will keep your bananas looking fresh and appealing. Alternatively, you can use a solution of water and a tiny pinch of ascorbic acid (Vitamin C powder) to dip the bananas in. Another tip for setting is to gently press down on the layers as you build them, especially after adding the wafers and bananas. This helps to eliminate air pockets and ensures a more cohesive “cake” when it’s chilled. Finally, always use a dish with a lid or cover it tightly with plastic wrap to prevent the dessert from absorbing any refrigerator odors and to maintain its moisture content.
Storage and Reheating
Storing your Banana Pudding Cake properly is key to maintaining its freshness and deliciousness. Because it contains dairy and fresh fruit, it must be kept refrigerated at all times. After serving, if there are any leftovers, cover the baking dish tightly with plastic wrap or transfer individual portions to airtight containers. This will prevent the cake from drying out, absorbing other food odors from the refrigerator, and will help keep the bananas from browning further. When stored correctly in the refrigerator, the Banana Pudding Cake will remain fresh and delicious for up to 3-4 days. While the bananas may continue to soften slightly over time, the overall flavor and texture will still be delightful.
It’s important to note that this is a no-bake dessert and is meant to be served chilled, directly from the refrigerator. Therefore, reheating is not applicable and not recommended for Banana Pudding Cake. Attempting to heat it would melt the whipped topping, alter the texture of the pudding, and turn the softened wafers into a soggy mess. The beauty of this dessert lies in its cool, creamy, and refreshing qualities. Always serve it cold for the best experience. If you’ve made it ahead of time and it’s been in the fridge for an extended period, simply take it out, garnish if desired, and serve immediately.
If you’re planning to make this dessert for a party or gathering, assembling it the day before is ideal, as it gives it ample time to chill and set. For transport, ensure it’s kept in a cooler with ice packs if you have a long journey, especially in warm weather. Once at your destination, it should go back into refrigeration as soon as possible. Freezing is generally not recommended for Banana Pudding Cake. While some components might freeze okay, the texture of the bananas will become mushy upon thawing, and the whipped topping can separate, leading to a less appealing dessert. Stick to refrigeration for optimal enjoyment.
Frequently Asked Questions
Can I use homemade whipped cream instead of store-bought whipped topping?
Absolutely! Using homemade whipped cream will elevate the flavor and texture of your Banana Pudding Cake even further. Simply whip 2 cups of heavy cream with 1/2 cup of powdered sugar and 1 teaspoon of vanilla extract until stiff peaks form. You’ll use half of this mixture in the pudding base and the other half for the topping, just as you would with store-bought whipped topping. Homemade whipped cream offers a richer, fresher taste that many prefer.
How do I prevent the bananas from turning brown?
The best way to prevent bananas from browning is to lightly toss the sliced bananas with about 1 teaspoon of fresh lemon juice before layering them into the cake. The acidity in the lemon juice acts as a natural antioxidant, slowing down the oxidation process that causes browning. Don’t worry, you won’t taste the lemon in the final dessert. Alternatively, a very diluted solution of water and a tiny pinch of ascorbic acid (Vitamin C powder) can also be used as a quick dip for the banana slices.
Can I make this dessert ahead of time for a party?
Yes, making this dessert ahead of time is highly recommended! In fact, it’s best when made at least 4 hours in advance, and even better if made the day before. The extended chilling time allows the Nilla Wafers to fully soften and absorb the flavors of the pudding, transforming them into a cake-like layer, and allows all the layers to meld together beautifully. Just be sure to cover it tightly with plastic wrap and keep it refrigerated until serving.
What if my pudding mixture is too thin or too thick?
If your pudding mixture seems too thin, it’s likely due to not whisking the instant pudding mix with the milk long enough, or perhaps the milk wasn’t cold enough. Ensure you whisk vigorously for at least 2 minutes. If it’s still too thin after adding the cream cheese and whipped topping, you can try refrigerating it for an extra 30 minutes to an hour before assembling. If it’s too thick, it might be that your milk-to-pudding ratio was slightly off, or the pudding set too much before combining. You can try adding a tiny splash of cold milk (1 tablespoon at a time) to thin it slightly while gently whisking, but be careful not to overdo it. The consistency should be thick enough to hold its shape but still spreadable.