Instructions
- Preheat your oven to 375°F (190°C). Grease a 9×13-inch baking dish with butter or cooking spray.
- Prepare the potatoes: Peel the Yukon Gold potatoes and slice them uniformly thin, about 1/8-inch thick. A mandoline slicer is highly recommended for consistent results, which ensures even cooking. If you don’t have one, use a sharp knife and take your time. Place the sliced potatoes in a large bowl and set aside.
- Make the cheese sauce: In a large saucepan or Dutch oven, melt 1 tablespoon of unsalted butter over medium heat. Add the finely diced yellow onion and cook until softened and translucent, about 5-7 minutes, stirring occasionally.
- Add the minced garlic to the saucepan and cook for another minute until fragrant, being careful not to burn it.
- Sprinkle the 1/4 cup of all-purpose flour over the cooked onions and garlic. Stir continuously for 1-2 minutes, creating a roux. This will help thicken your sauce.
- Gradually whisk in the 3 cups of warmed whole milk, a little at a time, to prevent lumps. Continue whisking until the sauce is smooth and starts to thicken, about 5-7 minutes.
- Season the sauce with 1 teaspoon of salt, 1/2 teaspoon of black pepper, 1/4 teaspoon of ground nutmeg, and 1/4 teaspoon of smoked paprika (if using). Stir well to combine.
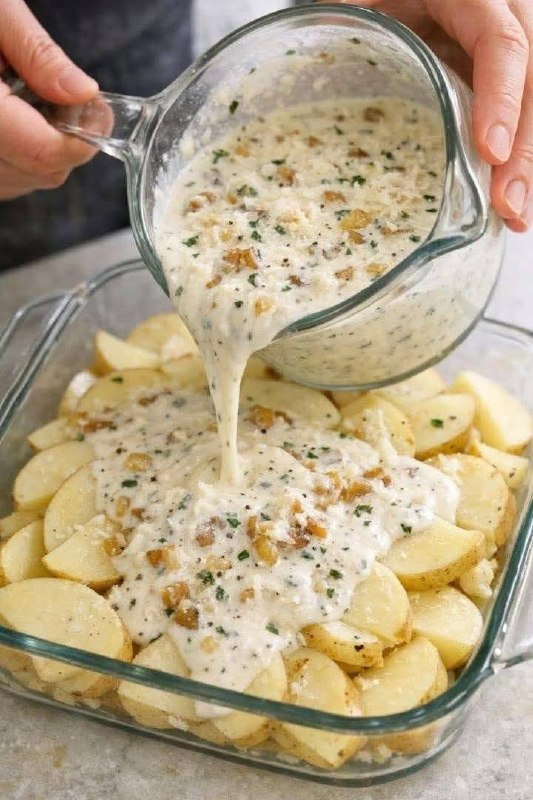
- Remove the saucepan from the heat. Add 1.5 cups of shredded sharp cheddar cheese, 0.75 cup of shredded Gruyere cheese, and 1/4 cup of grated Parmesan cheese to the sauce. Stir until the cheeses are completely melted and the sauce is smooth and creamy. Taste and adjust seasoning if needed.
- Assemble the scalloped potatoes: Arrange about one-third of the sliced potatoes in an even layer at the bottom of the prepared baking dish.
- Pour about one-third of the cheese sauce evenly over the first layer of potatoes.
- Repeat the layering process: Add another one-third of the potato slices, followed by another one-third of the cheese sauce.
- Finish with the remaining one-third of potato slices, and then pour the last of the cheese sauce over the top, making sure all potatoes are well covered.
- Sprinkle the remaining 0.5 cup of sharp cheddar cheese, 0.25 cup of Gruyere cheese, and 0.25 cup of Parmesan cheese evenly over the top layer.
- Cover the baking dish tightly with aluminum foil.
- Bake for 60 minutes.
- Remove the foil and continue baking for another 20-30 minutes, or until the potatoes are fork-tender and the top is golden brown and bubbly. If the top is browning too quickly, you can loosely tent it with foil again.
- Once baked, remove the dish from the oven and let it rest for 10-15 minutes before serving. This allows the sauce to set and prevents it from being too runny.
- Garnish with fresh chopped parsley before serving, if desired.
Cooking Tips and Variations
For the best cheesy scalloped potatoes, attention to detail makes all the difference. Uniformly thin potato slices are paramount; they ensure even cooking and a tender texture throughout the dish. A mandoline slicer is truly your best friend here, delivering consistent 1/8-inch slices that will cook perfectly. If slicing by hand, take your time and aim for consistency. Don’t skip warming the milk for the sauce; adding cold milk to a hot roux can cause lumps, so a quick warm-up helps create a smooth, velvety sauce. When layering, try to overlap the potato slices slightly to create a more stable structure and ensure every potato gets coated in that delicious cheese sauce. And remember to let the dish rest after baking; this allows the sauce to set and prevents it from being too watery when served.
There are many ways to customize this classic dish to your liking. For a richer, more complex flavor, consider adding a pinch of cayenne pepper or a dash of hot sauce to the cheese sauce for a subtle kick. You can also experiment with different cheese combinations; Monterey Jack, fontina, or even a smoked gouda can add unique notes. For a hearty meal, incorporate cooked, crumbled bacon, diced ham, or shredded rotisserie chicken between the layers. If you prefer a vegetarian option, sautéed mushrooms or spinach can be delightful additions. For an herbier profile, mix in some fresh thyme or rosemary with the potatoes. And for those who love a crispy topping, a sprinkle of panko breadcrumbs mixed with a little melted butter can be added during the last 15 minutes of baking.
Storage and Reheating
Leftover cheesy scalloped potatoes are a delicious treat, and storing them properly ensures they remain enjoyable. Once the dish has cooled completely to room temperature, cover the baking dish tightly with plastic wrap or aluminum foil, or transfer the leftovers to an airtight container. Refrigerate promptly within two hours of cooking. Stored this way, the scalloped potatoes will keep well in the refrigerator for up to 3-4 days.
For longer storage, cheesy scalloped potatoes can also be frozen, though the texture of the potatoes might change slightly upon thawing, becoming a bit softer. To freeze, transfer cooled leftovers to a freezer-safe airtight container or wrap individual portions tightly in plastic wrap and then aluminum foil. They can be frozen for up to 2-3 months. Thaw frozen potatoes in the refrigerator overnight before reheating.
When it comes to reheating, the oven is your best bet for maintaining the dish’s integrity and achieving that desirable bubbly top. Preheat your oven to 300-325°F (150-160°C). Place the leftovers in an oven-safe dish, cover it loosely with foil to prevent drying out, and bake for 20-30 minutes, or until heated through and bubbly. If you want to crisp up the top, remove the foil for the last 5-10 minutes. You can also reheat individual portions in the microwave, though this method may result in a softer texture and less crispy top. Heat in 1-2 minute intervals, stirring occasionally, until thoroughly warmed.
Frequently Asked Questions
What kind of potatoes are best for scalloped potatoes?
Yukon Gold potatoes are highly recommended for scalloped potatoes. Their waxy texture holds up well during baking, preventing them from becoming mushy, and they have a natural buttery flavor that complements the cheese sauce beautifully. Russet potatoes can also be used, but they tend to be starchier and may result in a slightly drier or more crumbly texture.
Can I make cheesy scalloped potatoes ahead of time?
Yes, you can absolutely prepare cheesy scalloped potatoes ahead of time. You have a couple of options: you can assemble the entire dish, cover it tightly with foil, and refrigerate it for up to 24 hours before baking. When ready to bake, let it sit at room temperature for about 30 minutes while your oven preheats, then bake as directed, potentially adding an extra 10-15 minutes to the covered baking time. Alternatively, you can bake the dish completely, let it cool, then refrigerate or freeze it. Reheat following the instructions above.
Why are my scalloped potatoes watery or soupy?
There are a few common reasons for watery scalloped potatoes. First, not allowing the cheese sauce to thicken properly before adding it to the potatoes can be a culprit. Ensure your roux (flour and butter mixture) cooks long enough and that the milk is gradually whisked in until the sauce visibly thickens. Second, using potatoes that are too thin or not letting the dish rest after baking can cause excess moisture. The resting period allows the sauce to set and the potatoes to absorb more liquid. Finally, some potatoes release more water than others; using Yukon Golds helps mitigate this, but ensuring all potatoes are well-coated in the sauce helps too.
Can I use different cheeses in this recipe?
Absolutely! This recipe uses a classic combination of sharp cheddar, Gruyere, and Parmesan for a rich and complex flavor, but feel free to experiment with your favorite melting cheeses. Good options include Monterey Jack, Fontina, Provolone, or even a mild Gouda. Just be sure to choose cheeses that melt well to ensure a creamy sauce. A combination of a sharp cheese and a milder, melty cheese often yields the best results.