Instructions
- Prepare the Crust: In a large bowl, whisk together the flour, sugar, and salt. Add the cold, cubed butter. Using a pastry blender, your fingertips, or a food processor, cut the butter into the flour mixture until it resembles coarse crumbs with some pea-sized pieces of butter remaining.
- Gradually add the ice water, one tablespoon at a time, mixing until the dough just comes together. Be careful not to overmix. The dough should be shaggy but hold together when squeezed.
- Divide the dough in half. Form each half into a flat disc, wrap tightly in plastic wrap, and refrigerate for at least 30 minutes (or up to 2 days). Chilling the dough is crucial for a flaky crust.
- Preheat Oven and Prepare Pan: Preheat your oven to 375°F (190°C). Lightly grease and flour a 9×13-inch baking pan, or line it with parchment paper, leaving an overhang on the sides for easy removal.
- Roll Out Bottom Crust: On a lightly floured surface, roll out one disc of chilled dough into a 9×13-inch rectangle, roughly ¼-inch thick. Carefully transfer the dough to the prepared baking pan, pressing it evenly into the bottom and slightly up the sides. If the dough tears, simply press it back together.
- Blind Bake (Optional, for extra crispness): To prevent a soggy bottom crust, you can blind bake it. Prick the bottom of the crust all over with a fork. Line the crust with parchment paper and fill with pie weights or dried beans. Bake for 10-15 minutes, or until the edges are lightly golden. Remove the weights and parchment, then continue to bake for another 5 minutes. Let cool slightly.
- Prepare the Cherry Filling: In a medium saucepan, combine the pitted cherries, granulated sugar, lemon juice, and cornstarch. If using fresh cherries, you may add 1-2 tablespoons of water to help them release their juices. Cook over medium heat, stirring constantly, until the mixture thickens and comes to a gentle boil. The cherries should soften, and the sauce should become glossy. This usually takes about 5-8 minutes.
- Remove from heat and stir in the almond extract (if using) and the 2 tablespoons of butter until melted and well combined. Let the filling cool slightly while you prepare the top layer.
- Assemble the Bars: Pour the cooled cherry filling evenly over the prepared bottom crust in the baking pan.
- Prepare the Top Layer:
- For a Solid Top Crust or Lattice: Roll out the second disc of chilled dough into a 9×13-inch rectangle. You can either place it directly over the filling, or cut it into strips to create a lattice pattern. If using a full top crust, cut a few slits in the top for steam to escape.
- For a Crumb Topping: In a medium bowl, combine the flour, sugar, and cinnamon (if using). Pour in the melted butter and mix with a fork until moist crumbs form. Sprinkle this mixture evenly over the cherry filling.
- Bake: If using a full top crust, you can brush it with an egg wash for a golden sheen. Place the baking pan on a baking sheet to catch any potential drips. Bake for 40-50 minutes, or until the crust is golden brown and the filling is bubbly. If the crust starts to brown too quickly, you can loosely tent it with aluminum foil.
- Cool Completely: This is the most crucial step for neat bars! Remove the pan from the oven and place it on a wire rack to cool completely. This can take 2-3 hours, or even longer. The filling needs ample time to set properly.
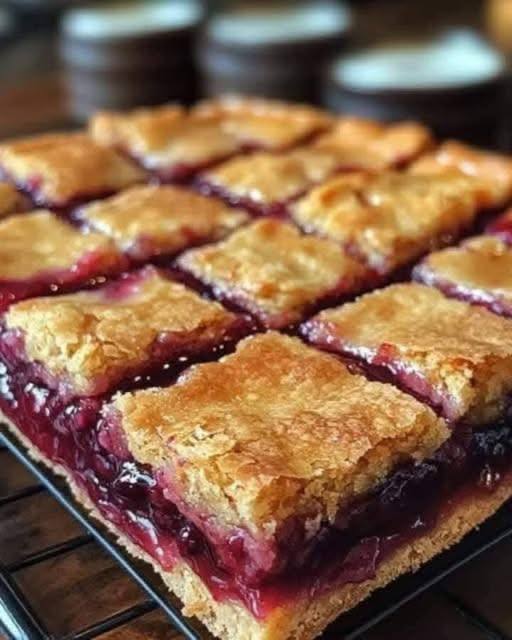
- Cut and Serve: Once fully cooled, use the parchment paper overhang to lift the bars out of the pan. Place them on a cutting board and cut into squares or rectangles using a sharp knife. Wipe the knife clean between cuts for the neatest edges. Serve and enjoy!
Cooking Tips and Variations
To ensure your Cherry Pie Bars are nothing short of perfect, here are some invaluable tips and exciting variations to try:
Prevent a Soggy Crust: A common pitfall with fruit bars is a soggy bottom crust. To combat this, first and foremost, ensure your butter and water for the crust are ice cold. This creates steam during baking, leading to a flakier texture. Additionally, blind-baking the bottom crust as described in the instructions is highly recommended. Prick the crust with a fork, line with parchment paper, fill with pie weights, and bake for 10-15 minutes before adding the filling. This pre-baking step helps create a barrier against the moisture from the fruit. Another trick is to sprinkle a thin layer of fine breadcrumbs or crushed cornflakes over the bottom crust before adding the filling; these absorb excess moisture.
Achieving a Golden-Brown Top Crust: For that irresistible, bakery-quality golden finish on your top crust or lattice, an egg wash is your best friend. Whisk one large egg with a tablespoon of water or milk and brush it lightly over the dough before baking. This not only promotes browning but also adds a beautiful sheen. If you’re opting for a crumb topping, ensure the butter is fully melted and mixed thoroughly with the dry ingredients to create distinct, golden crumbs.
Cutting Neat Bars: Patience is key here! Allow the bars to cool completely to room temperature, or even chill them in the refrigerator for an hour or two, before attempting to cut them. A chilled filling will be much firmer and less likely to squish out. Use a very sharp, clean knife. For the cleanest cuts, wipe the blade with a damp cloth after each slice. If you used parchment paper with an overhang, you can lift the entire slab of bars out of the pan onto a cutting board, which makes cutting much easier.
Cherry Pit Removal: If you’re using fresh cherries, a cherry pitter is a small investment that will save you a lot of time and effort. If you don’t have one, a clean, sturdy paperclip or a chopstick can be used to push the pits out. Just be prepared for a bit of a mess!
Thickening the Filling: Cornstarch is a reliable thickener for fruit fillings, but you can also use tapioca starch (often found as “Minute Tapioca”). Tapioca starch can give a slightly clearer, glossier finish. Always cook the filling until it boils and thickens; this activates the starch’s thickening power. If your filling seems too thin after cooking, you can mix an additional teaspoon of cornstarch with a tablespoon of cold water to create a slurry, then stir it into the hot filling and continue to cook for another minute until thickened.
Enhancing Flavor: A pinch of cinnamon or nutmeg added to the cherry filling can beautifully complement the fruit’s natural flavors. For an extra layer of complexity, a tiny dash of almond extract, as suggested in the recipe, truly elevates cherry desserts. You can also experiment with a splash of kirsch (cherry brandy) for an adult twist, adding it at the very end of cooking the filling.
Crust Variations: For a gluten-free option, you can substitute a high-quality gluten-free all-purpose flour blend for the regular flour in the crust. Ensure the blend contains xanthan gum for structure. Alternatively, for a quicker crust, you can use a store-bought pie crust or even a shortbread cookie base.
Topping Variations: While a full top crust or a crumb topping are classic, consider a lattice top for an elegant presentation. For a truly decadent touch, add a drizzle of a simple glaze (powdered sugar, milk, and a touch of almond extract) over the cooled bars. A sprinkle of coarse sugar on top of the crust before baking also adds a lovely sparkle and slight crunch.
Fruit Variations: Don’t limit yourself to just cherries! These bars are incredibly adaptable. Substitute the cherries with other fruits like blueberries, raspberries, sliced peaches, or thinly sliced apples. Adjust the sugar content based on the sweetness of your chosen fruit. For apple bars, a touch of cinnamon and nutmeg in the filling is a must.
Adding Texture: For a pleasant textural contrast, you can fold in a handful of chopped walnuts or pecans into the crumb topping, or even sprinkle them over the cherry filling before adding the top crust.
Storage and Reheating
Proper storage is essential to keep your Cherry Pie Bars fresh and delicious. Once completely cooled, the bars should be stored in an airtight container. They can be kept at room temperature for up to 2 days, especially if your kitchen is cool. However, for extended freshness and food safety, particularly with fruit fillings, it’s best to store them in the refrigerator. In the refrigerator, they will stay fresh for up to 5-7 days.
If you’ve made a large batch or want to enjoy them later, Cherry Pie Bars freeze beautifully. Once completely cooled, cut the bars into individual portions. Wrap each bar tightly in plastic wrap, then place them in a freezer-safe bag or container. They can be frozen for up to 3 months. Thaw frozen bars overnight in the refrigerator or at room temperature for a few hours before serving.
When it comes to reheating, these bars are generally best served at room temperature or slightly warmed. If you prefer them warm, you can gently heat individual bars in the microwave for 15-30 seconds, or until just warm through. Be careful not to overheat, as this can make the crust soggy. Alternatively, you can warm them in a preheated oven at 300°F (150°C) for about 5-10 minutes, which will help crisp up the crust again. This is especially good if you like them served with a scoop of vanilla ice cream!
Frequently Asked Questions
Can I use canned cherries for Cherry Pie Bars?
Yes, you can absolutely use canned cherries! If using canned, opt for tart cherry pie filling or whole pitted cherries packed in water or light syrup. If using pie filling, you might need to reduce the amount of added sugar and cornstarch in the recipe, as canned fillings are often pre-sweetened and thickened. If using whole canned cherries, drain them very well and proceed with the recipe, adjusting sugar to taste. You may need slightly less cornstarch as canned cherries tend to be softer and release less liquid than fresh or frozen.
Why did my cherry filling turn out runny?
A runny filling is a common issue, usually due to insufficient cooking or not enough thickener. Ensure you cook the cherry filling mixture until it comes to a full boil and visibly thickens. Cornstarch needs to reach a boiling temperature to activate its thickening properties. If your filling still seems too thin, you can create a slurry of 1-2 teaspoons of cornstarch mixed with an equal amount of cold water, then stir it into the hot filling and continue to cook for another minute or two until it reaches the desired consistency. Also, make sure to let the bars cool completely; the filling will continue to set as it cools.
Can I make the dough ahead of time?
Absolutely! The dough for these Cherry Pie Bars is excellent for making ahead. You can prepare the dough, form it into discs, wrap it tightly in plastic, and refrigerate it for up to 2-3 days. This actually helps develop the flavor and texture of the crust. You can also freeze the dough for up to 1 month; just thaw it in the refrigerator overnight before rolling and baking.
What’s the best way to serve Cherry Pie Bars?
Cherry Pie Bars are incredibly versatile! They are delicious served at room temperature, making them perfect for potlucks and picnics. For a truly decadent treat, serve them slightly warm, perhaps with a scoop of vanilla ice cream, a dollop of whipped cream, or a drizzle of crème anglaise. The contrast of the warm, fruity filling with cold, creamy toppings is divine. They also make a fantastic breakfast treat with a cup of coffee or tea!