Instructions
-
Prepare the Coconut Filling: In a large mixing bowl, combine the shredded sweetened coconut, powdered sugar, softened unsalted butter, vanilla extract, and milk. Use your hands or a sturdy spoon to mix thoroughly until all ingredients are well combined and the mixture is moist and holds together when pressed. The butter and milk will help bind the coconut together.
-
Form the Bars: Line an 8×8 inch baking dish or a small baking sheet with parchment paper, leaving an overhang on the sides to easily lift the bars later. Press the coconut mixture firmly and evenly into the prepared dish. Ensure the top is smooth and compact. For individual bars, you can also roll the mixture into small logs or balls by hand. The key is to make them uniform in size for even coating.
-
Chill the Coconut Base: Place the baking dish with the coconut mixture into the refrigerator for at least 1 hour. This chilling step is crucial as it allows the coconut bars to firm up, making them much easier to cut and dip without falling apart.
-
Cut into Bars: Once thoroughly chilled, remove the coconut slab from the refrigerator using the parchment paper overhang. Carefully transfer it to a cutting board. Using a sharp knife, cut the slab into approximately 12-16 uniform bars or squares, depending on your desired size. If you formed logs or balls, you can skip this step.
-
Melt the Chocolate: Prepare a double boiler by placing a heatproof bowl over a saucepan of simmering water, ensuring the bottom of the bowl does not touch the water. Add the chopped chocolate to the bowl. If using, add the coconut oil to the chocolate. Stir occasionally until the chocolate is completely melted and smooth. Alternatively, you can melt the chocolate in the microwave in 30-second intervals, stirring well after each interval, until smooth. Be careful not to overheat the chocolate, as it can seize.
-
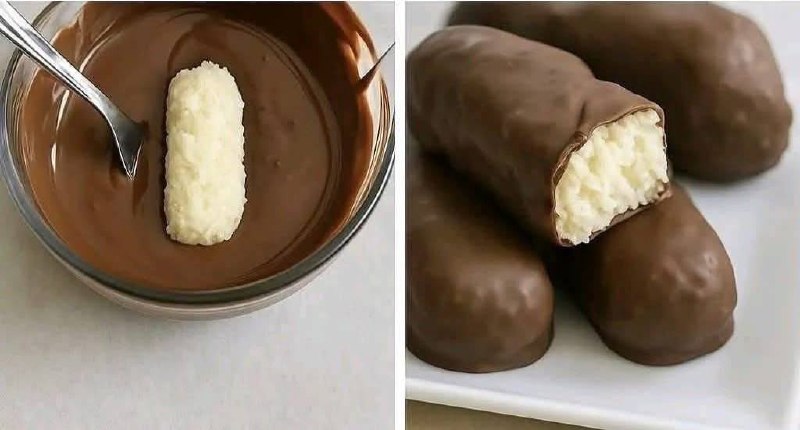
Dip the Coconut Bars: Once the chocolate is melted, remove it from the heat but keep it over the warm water (if using a double boiler) to maintain its fluidity. Using a fork or dipping tools, carefully dip each chilled coconut bar into the melted chocolate, ensuring it is fully coated. Lift the bar out of the chocolate, allowing any excess to drip back into the bowl. Gently tap the fork against the edge of the bowl to remove extra chocolate and achieve a thin, even coating.
-
Set the Chocolate: Place the chocolate-covered bars onto a clean sheet of parchment paper or a wire rack set over parchment paper. If desired, you can sprinkle a pinch of sea salt or extra shredded coconut on top of the bars while the chocolate is still wet for added flavor and visual appeal. Repeat the dipping process for all remaining coconut bars.
-
Chill to Set: Transfer the parchment-lined baking sheet with the chocolate-covered bars back into the refrigerator for at least 30 minutes, or until the chocolate coating is completely firm and set. This will ensure a beautiful, glossy finish and prevent the chocolate from smudging.
-
Serve and Enjoy: Once the chocolate is fully set, your Chocolate Coconut Bars are ready to be enjoyed! Store any leftover bars in an airtight container in the refrigerator.
Cooking Tips and Variations
For the best results with your Chocolate Coconut Bars, ensure your butter is truly softened for the filling; this helps create a smooth, cohesive mixture. When melting chocolate, patience is key. Low and slow heat prevents burning and ensures a silky-smooth coating. If your chocolate seems too thick for dipping, adding a teaspoon of coconut oil or a neutral oil can thin it out without affecting the flavor, making the dipping process much easier and yielding a thinner, more elegant coating.
To take your bars to the next level, experiment with different types of chocolate. Dark chocolate offers a sophisticated bitterness that beautifully complements the sweet coconut, while white chocolate provides a creamy, extra-sweet contrast. For an added layer of texture and flavor, consider folding in finely chopped nuts like almonds or pecans into the coconut mixture before chilling. A pinch of orange zest or a hint of almond extract in the coconut filling can also introduce a delightful aromatic twist. You can also drizzle a contrasting chocolate color over the set bars for a decorative finish. For easy cleanup and perfectly smooth bottoms, place dipped bars on parchment paper and transfer to the fridge immediately.
Storage and Reheating
Chocolate Coconut Bars are best stored in an airtight container in the refrigerator. This helps maintain their shape, firmness, and prevents the chocolate from melting, especially in warmer environments. When stored properly, they will remain fresh and delicious for up to 1 week. It is not recommended to freeze these bars, as the texture of the coconut can become grainy and the chocolate may bloom (develop white streaks) upon thawing, though they would still be edible. These bars are typically enjoyed chilled, directly from the refrigerator, so no reheating is necessary. In fact, warming them up would cause the chocolate to soften and melt, making them messy to eat.
Frequently Asked Questions
Can I use unsweetened coconut for this recipe?
Yes, you can use unsweetened shredded coconut, but you may need to adjust the amount of powdered sugar in the filling to achieve your desired level of sweetness. Start with the recipe amount and add more powdered sugar a tablespoon at a time until the coconut mixture is sweet enough for your preference. Unsweetened coconut will give a more intense coconut flavor.
My chocolate seized when melting, what went wrong?
Chocolate seizes when it comes into contact with even a tiny amount of water or is exposed to too much heat too quickly. Ensure your melting bowl is completely dry, and when using a double boiler, make sure no steam or water splashes into the chocolate. Also, melt chocolate slowly over low heat, stirring constantly, especially in the microwave where it’s easy to overheat.
How can I prevent the chocolate from cracking when I cut the bars?
To prevent the chocolate from cracking, make sure the chocolate coating is completely set but not overly cold or brittle. If the bars are too cold, let them sit at room temperature for 5-10 minutes before cutting. Use a sharp, thin knife, and warm it slightly by running it under hot water and wiping it dry between cuts. This helps create clean cuts without shattering the chocolate.