Instructions
- Preheat your oven to 350°F (175°C). Grease and flour a 9×5-inch (23×13 cm) loaf pan. For easy removal, you can also line the pan with parchment paper, leaving an overhang on the longer sides.
- In a medium bowl, whisk together the all-purpose flour, baking powder, and salt. Set aside.
- In a large bowl, using an electric mixer, cream together the softened unsalted butter and granulated sugar on medium-high speed until light and fluffy, about 3-5 minutes. Scrape down the sides of the bowl as needed.
- Add the eggs one at a time, beating well after each addition until fully incorporated. Beat in the vanilla extract until combined.
- With the mixer on low speed, gradually add half of the dry ingredients to the wet ingredients, mixing until just combined.
- Pour in the 1 cup of whole milk and mix until just incorporated.
- Add the remaining dry ingredients, mixing on low speed until just combined and no streaks of flour remain. Be careful not to overmix the batter.
- Divide the batter evenly into two separate bowls.
- In one bowl, gently fold in the unsweetened cocoa powder and the 2 tablespoons of additional whole milk until fully combined and the batter is a uniform chocolate color. This is your chocolate batter.
- Leave the other bowl of batter as is; this is your vanilla batter.
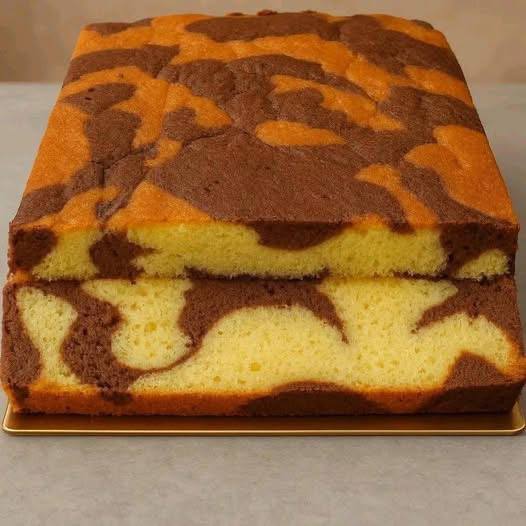
- To create the marble effect, alternate spoonfuls of vanilla and chocolate batter into the prepared loaf pan. Start with a spoonful of vanilla, then chocolate, then vanilla, and so on, creating an alternating pattern down the length of the pan. Don’t worry about being too neat.
- Once all the batter is in the pan, use a butter knife or a skewer to gently swirl the batters together. Make long, S-shaped motions or figure-eights through the batter, being careful not to overmix. You want distinct swirls, not a fully blended color.
- Bake for 50-65 minutes, or until a wooden skewer or toothpick inserted into the center of the cake comes out clean or with only a few moist crumbs attached.
- Once baked, remove the loaf pan from the oven and let it cool in the pan on a wire rack for 15-20 minutes.
- After cooling slightly, carefully invert the cake onto the wire rack to cool completely before slicing and serving.
Cooking Tips and Variations
Achieving a dazzling Chocolate Vanilla Marble Cake isn’t just about following the steps; a few insider tips can elevate your baking game and ensure a perfect outcome every time. For that signature beautiful marble effect, remember the golden rule: don’t over-swirl! A gentle hand with a butter knife or a skewer is all you need to create those distinct, artistic patterns. Too much swirling will blend the batters into a muddy brown, losing the visual charm entirely. Aim for 2-3 passes through the batter in an S-shape or figure-eight pattern, and then stop. The beauty is in the imperfection of the swirls.
Preventing a dry cake is crucial for any successful bake, and marble cake is no exception. The secret lies in using room-temperature ingredients, especially the butter, eggs, and milk. This allows them to emulsify properly, creating a smooth, cohesive batter that bakes up moist and tender. Another common culprit for dry cake is overbaking. Keep a close eye on your cake towards the end of the baking time. Start checking for doneness around the 50-minute mark. A wooden skewer or toothpick inserted into the thickest part of the cake should come out clean or with only a few moist crumbs, but no wet batter. If it’s completely clean and dry, it might be slightly overbaked. Remember, ovens can vary, so trust your toothpick test!
Ensuring even baking is another key to a perfectly cooked loaf. Always preheat your oven thoroughly before placing the cake inside. This ensures a consistent temperature from the start. Place your loaf pan in the center of the oven rack, not too close to the top or bottom heating elements, which can cause uneven browning or baking. If you notice one side browning faster, you can carefully rotate the pan halfway through baking, but try to avoid opening the oven door too frequently, especially in the first 30 minutes, as this can cause the cake to sink.
For variations, this marble cake is a fantastic base for customization. For an extra touch of decadence, consider a simple chocolate glaze. Melt ½ cup chocolate chips with 2 tablespoons of heavy cream and a teaspoon of butter, then drizzle over the cooled cake. A vanilla bean glaze, made with powdered sugar, milk, and a tiny bit of vanilla bean paste, would also be exquisite. If you’re feeling adventurous, you could even add a hint of orange zest to the vanilla batter or a touch of espresso powder to the chocolate batter to deepen its flavor. Serving suggestions are abundant: enjoy a slice plain with a cup of tea or coffee, serve it with a dollop of whipped cream and fresh berries for a more elegant dessert, or gently warm individual slices in the microwave for 10-15 seconds to bring out its comforting aromas and tender texture.
Storage and Reheating
Proper storage is essential to keep your Chocolate Vanilla Marble Cake fresh and delicious for as long as possible. Once the cake has cooled completely to room temperature, wrap it tightly in plastic wrap or aluminum foil. You can also store it in an airtight container. Stored at room temperature, your marble cake will stay fresh for up to 3-4 days. Placing it in the refrigerator can extend its freshness slightly, up to about a week, but it’s important to remember that refrigeration can sometimes alter the texture of cakes, making them a little drier. If refrigerating, make sure it’s well-wrapped to prevent it from absorbing odors from other foods.
For longer storage, marble cake freezes beautifully. Once completely cooled, wrap the entire loaf or individual slices tightly in plastic wrap, then again in aluminum foil. Place the wrapped cake in a freezer-safe bag or airtight container. Frozen marble cake can last for up to 2-3 months. To thaw, simply transfer the cake from the freezer to the refrigerator overnight, or let it sit at room temperature for a few hours. Thawing individual slices is often quicker and more convenient.
Reheating this cake is simple and can revive its freshly baked aroma and tender crumb. If you prefer a warm slice, especially if serving it with ice cream or a warm beverage, you can gently heat individual slices in the microwave for 10-15 seconds until just warm. Be careful not to overheat, as this can dry out the cake. Alternatively, you can warm slices in a preheated oven at 250°F (120°C) for about 5-10 minutes, wrapped loosely in foil, until warmed through. This method often helps maintain a softer texture. Whether enjoyed at room temperature or slightly warmed, this Chocolate Vanilla Marble Cake is a delightful treat.
Frequently Asked Questions
What causes my marble cake to be dry?
A dry marble cake is most often caused by overbaking. Ovens can vary, so always keep an eye on your cake and start checking for doneness a bit before the minimum baking time specified in the recipe. Another common reason is not using room-temperature ingredients, especially butter, eggs, and milk. Cold ingredients don’t emulsify as well, leading to a less moist batter. Lastly, too much flour or not enough liquid in the recipe can also contribute to dryness, so ensure accurate measurements.
How do I get a good marble swirl without overmixing?
The key to a distinct marble swirl is gentle handling. Once you’ve alternated spoonfuls of vanilla and chocolate batter in the pan, use a butter knife, a chopstick, or a skewer to make a few gentle S-shaped or figure-eight motions through the batter. Do this only 2-3 times. The goal is to create swirls, not to fully combine the colors. If you stir too much, the chocolate and vanilla batters will blend, resulting in a muddy brown color rather than defined marbling.
Can I make this cake in advance?
Absolutely! Marble cake is an excellent make-ahead dessert. You can bake the cake up to 2-3 days in advance and store it at room temperature, well-wrapped in plastic wrap or an airtight container. It also freezes beautifully for up to 2-3 months. Baking it ahead of time can actually allow the flavors to meld and deepen, making it even more delicious on serving day.
Can I substitute oil for butter in this recipe?
While you can technically substitute oil for butter, it will change the texture and flavor of the cake. Butter provides a rich, creamy flavor and contributes to a tender crumb, while oil tends to make cakes more moist and slightly denser. If you do substitute, use a neutral-flavored oil like vegetable or canola oil. For the best flavor and texture in this specific recipe, we recommend sticking with unsalted butter.