Instructions
- Preheat your oven to 350°F (175°C). Line a 9×13 inch baking pan with parchment paper, leaving an overhang on the sides to easily lift the brownies out later. Lightly grease the parchment paper with butter or cooking spray.
- In a large heatproof bowl, combine the melted butter and granulated sugar. Whisk them together until well combined. The mixture should be smooth and glossy.
- Add the eggs to the butter and sugar mixture, one at a time, whisking well after each addition. This step is crucial for incorporating air and creating that desirable crackly top. Continue whisking until the mixture is light in color and slightly thickened, about 1-2 minutes.
- Stir in the vanilla extract until fully incorporated.
- In a separate medium bowl, whisk together the all-purpose flour, unsweetened cocoa powder, baking powder, and salt. Ensure there are no lumps of cocoa powder.
- Gradually add the dry ingredients to the wet ingredients, mixing with a spatula or wooden spoon until just combined. Be careful not to overmix the batter; overmixing can lead to tougher brownies. A few streaks of flour are acceptable at this stage.
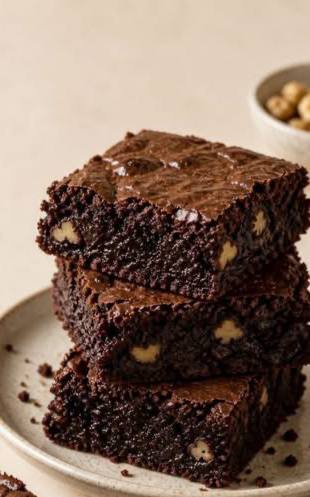
- Gently fold in the chopped walnuts and chocolate chips until evenly distributed throughout the batter.
- Pour the brownie batter into the prepared baking pan. Spread it evenly using a spatula.
- Bake for 25-30 minutes, or until a toothpick inserted into the center comes out with moist crumbs attached, but not wet batter. The edges should appear set. Remember, it’s better to underbake brownies slightly for a fudgier texture than to overbake them.
- Remove the pan from the oven and place it on a wire rack to cool completely. This cooling process allows the brownies to set properly and become fudgy. Resist the urge to cut them while warm, as they will be crumbly.
- Once completely cooled, use the parchment paper overhang to lift the entire slab of brownies out of the pan. Place it on a cutting board and cut into 24 squares or bars.
- Serve and enjoy!
Cooking Tips and Variations
For the ultimate fudgy texture, the key is to not overbake your brownies. The toothpick test is your best friend here; you want moist crumbs, not liquid batter, but also not a completely clean toothpick. A slightly underbaked brownie will set into that perfect dense, chewy, fudgy consistency as it cools. Another tip for fudginess is to use good quality butter and chocolate. The better the ingredients, the richer the flavor and texture.
Toasting your walnuts before adding them to the batter can significantly enhance their flavor. Simply spread them on a baking sheet and toast in a 350°F (175°C) oven for 5-7 minutes, watching carefully to prevent burning. Let them cool before chopping and adding to the batter. This brings out their natural oils and nuttiness.
Want to customize your brownie bars? The possibilities are endless! For an extra layer of chocolate, try swirling a tablespoon of melted dark chocolate over the top of the batter before baking. You could also experiment with different nuts like pecans or almonds. A pinch of espresso powder (about ½ teaspoon) added to the dry ingredients will deepen the chocolate flavor without making the brownies taste like coffee. For a touch of spice, add ¼ teaspoon of cayenne pepper for a subtle warming heat. You can also swap out the chocolate chips for white chocolate chips, butterscotch chips, or even chopped caramels for different flavor profiles.
If you find your brownies are too cakey, it’s likely due to overmixing the batter or overbaking. Mix until just combined, and always err on the side of underbaking slightly. If your brownies stick to the pan, ensure you’ve properly lined it with parchment paper and greased it, especially the parchment itself. Letting them cool completely is also vital for clean removal and cutting.
Storage and Reheating
To keep your Chocolate Walnut Brownie Bars fresh and fudgy, store them in an airtight container at room temperature for up to 3-4 days. Placing a piece of parchment paper between layers of brownies can prevent them from sticking together. If you live in a warm climate or want to extend their shelf life, you can store them in the refrigerator for up to a week. Just be aware that refrigeration can make them a bit firmer, so allow them to come to room temperature before serving for the best texture.
For longer storage, brownie bars freeze beautifully! Once completely cooled, wrap individual bars tightly in plastic wrap, then place them in a freezer-safe bag or container. They can be stored in the freezer for up to 3 months. To enjoy, simply thaw them at room temperature for a few hours. If you prefer them warm, you can gently reheat them in a microwave for 10-15 seconds, or in a preheated oven at 275°F (135°C) for about 5-7 minutes. Serving them slightly warm with a scoop of vanilla ice cream or a dusting of powdered sugar is an absolute treat!
Frequently Asked Questions
Can I use a different size pan?
Yes, you can, but you’ll need to adjust the baking time. If you use a smaller pan (e.g., an 8×8 inch pan), the brownies will be thicker and will require a longer baking time, likely 35-45 minutes. Conversely, a larger pan might result in thinner brownies that bake faster. Always keep an eye on them and use the toothpick test for doneness.
Why are my brownies cakey instead of fudgy?
Cakey brownies are usually the result of one of two things: overmixing the batter or overbaking. Overmixing develops the gluten in the flour, leading to a tougher, more cake-like texture. Overbaking dries out the brownies, making them less fudgy. For fudgy brownies, mix until just combined and remove them from the oven when a toothpick inserted comes out with moist crumbs, not clean.
Do I have to use Dutch-processed cocoa powder?
While not strictly necessary, Dutch-processed cocoa powder is recommended if you want a darker, less acidic, and more intense chocolate flavor. Regular unsweetened cocoa powder will also work, but the color might be lighter, and the flavor slightly sharper. Both will yield delicious results, so use what you have on hand!
Can I omit the walnuts?
Absolutely! If you’re not a fan of walnuts or have an allergy, you can simply omit them from the recipe. The brownies will still be incredibly delicious and fudgy. If you’d like to add another mix-in, you could try an equal amount of pecans, chocolate chunks, or even a sprinkle of sea salt on top before baking for a salted chocolate effect.