Instructions
- Begin by gathering all your ingredients. Ensure your unsalted butter is at room temperature, soft enough to indent with a finger but not melted.
- In a medium bowl, whisk together the 2 ½ cups of all-purpose flour, ¾ teaspoon of baking powder, and ½ teaspoon of salt. Sifting these dry ingredients together is optional but recommended for a lighter texture and to ensure even distribution. Set aside.
- In a large bowl, using an electric mixer (stand mixer with paddle attachment or a hand mixer), cream together the softened butter and 1 ½ cups of granulated sugar on medium speed until the mixture is light and fluffy, about 3-5 minutes. Scrape down the sides of the bowl as needed.
- Beat in the large egg until fully incorporated. Then, add the 2 teaspoons of pure vanilla extract and mix until just combined.
- Gradually add the dry ingredients to the wet ingredients, mixing on low speed until just combined. Be careful not to overmix the dough. Overmixing can develop gluten, leading to tougher cookies. Stop mixing as soon as no streaks of flour remain.
- Divide the dough into two equal portions. Flatten each portion into a disc, wrap tightly in plastic wrap, and refrigerate for at least 1-2 hours, or preferably overnight. Chilling the dough is crucial as it prevents the cookies from spreading too much during baking and helps them hold their cut-out shape.
- When ready to bake, preheat your oven to 375°F (190°C). Line several baking sheets with parchment paper.
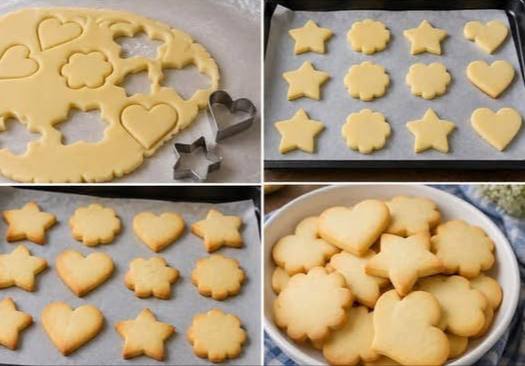
- On a lightly floured surface, unwrap one disc of chilled dough. Using a rolling pin, roll out the dough to an even thickness of about ¼ inch. For consistent baking and appearance, try to keep the thickness uniform across the entire sheet of dough.
- Using your favorite cookie cutters, cut out shapes from the rolled dough. Carefully transfer the cut-out cookies to the prepared baking sheets, leaving about 1-2 inches between each cookie.
- Gather the dough scraps, gently re-roll them, and cut out more shapes until all the dough is used. If the dough becomes too warm and sticky, chill it again briefly before continuing.
- Bake one sheet at a time in the preheated oven for 8-10 minutes, or until the edges are lightly golden. The centers should still look pale and set. Baking time may vary slightly depending on your oven and the size of your cookies.
- Once baked, remove the baking sheets from the oven. Let the cookies cool on the baking sheet for 5 minutes before carefully transferring them to a wire rack to cool completely. This brief cooling period on the hot sheet helps them firm up without breaking.
- Repeat the rolling, cutting, and baking process with the second disc of dough and any remaining scraps.
- Once completely cooled, your classic butter sugar cookies are ready to be enjoyed as is, or decorated as desired.
Cooking Tips and Variations
For truly perfect classic butter sugar cookies, the devil is in the details, and a few key tips can elevate your baking game. Firstly, the importance of cold dough cannot be overstated. Chilling the dough for the recommended time, or even longer, is critical for preventing the cookies from spreading excessively in the oven. Cold butter solidifies, making the dough easier to roll and ensuring your cut-out shapes maintain their crisp edges. If your kitchen is warm, or if you’re re-rolling scraps, don’t hesitate to pop the dough back into the fridge for 10-15 minutes to firm up again. Secondly, avoid the temptation to overmix the dough. Once the dry ingredients are added, mix only until just combined. Overmixing develops gluten, which can lead to tough, chewy cookies instead of the desired tender, crumbly texture. A light hand is key here.
Achieving uniform baking is another crucial aspect. Roll your dough to an even thickness, ideally about ¼ inch. Inconsistent thickness will result in some cookies being perfectly baked while others are undercooked or overdone. Using a rolling pin with thickness guides can be incredibly helpful. Parchment paper is your best friend when baking these cookies; it not only prevents sticking but also makes cleanup a breeze and helps the cookies bake more evenly. When arranging cookies on the baking sheet, ensure adequate spacing to allow for even heat circulation, preventing them from fusing together. Finally, trust your eyes when it comes to doneness: bake until the edges are just lightly golden, but the centers still appear pale and set. This indicates a perfectly baked cookie that will be tender, not brittle.
Beyond the classic, these cookies are wonderfully versatile. For flavor variations, consider adding the zest of one lemon or orange to the butter and sugar mixture for a bright, citrusy note. A teaspoon of almond extract can be substituted for half of the vanilla for a distinct, nutty flavor. You can also experiment with spices like a pinch of cardamom or cinnamon for a warm twist. When it comes to decoration, the possibilities are endless. A simple glaze made from powdered sugar and milk or lemon juice is quick and elegant. For more intricate designs, royal icing is the traditional choice, allowing for detailed piping and flooding. Sprinkles, sanding sugar, or edible glitter can add a festive touch with minimal effort. For holidays, customize your cookie cutters and decorations accordingly – think spooky ghosts for Halloween, festive trees for Christmas, or pastel eggs for Easter. These cookies are a celebration of both flavor and artistry.
Storage and Reheating
Proper storage is key to keeping your classic butter sugar cookies fresh and delicious. Once completely cooled, store the baked cookies in an airtight container at room temperature for up to 5-7 days. To prevent them from sticking together, you can place a piece of parchment paper between layers, especially if they are decorated. Avoid storing them in the refrigerator, as this can dry them out and make them crumbly.
If you’ve decorated your cookies with royal icing, ensure the icing is completely dry and set before stacking them to prevent smudging. For cookies with simple glazes or sprinkles, they can usually be stacked once the glaze is firm to the touch.
These cookies also freeze beautifully, both baked and unbaked. To freeze baked cookies, arrange them in a single layer on a baking sheet and freeze until solid, about 1-2 hours. Then, transfer the frozen cookies to a freezer-safe airtight container or heavy-duty freezer bag, layering with parchment paper to prevent sticking. They will stay fresh in the freezer for up to 3 months. Thaw frozen cookies at room temperature before serving.
To freeze unbaked cookie dough, wrap the discs tightly in plastic wrap and then place them in a freezer-safe bag. They can be frozen for up to 3 months. When ready to bake, transfer the dough to the refrigerator to thaw overnight, then proceed with rolling, cutting, and baking as usual. You can also freeze cut-out unbaked cookies on a baking sheet, then transfer to a freezer bag. Bake directly from frozen, adding a minute or two to the baking time.
Reheating is generally not necessary or recommended for these cookies, as they are best enjoyed at room temperature. Warming them can alter their tender texture and make them too soft or prone to breaking.
Frequently Asked Questions
Why did my cookies spread too much?
One of the most common reasons for cookies spreading too much is insufficient chilling of the dough. Cold dough helps the butter solidify, preventing the cookies from spreading too quickly in the oven. Ensure you chill your dough for at least 1-2 hours, or even overnight. Other factors can include butter that was too soft when mixing, an oven that isn’t at the correct temperature (too low), or overmixing the dough, which develops gluten and makes it more elastic and prone to spreading.
Can I make these cookies without baking powder?
While baking powder provides a slight lift and contributes to the tender texture, you can technically make these cookies without it. However, the resulting cookies will be denser and flatter. If you prefer a very crisp, shortbread-like cookie, omitting the baking powder is an option, but for the classic tender sugar cookie, it’s recommended to include it as specified in the recipe.
How can I prevent my cookies from sticking to the cookie cutters?
To prevent dough from sticking to your cookie cutters, lightly dust the cutters with flour before each use. You can also dip them in a small bowl of flour. Ensure your dough is properly chilled, as warmer, stickier dough is more likely to adhere to the cutters. If you’re having persistent issues, try rolling the dough between two sheets of parchment paper instead of directly on a floured surface, which can also help prevent sticking.
Can I use margarine instead of butter?
While margarine can be used as a substitute for butter in some recipes, it is not recommended for classic butter sugar cookies. Butter is a key ingredient for both flavor and texture. Margarine has a different fat content and water composition, which can significantly alter the taste and texture of the cookies, often resulting in a less rich flavor and a different crumb structure. For the best classic results, stick with unsalted butter.