Instructions
- Prepare the Cornstarch Slurry: In a small bowl, whisk together the 4 tablespoons of cornstarch with 1/2 cup of the cold whole milk until completely smooth and lump-free. Set aside. This slurry is crucial for thickening the pudding without creating lumps.
- Heat the Milk Mixture: In a medium-sized heavy-bottomed saucepan, combine the remaining 2 1/2 cups of whole milk, 1/2 cup of granulated sugar, 2 tablespoons of unsalted butter, and a pinch of salt. Place the saucepan over medium heat.
- Melt and Dissolve: Stir occasionally until the butter is fully melted and the sugar has completely dissolved into the milk. Do not let the mixture come to a rolling boil at this stage; just bring it to a gentle simmer, with small bubbles forming around the edges.
- Thicken the Pudding Base: Once the milk mixture is gently simmering and the sugar and butter are dissolved, give the cornstarch slurry another quick whisk to ensure it’s still smooth. Gradually pour the cornstarch slurry into the hot milk mixture in a slow, steady stream, whisking continuously.
- Cook to Desired Consistency: Continue to whisk constantly as the pudding base heats and thickens. This process will take about 3-5 minutes. The mixture will visibly thicken and start to bubble slowly. Continue to cook for another 1-2 minutes after it starts to thicken, whisking all the while, to ensure the cornstarch is fully cooked and there’s no starchy taste. The pudding should be thick enough to coat the back of a spoon.
- Remove from Heat and Add Vanilla: Once the pudding has reached your desired creamy consistency, remove the saucepan from the heat. If using, stir in the 1 teaspoon of vanilla extract until well combined.
- Prepare Serving Dishes: Immediately pour the hot pudding base into your chosen heat-safe serving dish(es) – this could be a larger communal bowl, individual ramekins, or glasses.
- Melt the Chocolate: While the pudding is still hot, prepare your chocolate swirl. You can do this in a few ways:
- Microwave Method: Place the finely chopped milk chocolate or chocolate chips in a microwave-safe bowl. Microwave in 15-20 second intervals, stirring well after each interval, until the chocolate is smooth and fully melted. Be careful not to overheat.
- Double Boiler Method: Place the chocolate in a heat-safe bowl set over a small saucepan of simmering water (ensure the bottom of the bowl does not touch the water). Stir occasionally until the chocolate is melted and smooth.
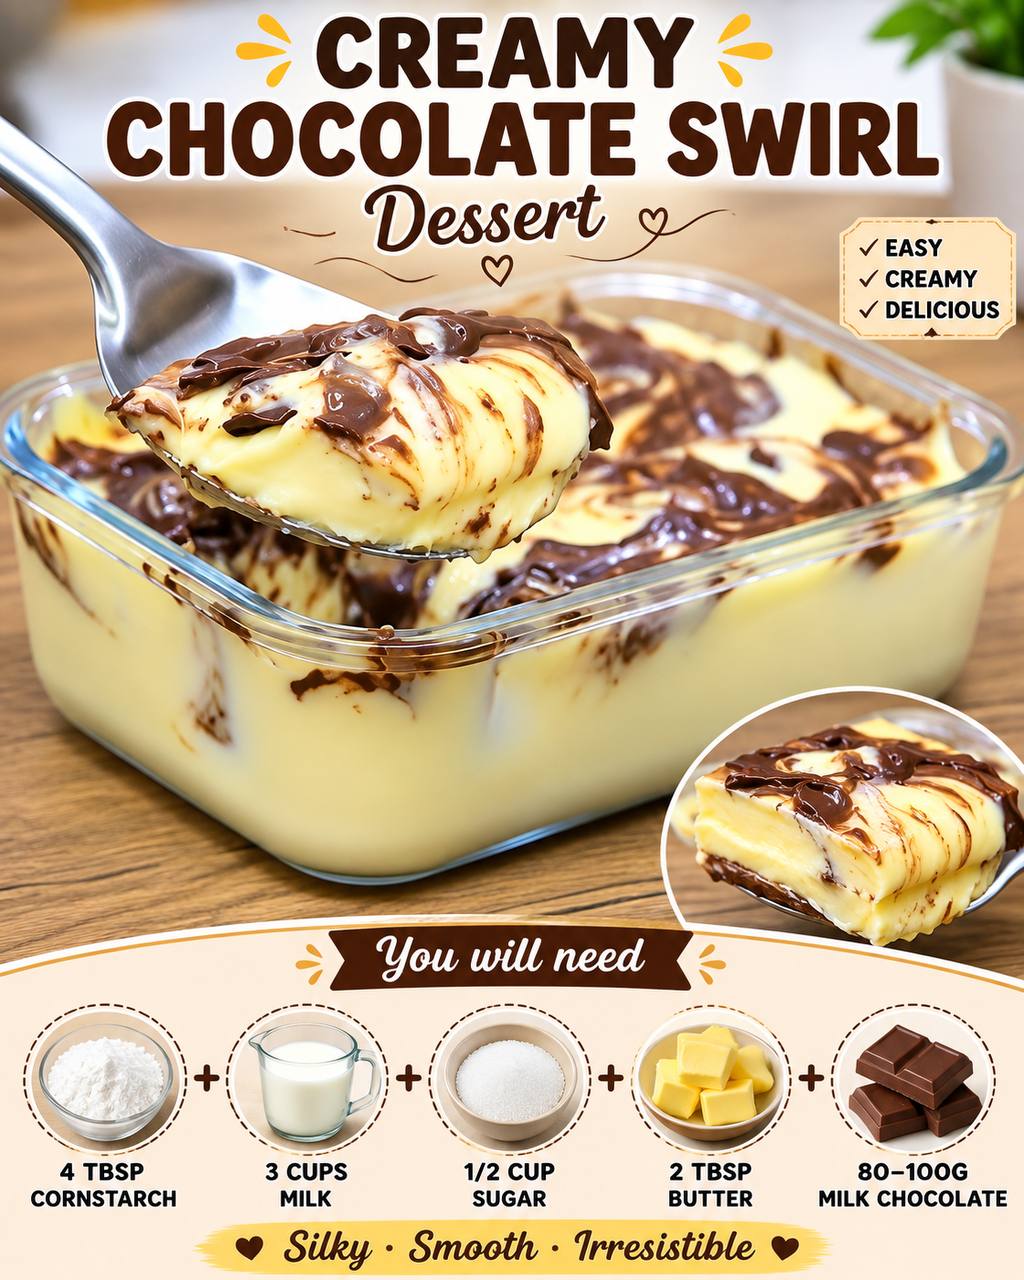
- Create the Chocolate Swirl: Drizzle the melted milk chocolate over the surface of the warm pudding in your serving dish(es). Don’t be too neat; uneven drizzles work best for swirling.
- Swirl the Chocolate: Take a skewer, a butter knife, or the handle of a spoon and gently drag it through the drizzled chocolate and into the pudding base, creating swirls and patterns. Be careful not to over-swirl, or the chocolate will fully incorporate, and you’ll lose the distinct swirl effect. A few gentle passes are usually sufficient to create beautiful marbling.
- Chill and Set: Once swirled, allow the pudding to cool slightly at room temperature for about 15-20 minutes. Then, cover the dish(es) loosely with plastic wrap (you can press the plastic wrap directly onto the surface of the pudding to prevent a skin from forming, though with the chocolate swirl, it’s less of an issue). Refrigerate for at least 3-4 hours, or preferably overnight, until the pudding is completely set and thoroughly chilled.
- Serve: Once firm and chilled, your Creamy Chocolate Swirl dessert is ready to be enjoyed! Serve as is, or with optional garnishes.
Cooking Tips and Variations
Achieving the perfect creamy texture for your chocolate swirl pudding is all about technique. To avoid lumps, always mix your cornstarch with a small amount of cold liquid (milk in this case) *before* adding it to the hot mixture. This creates a “slurry” that incorporates smoothly. Once the slurry is added, constant whisking is your best friend. Don’t stop whisking until the pudding thickens and bubbles for a minute or two; this ensures the cornstarch is fully cooked out and prevents a starchy taste. Under-cooking can lead to a runny pudding, while over-cooking might make it too thick or gluey. Aim for a consistency that coats the back of a spoon thickly.
The quality of your chocolate dramatically impacts the flavor of the swirl. While milk chocolate provides a classic, sweet flavor, feel free to customize! For a richer, more intense chocolate experience, use dark chocolate (60-70% cocoa solids). If you prefer a milder, sweeter contrast, white chocolate can also create a stunning visual and flavor variation. You can even use a combination, perhaps drizzling both dark and white chocolate for a striking marbled effect. Ensure your chocolate is finely chopped or in chip form for even melting.
Elevate your Creamy Chocolate Swirl with various flavor additions. A splash of good quality vanilla extract (as included in the recipe) is highly recommended as it enhances the overall sweetness and depth of the pudding. For a more sophisticated twist, consider adding 1/2 teaspoon of instant espresso powder to the milk mixture along with the sugar; it won’t make the pudding taste like coffee but will deepen the chocolate flavor beautifully. A pinch of cinnamon or a tiny amount of orange zest (added to the hot milk and then strained out before chilling) can also introduce intriguing aromatic notes. For a boozy kick, a tablespoon of rum or brandy can be stirred into the pudding base after it’s removed from the heat.
Presentation can turn a simple dessert into a showstopper. While a large communal dish is lovely, individual servings in elegant glasses, teacups, or small ramekins make for a more refined presentation. For an extra touch of indulgence, top the chilled pudding with a dollop of freshly whipped cream, a sprinkle of chocolate shavings, a few fresh berries (raspberries or strawberries pair wonderfully with chocolate), or a dusting of cocoa powder just before serving. For a layered dessert, you could even spoon some pudding into glasses, add a layer of crushed cookies (like Oreos or graham crackers), then another layer of pudding, and finally the chocolate swirl on top.
When creating the chocolate swirl, remember that less is often more. Drizzle the melted chocolate over the surface, then use a skewer or the tip of a knife to gently make a few passes through the chocolate and pudding. Don’t overmix, or the chocolate will fully incorporate into the pudding, and you’ll lose the beautiful marbled effect. The goal is distinct ribbons and swirls, not a uniformly brown pudding. If your melted chocolate is too thick to drizzle easily, add a tiny amount (1/2 teaspoon) of neutral oil like canola or vegetable oil, or a small pat of butter, and stir until smooth and more fluid.
Storage and Reheating
The Creamy Chocolate Swirl is a fantastic make-ahead dessert, as it requires chilling to set properly and tastes best when cold. To store leftovers, ensure the pudding is covered tightly with plastic wrap. If it’s in a communal dish, press the plastic wrap directly onto the surface of the pudding to prevent a “skin” from forming and to keep it fresh. If stored in individual ramekins, you can cover each one individually. When properly covered and refrigerated, this dessert will stay fresh and delicious for up to 3-4 days.
Due to its delicate, creamy texture and the fact that it’s designed to be served cold, this dessert is generally not suitable for reheating. Reheating would cause the pudding to lose its set consistency and become a liquid mess. The beauty of this dessert lies in its chilled, silky smoothness, which would be compromised by heat. Therefore, it’s best enjoyed straight from the refrigerator.
If you’re planning to serve this for a party, making it the day before is ideal. This allows ample time for the pudding to chill completely and for the flavors to meld beautifully. Simply take it out of the refrigerator shortly before serving, add any fresh garnishes, and enjoy!
Frequently Asked Questions
Can I use a different type of milk for the pudding?
Yes, you can experiment with different types of milk, but be aware that it will affect the final texture and richness. Whole milk is recommended for the creamiest, most luxurious result. Skim or low-fat milk can be used, but the pudding may be slightly less rich and creamy. Non-dairy milks like almond milk or oat milk can also work, but results may vary in terms of thickness and flavor, and you might need to adjust the cornstarch amount slightly to achieve the desired consistency. Always choose an unsweetened variety for best control over the sugar content.
Why did my pudding turn out lumpy?
Lumpy pudding is almost always due to the cornstarch not being properly dissolved before being added to the hot milk, or not whisking continuously as it thickens. To prevent lumps, ensure you create a smooth cornstarch slurry with cold milk first. When adding the slurry to the hot milk, pour it in slowly while whisking vigorously. Continue whisking constantly until the pudding thickens and bubbles; this ensures even cooking and prevents clumps from forming at the bottom of the pan.
Can I make this dessert ahead of time for a party?
Absolutely! This Creamy Chocolate Swirl is an excellent make-ahead dessert. In fact, it needs several hours to chill and set properly, making it perfect for preparing the day before an event. Prepare the pudding, swirl the chocolate, and then cover it tightly and refrigerate overnight. This allows the flavors to fully develop and the texture to become perfectly firm and creamy. When serving, simply pull it from the fridge and add any desired garnishes.
How can I make the chocolate swirl more pronounced?
To achieve a more pronounced and vibrant chocolate swirl, ensure your melted chocolate is not too hot when drizzling it onto the pudding, as very hot chocolate might sink or spread too quickly. Also, don’t over-swirl! A few gentle passes with a skewer or the tip of a knife are usually sufficient. If you swirl too much, the chocolate will fully incorporate into the pudding, resulting in a more uniformly chocolate-flavored dessert rather than distinct swirls. For extra visual impact, you can also use slightly contrasting chocolates, like a dark chocolate swirl on a milk chocolate pudding base, or even white chocolate for a lighter contrast.