Instructions
- Prepare the Rice: Rinse the Arborio rice under cold water until the water runs clear. This helps remove excess starch and prevents the pudding from becoming too sticky.
- Cook the Rice Pudding Base: In a large, heavy-bottomed saucepan or Dutch oven, combine the rinsed rice, 5 cups (1.2 liters) of whole milk, 1 cup of granulated sugar, salt, and the vanilla bean (if using). If using vanilla extract, add it later. Bring the mixture to a gentle boil over medium heat, stirring occasionally to prevent the rice from sticking to the bottom.
- Simmer to Creaminess: Once boiling, reduce the heat to low, cover the saucepan partially, and simmer for 45-55 minutes, stirring every 5-10 minutes. The rice should be tender and most of the milk absorbed, resulting in a thick, creamy pudding. If the pudding becomes too thick before the rice is tender, add a splash more milk. Remove the vanilla bean pod at this stage if used.
- Temper the Eggs: In a separate medium bowl, whisk together the 4 large eggs, the remaining 1 cup (240ml) of whole milk, the 1/2 cup of heavy cream, orange zest, and 1/4 teaspoon ground cinnamon. If you are using vanilla extract, stir it into this mixture now.
- Combine and Thicken: Slowly ladle about 1 cup of the hot rice pudding into the egg mixture, whisking constantly to temper the eggs and prevent them from scrambling. Once tempered, gradually pour the egg mixture back into the saucepan with the remaining hot rice pudding, whisking continuously. Cook over low heat, stirring constantly for another 5-7 minutes, or until the pudding thickens slightly and coats the back of a spoon. Do not boil.
- Prepare for Baking: Preheat your oven to 325°F (160°C). Lightly butter a 9-inch round springform pan or a 9×9 inch baking dish. If using a springform pan, wrap the bottom and sides tightly with aluminum foil to prevent any leaks, as we will be using a water bath.
- Pour into Pan: Pour the creamy rice pudding mixture into the prepared baking pan. Smooth the top with a spatula.
- Bake in a Water Bath: Place the baking pan into a larger roasting pan. Carefully pour hot water into the roasting pan until it comes halfway up the sides of the rice pudding cake pan. This water bath (bain-marie) helps the cake bake evenly and prevents it from cracking, resulting in a wonderfully creamy texture.
- Bake the Cake: Bake for 60-75 minutes, or until the edges are set but the center still has a slight jiggle. The cake will continue to set as it cools.
- Cool and Chill: Carefully remove the springform pan from the water bath. Let the cake cool completely on a wire rack at room temperature for at least 2-3 hours. Then, cover it loosely and refrigerate for at least 4 hours, or preferably overnight, to allow it to firm up and for the flavors to meld.
- Caramelize the Top (Optional but Recommended): Once chilled, remove the cake from the refrigerator. If using a springform pan, carefully remove the sides. Sprinkle the remaining 2 tablespoons of granulated sugar evenly over the top of the cake.
- Broil or Torch: Place the cake under a preheated broiler for 1-3 minutes, watching it very carefully, until the sugar melts and caramelizes to a beautiful golden-brown crust. Alternatively, use a kitchen torch to caramelize the sugar. Be mindful not to burn it.
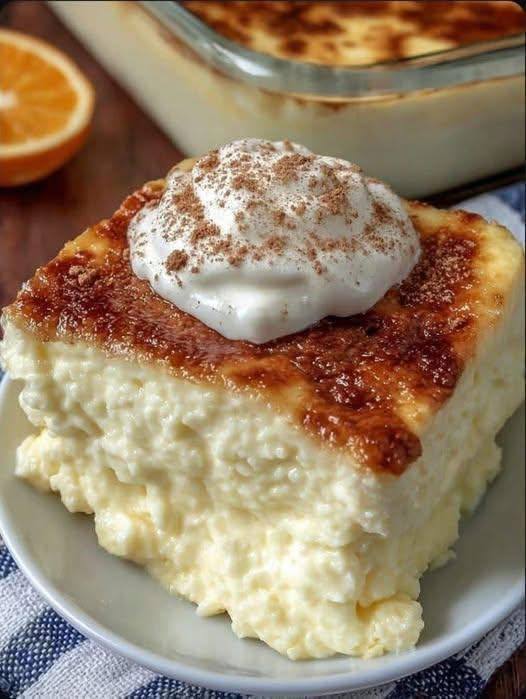
- Serve: Let the caramelized top cool and harden slightly. Serve slices of Creamy Rice Pudding Cake chilled, garnished with a dollop of freshly whipped cream, a sprinkle of cinnamon, and perhaps a thin slice of orange.
Cooking Tips and Variations
For the ultimate creamy texture, don’t rush the simmering process of the rice. Low and slow is the key to allowing the rice to release its starches and absorb the milk fully. Stir frequently, especially towards the end, to prevent sticking and ensure even cooking. When tempering the eggs, make sure to whisk constantly as you slowly add the hot rice pudding. This gradual temperature increase prevents the eggs from scrambling, creating a smooth, custardy base. The water bath is crucial for this cake; it provides a gentle, moist cooking environment that yields an incredibly tender and crack-free cake. Don’t skip it!
To enhance the flavor profile, consider adding a pinch of cardamom or nutmeg along with the cinnamon for a warmer, more complex spice note. For a richer, more decadent cake, you can substitute some of the whole milk with half-and-half or even more heavy cream. For a brighter citrus kick, you can add lemon zest in addition to, or instead of, orange zest. If you’re a chocolate lover, stir in 1/2 cup of white chocolate chips or finely chopped dark chocolate into the hot rice pudding base just before adding the egg mixture. The residual heat will melt the chocolate, infusing the cake with its flavor.
For a fruitier variation, gently fold in 1/2 cup of rehydrated dried cranberries or cherries after the cake has baked and cooled slightly, or serve with a berry compote on the side. You can also experiment with different extracts; almond extract can add a lovely nutty dimension, or a touch of rose water can provide an exotic floral aroma. If you prefer a less sweet dessert, you can reduce the amount of granulated sugar by 1/4 cup, adjusting to your taste. Always remember to taste the pudding base before adding the eggs and adjust sweetness as needed.
Storage and Reheating
This Creamy Rice Pudding Cake is best enjoyed chilled, especially after the caramelization process, which creates a delightful contrast in temperature and texture. To store leftovers, cover the cake tightly with plastic wrap or transfer individual slices to an airtight container. It will keep well in the refrigerator for up to 3-4 days. The caramelized top may soften slightly over time, but the cake will remain delicious.
Reheating this cake is generally not recommended as it is designed to be served cold. Reheating can alter the creamy texture and make it less appealing. If you must, you can gently warm a slice in the microwave for a very short period (15-30 seconds), but be careful not to overheat it, as it can become rubbery. For the best experience, simply take it out of the refrigerator a few minutes before serving to allow it to temper slightly, and enjoy it chilled.
Frequently Asked Questions
Can I use any type of rice for this cake?
While Arborio rice is highly recommended due to its high starch content which creates the creamiest texture, you can use other short-grain rices like sushi rice or even medium-grain rice. Long-grain rice is generally not ideal as it doesn’t release enough starch and won’t achieve the desired creamy consistency. If using another type of rice, you might need to adjust the cooking time and milk quantity slightly.
My rice pudding cake didn’t set properly, what went wrong?
There are a few reasons why your cake might not have set. Overcooking the rice pudding initially can lead to a dry cake that doesn’t set well. Not baking the cake long enough in the oven or not allowing it to cool and chill completely can also result in a soft, unset texture. Ensure your eggs were properly tempered and fully incorporated, as they act as a crucial binder. Always allow ample chilling time; the cake truly firms up as it chills overnight in the refrigerator.
Can I make this dairy-free or gluten-free?
Making this cake dairy-free is possible by substituting whole milk and heavy cream with full-fat coconut milk or a rich plant-based milk alternative like cashew or oat milk. Be aware that the flavor profile will change, and you might need to adjust the sweetness. For gluten-free, this recipe is naturally gluten-free as long as you ensure all your ingredients (like vanilla extract) are certified gluten-free, as rice is a naturally gluten-free grain.
How do I get a perfect caramelized top without burning it?
Achieving that perfect caramelized top requires vigilance. If using a broiler, place the cake on a rack in the upper third of your oven and watch it continuously. Broilers can be very powerful, and sugar can go from perfectly golden to burnt in seconds. Have your oven light on and your face close to the glass. If using a kitchen torch, move the flame constantly in a circular motion over the sugar until it melts and caramelizes evenly. This method offers more control and is often preferred for precision caramelization.