Instructions
- Prepare the Chicken: Thoroughly rinse the chicken pieces under cold water and pat them completely dry with paper towels. This step is crucial for achieving a crispy skin.
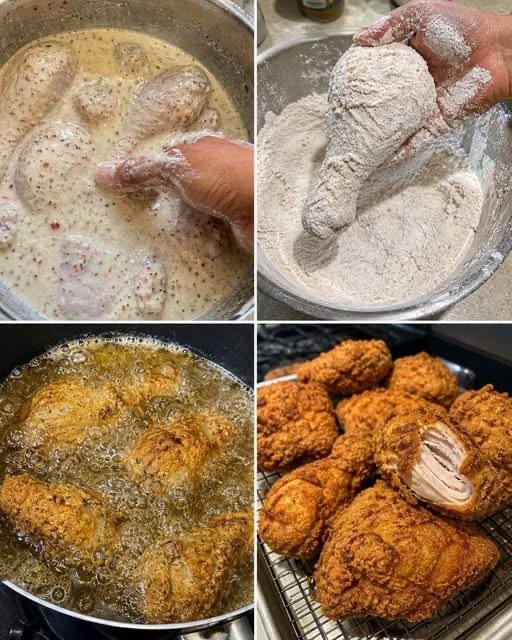
- Make the Buttermilk Marinade: In a large, non-reactive bowl or a gallon-sized freezer bag, combine the buttermilk, hot sauce (if using), 1 tablespoon of kosher salt, 1/2 tablespoon of black pepper, 1 teaspoon of garlic powder, 1 teaspoon of onion powder, 1/2 teaspoon of smoked paprika, and 1/4 teaspoon of cayenne pepper (if using). Stir well to combine all the seasonings.
- Marinate the Chicken: Add the dried chicken pieces to the buttermilk mixture, ensuring all pieces are fully submerged and coated. Cover the bowl or seal the bag and refrigerate for at least 4 hours, or preferably overnight (up to 24 hours). The longer the marination, the more tender and flavorful the chicken will be.
- Prepare the Dredging Station: In a large, shallow dish or pan, whisk together the all-purpose flour, cornstarch, baking powder, the remaining 1 tablespoon of kosher salt, 1/2 tablespoon of black pepper, 1 teaspoon of garlic powder, 1 teaspoon of onion powder, 1/2 teaspoon of smoked paprika, and 1/4 teaspoon of cayenne pepper (if using). Mix thoroughly to ensure all seasonings are evenly distributed.
- Set Up for Frying: Choose a heavy-bottomed pot, Dutch oven, or deep-fryer for frying. Pour the frying oil into the pot, ensuring there’s enough to submerge the chicken halfway (about 3-4 inches deep). Attach a deep-fry thermometer to the side of the pot.
- Dredge the Chicken: Working with one piece of chicken at a time, remove it from the buttermilk marinade, allowing any excess to drip off. Do not rinse the chicken. Place the chicken piece into the seasoned flour mixture, pressing firmly to ensure a thick, even coating. Make sure every crevice is covered. For an extra crispy crust, you can “double dredge”: after the first flour coating, dip the chicken back into the remaining buttermilk marinade briefly, then back into the flour for a second coating. Place the dredged chicken on a wire rack set over a baking sheet while you prepare the remaining pieces. Let the coated chicken rest for 10-15 minutes at room temperature; this helps the coating adhere better and prevents it from falling off during frying.
- Heat the Oil: Heat the oil over medium-high heat until it reaches a consistent temperature of 325-350°F (160-175°C). It is crucial to maintain this temperature throughout the frying process. If the oil is too cool, the chicken will be greasy; if it’s too hot, the outside will burn before the inside cooks.
- Fry the Chicken: Carefully lower 2-3 pieces of chicken into the hot oil using tongs. Do not overcrowd the pot, as this will lower the oil temperature and result in soggy chicken. Fry the chicken for 6-8 minutes per side, turning occasionally, until it is deep golden brown and cooked through. Drumsticks typically take 10-12 minutes total, and thighs 12-15 minutes total. The internal temperature should reach 165°F (74°C) when tested with an instant-read thermometer at the thickest part of the meat, away from the bone.
- Rest the Fried Chicken: Once cooked, remove the chicken from the oil and place it on a clean wire rack set over a baking sheet to allow excess oil to drain. This also helps keep the crust crispy. Do not place it directly on paper towels, as this can trap steam and make the chicken soggy.
- Repeat and Serve: Continue frying the remaining chicken in batches, allowing the oil to come back up to temperature between batches. Serve your Crispy Buttermilk Fried Chicken immediately, while it’s hot and at its crispiest!
Cooking Tips and Variations
Achieving fried chicken perfection is an art, but these tips will guide you to consistent success every time. The right preparation and attention to detail can elevate your homemade fried chicken from good to absolutely legendary.
- The Importance of Drying Chicken: Before marinating, thoroughly pat your chicken dry. Excess moisture on the skin can prevent the buttermilk and flour from adhering properly, leading to a less crispy crust.
- Marination Time is Key: While 4 hours is the minimum, marinating overnight (12-24 hours) in buttermilk truly makes a difference. The lactic acid in the buttermilk breaks down tough muscle fibers, resulting in incredibly tender and juicy chicken, while also infusing it with flavor.
- Don’t Skip the Cornstarch and Baking Powder: Cornstarch helps create a crispier crust by inhibiting gluten development in the flour, while baking powder contributes to a lighter, airier, and more shatteringly crisp coating. They are essential for that signature crunch.
- The Double Dredge for Extra Crisp: For an exceptionally thick and craggy crust, try the double-dredging technique. After the first flour coating, dip the chicken back into the remaining buttermilk marinade (ensure it’s still well-seasoned or add a pinch more salt), then back into the flour for a second, generous coating. This builds up more texture for maximum crunch.
- Resting the Dredged Chicken: After coating the chicken in flour, let it rest on a wire rack for 10-15 minutes at room temperature. This allows the flour to absorb some moisture from the chicken, creating a paste-like layer that adheres better during frying and prevents the coating from flaking off.
- Oil Temperature is Critical: Invest in a good deep-fry thermometer. Maintaining the oil temperature between 325-350°F (160-175°C) is the most crucial factor for crispy, non-greasy, and evenly cooked chicken. If the oil is too cold, the chicken will absorb too much oil and be greasy. If it’s too hot, the crust will burn before the inside cooks through.
- Don’t Overcrowd the Pot: Fry chicken in batches, leaving plenty of space between pieces. Overcrowding drops the oil temperature significantly, leading to soggy, poorly cooked chicken. Be patient and fry in small batches.
- Use a Wire Rack for Draining: Never place freshly fried chicken directly on paper towels. Paper towels trap steam, which makes the crispy crust soggy. A wire rack allows air to circulate around the chicken, letting excess oil drain off while maintaining crispiness.
- Season the Dredge Generously: Remember that the flour coating is where a lot of the flavor comes from. Don’t be shy with the seasonings in your flour mixture.
- Spice It Up: For those who love a bit of heat, increase the amount of cayenne pepper in both the marinade and the flour dredge. You can also add a pinch of chili powder or smoked chipotle powder for a different smoky heat profile.
- Herb Variations: Experiment with dried herbs in your flour dredge. A teaspoon of dried thyme or oregano can add a lovely aromatic layer to the crust.
- Gluten-Free Option: For a gluten-free version, substitute the all-purpose flour with a gluten-free all-purpose flour blend that contains xanthan gum. The results can be surprisingly good!
- Brining Before Marination: For an extra layer of moisture and seasoning, consider a quick brine (e.g., 30 minutes in a salt and sugar solution) before the buttermilk marinade. This is an advanced technique but yields incredibly juicy results.
- Oven Method (Recommended for Best Crispiness):
- Preheat your oven to 375°F (190°C).
- Place a wire rack on a baking sheet. Arrange the cold chicken pieces on the wire rack, ensuring there’s space between them for air circulation.
- Reheat for 15-25 minutes, depending on the size of the pieces, until heated through and the crust is crispy again. For frozen chicken, you may need to increase the reheating time to 30-40 minutes.
- Air Fryer Method (Excellent for Crispiness):
- Preheat your air fryer to 350°F (175°C).
- Place the cold chicken pieces in a single layer in the air fryer basket, making sure not to overcrowd.
- Air fry for 8-12 minutes, flipping halfway through, until heated through and crispy. For frozen chicken, increase to 15-20 minutes.
- Skillet Method (Good for Smaller Batches):
- Heat a cast-iron skillet or heavy-bottomed pan over medium heat. Add a tablespoon or two of oil (vegetable or peanut) to the pan.
- Once the oil is hot, add the chicken pieces, skin-side down first.
- Cook for 3-5 minutes per side, turning occasionally, until heated through and the crust is re-crisped. This method is best for 1-2 pieces at a time.
Storage and Reheating
While freshly fried chicken is undeniably at its peak, sometimes you’ll have leftovers. Knowing how to store and reheat it properly is key to enjoying it again without sacrificing too much of that glorious crispiness.
How to Store Leftover Fried Chicken
Allow the fried chicken to cool completely to room temperature before storing. This prevents condensation from forming, which can make the chicken soggy. Once cooled, place the chicken in an airtight container. You can layer pieces with parchment paper to prevent them from sticking. Store in the refrigerator for up to 3-4 days. For longer storage, you can freeze fried chicken for up to 2-3 months. Wrap individual pieces tightly in plastic wrap, then place them in a freezer-safe bag or container.
Best Methods for Reheating to Retain Crispiness
Reheating fried chicken without losing its crisp texture is the ultimate goal. Avoid the microwave at all costs, as it will steam the chicken and turn the crust rubbery and soggy.
Frequently Asked Questions
What kind of oil is best for frying chicken?
The best oils for frying chicken are those with a high smoke point and a neutral flavor. Vegetable oil, peanut oil, canola oil, and shortening are all excellent choices. Peanut oil is often favored for its clean taste and high smoke point, which allows it to get hot enough without burning.
Can I use boneless, skinless chicken for this recipe?
While you can, boneless, skinless chicken breasts or thighs will cook much faster and have a different texture. The bone and skin contribute significantly to the flavor and moisture of traditional fried chicken. If using boneless, skinless cuts, reduce the frying time significantly (5-8 minutes total, or until internal temperature reaches 165°F/74°C) to prevent them from drying out.
My fried chicken isn’t crispy, what went wrong?
Several factors can lead to less-than-crispy fried chicken. The most common culprits are: oil temperature that is too low (causing the chicken to absorb oil and become greasy), overcrowding the pot (which lowers oil temperature), not patting the chicken dry before marinating, or not letting the dredged chicken rest before frying. Ensure your oil is at the correct temperature, fry in small batches, and follow the drying and resting steps carefully.
How do I know when the chicken is fully cooked?
The most reliable way to know if your fried chicken is fully cooked is to use an instant-read meat thermometer. Insert the thermometer into the thickest part of the chicken, avoiding the bone. The internal temperature should register 165°F (74°C). The chicken should also be golden brown all over, and the juices should run clear when pierced with a knife.
Can I prepare the chicken ahead of time?
You can prepare the chicken by marinating it in the buttermilk mixture for up to 24 hours in advance. However, it is best to dredge the chicken in the flour mixture just before frying (allowing for the 10-15 minute rest period) to ensure the crispiest crust. Do not dredge the chicken too far in advance, as the flour can get soggy from the moisture.