Introduction
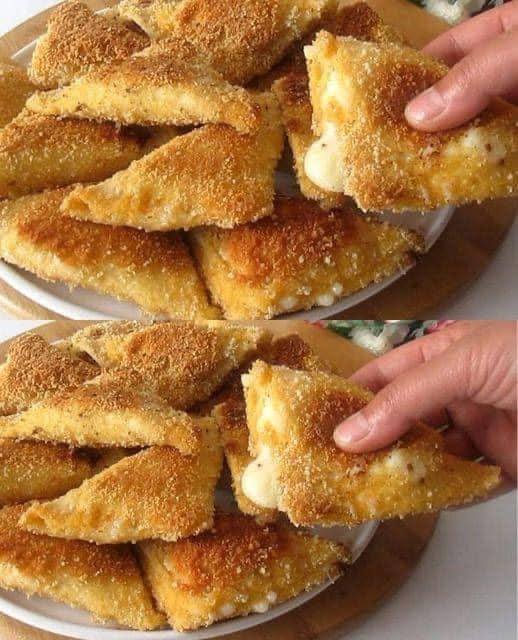
There are few appetizers that ignite a universal spark of joy quite like hot, crispy, melted cheese. Imagine a golden-brown exterior, perfectly crunchy with every bite, giving way to a luxuriously gooey, stretchy interior of warm, savory cheese. That, my friends, is the magic of Crispy Fried Cheese Triangles. This isn’t just a snack; it’s an experience, a delightful contradiction of textures and temperatures that makes it utterly irresistible. Whether you’re hosting a lively party, settling in for a cozy game night, or simply craving a comforting treat, these cheese triangles are guaranteed to be the star of the show, disappearing almost as quickly as you can make them.
What makes these Crispy Fried Cheese Triangles so special? It’s the masterful combination of simplicity and indulgence. With just a few basic ingredients and straightforward steps, you can transform ordinary cheese into an extraordinary culinary delight. The secret lies in the perfect breading, which creates that satisfying crunch, and the careful frying process that ensures the cheese within is perfectly melted without becoming greasy. Each triangular bite offers a harmonious blend of salty, savory, and rich flavors, making it a beloved choice for all ages and palates.
This recipe promises an easy-to-follow guide to achieving fried cheese perfection. We’ll walk you through selecting the best cheese for that epic cheese pull, mastering the dredging technique for maximum crispiness, and frying to a beautiful golden-brown. Get ready to impress your guests and satisfy your own cravings with these incredibly delicious, crowd-pleasing Crispy Fried Cheese Triangles – they’re so good, you might just want to keep the whole batch for yourself!
Nutritional Information
Per serving (approximate values):
- Calories: 310
- Protein: 18g
- Carbohydrates: 25g
- Fat: 15g
- Fiber: 1g
- Sodium: 450mg
Ingredients
- 16 ounces (approx. 450g) block of low-moisture mozzarella cheese (or other firm, meltable cheese like provolone or Monterey Jack)
- 1 cup all-purpose flour
- 2 large eggs, lightly beaten
- 2 cups panko breadcrumbs (for extra crispiness) or regular breadcrumbs
- 1 teaspoon garlic powder (optional)
- 1/2 teaspoon paprika (optional)
- 1/4 teaspoon dried oregano (optional)
- 1/2 teaspoon salt, plus more for seasoning
- 1/4 teaspoon black pepper, plus more for seasoning
- 4-6 cups vegetable oil, canola oil, or peanut oil for frying (enough to fill your pan about 2-3 inches deep)
- Marinara sauce, ranch dressing, or honey mustard for dipping (optional)
- Fresh parsley or chives, finely chopped, for garnish (optional)
Instructions
- Prepare the Cheese: Remove the block of cheese from its packaging. Using a sharp knife, cut the cheese into 1/2-inch thick slices. Then, cut each slice into triangles. Aim for pieces that are roughly 2-3 inches on each side. Place the cut cheese triangles on a plate lined with parchment paper and freeze for at least 30 minutes (or up to 2 hours) until firm. This helps prevent melting too quickly during frying.
- Set Up the Dredging Station: Prepare three shallow bowls for your breading station. In the first bowl, combine the all-purpose flour with 1/2 teaspoon salt and 1/4 teaspoon black pepper. Whisk well to combine. In the second bowl, lightly beat the two large eggs. In the third bowl, combine the panko breadcrumbs with the garlic powder, paprika, and dried oregano (if using). Stir to ensure the seasonings are evenly distributed.
- Coat the Cheese: Working with one cheese triangle at a time, first dredge it in the flour mixture, ensuring it’s fully coated. Gently shake off any excess flour. Next, dip the floured cheese into the beaten egg, allowing any excess egg to drip off. Finally, transfer the cheese to the breadcrumb mixture. Press the breadcrumbs firmly onto all sides of the cheese, ensuring it’s completely covered and sealed. This firm pressing is crucial for a crisp coating and to prevent cheese leakage.
- Double Coat (Optional, but Recommended): For an extra crispy exterior and added protection against cheese leakage, repeat the egg and breadcrumb steps. Dip the already breaded cheese triangle back into the egg, then again into the breadcrumbs, pressing firmly. Place the double-coated cheese triangles back on the parchment-lined plate.
- Chill Again: Once all the cheese triangles are coated, place them back in the freezer for at least 30 minutes. This second chill is vital for ensuring the coating adheres perfectly and the cheese stays intact during frying, preventing premature melting and blowout.
- Preheat the Oil: While the cheese is chilling, pour the vegetable, canola, or peanut oil into a deep, heavy-bottomed pot, Dutch oven, or deep fryer. The oil should be at least 2-3 inches deep. Heat the oil over medium-high heat until it reaches 350-375°F (175-190°C). If you don’t have a thermometer, you can test the oil by dropping a small pinch of breadcrumbs into it; if they sizzle vigorously and turn golden in about 15-20 seconds, the oil is ready.
- Fry the Cheese Triangles: Carefully lower 3-4 cheese triangles into the hot oil using a slotted spoon or tongs, being careful not to overcrowd the pan. Overcrowding will lower the oil temperature and result in greasy, less crispy cheese. Fry for 1-2 minutes per side, or until the breading is a beautiful golden brown and crispy. Watch closely, as they cook quickly.
- Drain and Season: Once golden brown, carefully remove the fried cheese triangles from the oil using a slotted spoon or spider and transfer them to a plate lined with paper towels to drain excess oil. Immediately sprinkle lightly with a pinch of salt if desired.
- Serve Immediately: Serve the Crispy Fried Cheese Triangles hot and fresh, ideally with a side of warm marinara sauce, ranch dressing, or honey mustard for dipping. Garnish with fresh parsley or chives if you like.
Cooking Tips and Variations
Achieving the Crispiest Exterior and Preventing Leakage
- Cold Cheese is Key: Begin with very cold, even slightly frozen, cheese. This significantly slows down the melting process, giving the breading enough time to crisp up before the cheese turns liquid and potentially bursts through the coating. Freezing the cut cheese for 30-60 minutes before the first dredge, and then for another 30 minutes after the final breading, is crucial.
- Double Dredging is Your Friend: While optional, double-coating the cheese (flour, egg, breadcrumbs, then egg again, then breadcrumbs again) creates a thicker, more robust crust. This extra layer not only provides incredible crispiness but also acts as a stronger barrier, greatly reducing the chances of cheese leakage.
- Press Firmly: When applying the breadcrumbs, press them firmly onto all surfaces of the cheese. You want a compact, even layer that completely encapsulates the cheese. This helps create a solid seal and prevents gaps where cheese could escape.
- Proper Oil Temperature: This is paramount! The oil should be maintained between 350-375°F (175-190°C). Too low, and the cheese will soak up oil, becoming greasy and soggy. Too high, and the breading will burn before the cheese has a chance to melt properly. Use a kitchen thermometer for accuracy.
- Don’t Overcrowd the Pan: Fry in small batches to maintain a consistent oil temperature. Overcrowding will drop the oil temperature, leading to greasy results. Give each triangle enough space to cook evenly.
Flavor Variations
- Cheese Choices: While mozzarella is classic for its stretch, don’t be afraid to experiment!
- Halloumi: A semi-hard, unripened brined cheese that has a high melting point, meaning it holds its shape beautifully when fried and gets a fantastic squeaky texture. No need to freeze as long.
- Feta: For a tangy, salty kick, try feta. It won’t give you a long cheese pull, but it will be soft and flavorful.
- Provolone or Monterey Jack: Offer a slightly different flavor profile and good melt.
- Cream Cheese: Mix softened cream cheese with herbs (like chives and dill) or even a little jalapeño, shape into small triangles or logs, then freeze solid before breading and frying.
- Spiced Breadcrumbs: Elevate your breading by adding more seasonings. Besides garlic powder and paprika, consider:
- Italian seasoning blend
- Cayenne pepper or chili powder for a kick
- Nutritional yeast for a cheesy, umami boost
- Finely grated Parmesan cheese mixed into the breadcrumbs
- Dipping Sauces: The right sauce can transform the experience!
- Classic Marinara: Always a winner.
- Ranch Dressing: Creamy and herby.
- Honey Mustard: Sweet and tangy.
- Sweet Chili Sauce: For an Asian-inspired twist.
- Spicy Aioli: Garlic mayo with a kick.
- Guacamole or Salsa: If using a Mexican-style cheese.
Storage and Reheating
Storage
Crispy Fried Cheese Triangles are best enjoyed immediately after frying, when the crust is at its crispiest and the cheese is perfectly molten. However, if you have leftovers:
- Refrigeration: Allow the fried cheese triangles to cool completely to room temperature. Place them in an airtight container lined with a paper towel to absorb any moisture. Store in the refrigerator for up to 2-3 days. The breading will lose some of its crispness, but the flavor will still be good.
- Freezing (Unfried): This is an excellent make-ahead option! After the final double-coating, arrange the breaded cheese triangles in a single layer on a parchment-lined baking sheet. Freeze until solid (about 2-3 hours). Once frozen, transfer them to a freezer-safe airtight container or heavy-duty freezer bag. They can be stored in the freezer for up to 1-2 months. When ready to cook, fry them directly from frozen, adding an extra minute or two to the cooking time. Do not thaw before frying.
Reheating
Reheating fried cheese can be tricky, as the goal is to restore crispness without making the cheese explode or become overly oily. Avoid the microwave, as it will make them soggy.
- Oven/Toaster Oven: This is the best method for reheating. Preheat your oven or toaster oven to 375°F (190°C). Place the cooled or frozen fried cheese triangles in a single layer on a baking sheet. Bake for 8-12 minutes for refrigerated triangles, or 12-18 minutes for frozen triangles, or until heated through and the breading is crispy again. Keep a close eye on them to prevent the cheese from leaking.
- Air Fryer: Preheat your air fryer to 350°F (175°C). Place the cheese triangles in a single layer in the air fryer basket, ensuring they don’t touch. Air fry for 5-8 minutes for refrigerated triangles, or 8-12 minutes for frozen, shaking the basket halfway through, until crispy and heated through.
Frequently Asked Questions
Why did my cheese leak out during frying?
Cheese leakage is usually due to three main factors: insufficient chilling of the cheese, an incomplete or thin breading layer, or oil that isn’t hot enough. Ensure your cheese is very cold (even slightly frozen) before frying. Double-coat the cheese and press the breadcrumbs firmly to create a complete seal. Also, make sure your oil is at the correct temperature (350-375°F) to cook the breading quickly before the cheese has a chance to melt through.
Can I use a different type of cheese?
Absolutely! While low-moisture mozzarella is excellent for its classic cheese pull, many other firm, meltable cheeses work well. Provolone, Monterey Jack, or even a blend of cheeses can be used. For a different texture and flavor, consider halloumi (which holds its shape beautifully when fried) or a firm feta. Avoid very soft or high-moisture cheeses, as they tend to melt too quickly and leak.
How do I know when the oil is hot enough without a thermometer?
If you don’t have a thermometer, you can test the oil temperature using a small piece of bread or a pinch of breadcrumbs. Drop a tiny bit into the hot oil. If it immediately sizzles vigorously and turns golden brown within 15-20 seconds, the oil is ready. If it browns too quickly, the oil is too hot; if it just barely sizzles or takes a long time to brown, it’s not hot enough.
Can I bake these instead of frying?
While frying gives the best crispy texture and gooey interior, you can bake them. Preheat your oven to 400°F (200°C). Arrange the frozen, breaded cheese triangles on a baking sheet lined with parchment paper. Bake for 12-18 minutes, flipping halfway through, until golden brown and the cheese is melted. They won’t be as crispy as fried ones, but they will still be delicious.