Introduction
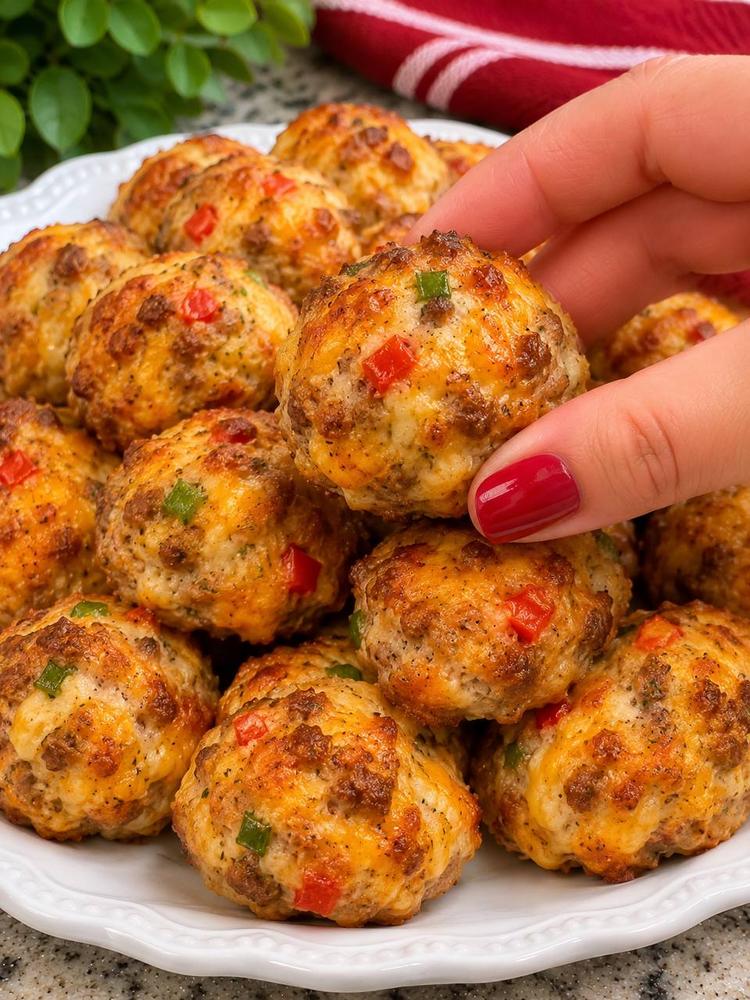
Imagine a perfect bite: warm, gloriously cheesy, and encased in a golden, crispy crust. That’s exactly what you get with these Crispy Golden Cheese Balls with Marinara Sauce! These delectable morsels are an absolute showstopper, transforming simple ingredients into an irresistible appetizer that will have everyone reaching for more. They’re the kind of snack that sparks joy, whether you’re hosting a lively party, cheering on your favorite team on game day, or simply looking for a fun and flavorful addition to a family meal. Each bite delivers a harmonious blend of savory goodness, from the rich, melted cheese to the subtle pops of fresh vegetables and seasoned meat, all perfectly complemented by the tangy embrace of a warm marinara sauce.
What makes these cheese balls truly special is their incredible versatility and undeniable crowd-pleasing power. Forget complicated recipes or endless hours in the kitchen; this dish is surprisingly easy to make, yet it tastes like something straight out of a gourmet kitchen. The magic lies in the simple combination of quality ingredients and a baking method that ensures that coveted golden-brown, slightly crispy exterior without any greasy fuss. We’ll walk you through every step, from mixing the savory base to forming those perfectly round bites and achieving that irresistible crispiness. Get ready to impress your guests and delight your taste buds with these golden nuggets of pure comfort food, perfectly paired with a vibrant, tangy marinara for dipping.
The beauty of these cheese balls isn’t just in their flavor, but also in their inviting texture. The moment you break through that golden crust, you’re met with a warm, gooey, and flavorful interior packed with melted cheese, savory ground meat, and bright flecks of bell pepper and green onion. It’s a textural symphony that keeps you coming back for another. This recipe promises not just a dish, but an experience – one that’s easy to create, incredibly satisfying to eat, and guaranteed to be a hit at any gathering. So, roll up your sleeves, gather your ingredients, and prepare to create some truly unforgettable crispy golden cheese balls!
Nutritional Information
Per serving (approximate values, based on 2-3 cheese balls):
- Calories: 280-350
- Protein: 15-20g
- Carbohydrates: 10-15g
- Fat: 20-25g
- Fiber: 1-2g
- Sodium: 400-600mg
Ingredients
- 1 pound ground breakfast sausage (mild or spicy, your preference)
- 8 ounces cream cheese, softened
- 2 cups shredded sharp cheddar cheese
- 1 cup shredded Monterey Jack cheese
- 1/2 cup finely diced red bell pepper
- 1/4 cup finely chopped green onions (white and green parts)
- 1/4 cup finely chopped fresh chives
- 1 teaspoon garlic powder
- 1/2 teaspoon onion powder
- 1/2 teaspoon smoked paprika
- 1/4 teaspoon black pepper
- Pinch of cayenne pepper (optional, for a kick)
- 1 large egg, lightly beaten
- 1/2 cup all-purpose flour (plus more for dusting, if needed)
- 2 cups marinara sauce, warmed for serving
Instructions
- Preheat your oven to 375°F (190°C). Line a large baking sheet with parchment paper or a silicone baking mat. This will prevent sticking and make cleanup a breeze.
- In a large skillet, cook the ground breakfast sausage over medium heat, breaking it up with a spoon as it cooks. Cook until it’s fully browned and no pink remains, about 8-10 minutes. Drain off any excess grease thoroughly. It’s crucial to remove as much fat as possible to prevent the cheese balls from being greasy. Transfer the cooked sausage to a large mixing bowl.
- Add the softened cream cheese to the bowl with the sausage. Use a sturdy spoon or a rubber spatula to mix the cream cheese into the warm sausage until it’s well combined and creamy. The residual heat from the sausage will help the cream cheese soften and incorporate smoothly.
- Stir in the shredded sharp cheddar cheese and Monterey Jack cheese until evenly distributed. The warmth will start to melt the cheese slightly, helping it bind.
- Add the finely diced red bell pepper, chopped green onions, and chopped fresh chives to the mixture. These fresh additions will provide vibrant color, texture, and a burst of fresh flavor.
- Season the mixture with garlic powder, onion powder, smoked paprika, and black pepper. If you like a little heat, add a pinch of cayenne pepper now. Mix all the seasonings in thoroughly, ensuring they are evenly distributed throughout the cheese and meat mixture.
- Crack the large egg into a small bowl, lightly beat it, and then add it to the cheese ball mixture. The egg acts as a crucial binding agent, helping the balls hold their shape during baking. Mix until everything is just combined.
- Finally, add the all-purpose flour to the mixture. The flour will also help bind the ingredients and contribute to the crispy exterior. Mix until the flour is fully incorporated and no dry streaks remain. Be careful not to overmix; just combine until uniform.
- Using a small cookie scoop (about 1.5 tablespoons) or your hands, roll the mixture into uniform balls, approximately 1.5 to 2 inches in diameter. If the mixture is a bit sticky, you can lightly moisten your hands with water or dust them with a little extra flour. Ensure they are packed firmly so they don’t fall apart during baking.
- Arrange the cheese balls on the prepared baking sheet, leaving about an inch of space between each ball. This allows for even air circulation and helps them brown beautifully on all sides. Avoid overcrowding the baking sheet; if necessary, bake in batches.
- Bake for 18-25 minutes, or until the cheese balls are golden brown and slightly crispy on the outside. The exact baking time may vary depending on your oven and the size of your balls. Keep an eye on them towards the end of the baking time to prevent over-browning.
- While the cheese balls are baking, gently warm your marinara sauce in a small saucepan over low heat, or in the microwave.
- Once baked, remove the cheese balls from the oven and let them cool on the baking sheet for 5 minutes before transferring them to a serving platter. This allows them to firm up slightly and makes them easier to handle.
- Serve the Crispy Golden Cheese Balls immediately, piled high on a beautiful plate, with the warm marinara sauce on the side for dipping. Enjoy the irresistible combination of crispy exterior, gooey interior, and tangy sauce!
Cooking Tips and Variations
Achieving the perfect crispy golden cheese ball is all about a few key techniques and ingredient choices. For the best texture, always use freshly grated cheese instead of pre-shredded. Pre-shredded cheeses often contain anti-caking agents like cellulose, which can prevent them from melting as smoothly and achieving that desirable gooey interior. Freshly grating your own cheese ensures a superior melt and flavor. When it comes to the ground meat, don’t skimp on properly browning the sausage first and, more importantly, draining off all excess fat. Too much grease will result in a soggy cheese ball rather than a crispy one. The fat can also cause the balls to spread out too much during baking. Once drained, the residual heat from the sausage is perfect for melting the cream cheese and starting the binding process.
To ensure your cheese balls hold their shape beautifully, make sure the cream cheese is softened to room temperature before mixing. This allows it to incorporate smoothly and evenly, creating a cohesive base. When forming the balls, aim for uniform size. This ensures they all cook at roughly the same rate, preventing some from being undercooked while others are over-browned. Don’t be afraid to press them firmly when rolling; a compact ball is less likely to crumble. Baking on parchment paper or a silicone mat is also crucial for preventing sticking and promoting even browning on the bottom. Avoid overcrowding the baking sheet, as this can steam the cheese balls rather than crisp them, leading to a less desirable texture.
Variations:
- Cheese Blend: Feel free to experiment with different cheese combinations. Gruyere, Colby Jack, or even a smoked Gouda could add unique flavor profiles. Just ensure they are good melting cheeses.
- Meat Options: While breakfast sausage is classic, you could substitute ground beef, ground turkey, or even finely crumbled cooked bacon for a different savory base. If using leaner meats, you might want to add a tablespoon of olive oil to the pan when browning to prevent sticking and add a little moisture.
- Spice It Up: For those who love heat, increase the amount of cayenne pepper or add a finely minced jalapeño or serrano pepper to the mixture. A dash of hot sauce in the mixture can also add a subtle kick.
- Herb Garden: Beyond green onions and chives, consider adding other fresh herbs like finely chopped parsley, thyme, or oregano for an aromatic twist.
- Veggie Boost: Finely grated carrots, zucchini (squeezed dry), or spinach (squeezed dry) could be incorporated for added nutrients and color, though be mindful of moisture content.
- Gluten-Free: To make these gluten-free, substitute the all-purpose flour with a gluten-free all-purpose flour blend that contains xanthan gum.
- Air Fryer Method: For an even crispier result with potentially less baking time, these cheese balls can be cooked in an air fryer. Preheat your air fryer to 375°F (190°C). Arrange the balls in a single layer in the air fryer basket, ensuring they don’t touch. Cook for 10-15 minutes, shaking the basket halfway through, until golden brown and crispy. Cooking time will vary by air fryer model.
Storage and Reheating
These Crispy Golden Cheese Balls are undoubtedly best enjoyed fresh out of the oven, when their exterior is at its crispiest and the interior is perfectly gooey. However, leftovers can be stored and reheated, and they even lend themselves well to make-ahead preparation.
Storage:
- Refrigeration: Store any leftover cheese balls in an airtight container in the refrigerator for up to 3-4 days. It’s best to store them separately from the marinara sauce to prevent them from becoming soggy.
- Freezing (Cooked): If you have cooked leftovers you want to save for longer, allow them to cool completely. Arrange them in a single layer on a baking sheet and freeze until solid (about 1-2 hours). Once frozen, transfer them to a freezer-safe airtight container or heavy-duty freezer bag. They can be stored in the freezer for up to 2-3 months.
- Freezing (Uncooked): These cheese balls are excellent for make-ahead preparation! After forming the balls (before baking), arrange them in a single layer on a parchment-lined baking sheet. Freeze until solid. Once frozen, transfer the uncooked balls to a freezer-safe airtight container or freezer bag. They can be stored in the freezer for up to 2-3 months. When ready to bake, you can bake them directly from frozen, adding an extra 5-10 minutes to the baking time, or until golden brown and cooked through.
Reheating:
- From Refrigerated:
- Oven: The best method for reheating to regain some crispiness. Preheat your oven to 350°F (175°C). Place the cheese balls on a baking sheet and heat for 10-15 minutes, or until warmed through and the exterior begins to crisp up again.
- Air Fryer: Preheat air fryer to 350°F (175°C). Place cheese balls in a single layer and cook for 5-8 minutes, shaking the basket halfway, until hot and crispy.
- Microwave: While quick, the microwave will not bring back the crispiness and can make them a bit chewy. Heat in short bursts (30-60 seconds) until warmed through. This is best if you don’t mind a softer texture.
- From Frozen (Cooked):
- Oven: Preheat oven to 375°F (190°C). Place frozen cooked cheese balls on a baking sheet and bake for 20-25 minutes, or until heated through and crispy.
- Air Fryer: Preheat air fryer to 375°F (190°C). Place frozen cooked cheese balls in a single layer and cook for 10-15 minutes, shaking the basket halfway, until hot and crispy.
Frequently Asked Questions
What kind of sausage is best for cheese balls?
For these cheese balls, ground breakfast sausage (either mild or spicy) is typically the best choice. Its flavor profile complements the cheese beautifully, and its texture, once browned and crumbled, integrates perfectly into the mixture. However, you could also use ground pork, ground turkey, or even ground beef if you prefer, just be sure to season them adequately as breakfast sausage comes pre-seasoned.
My cheese balls are falling apart! What went wrong?
There are a few common reasons why cheese balls might fall apart. The most likely culprit is insufficient binding. Ensure your cream cheese is softened and fully incorporated, and that you’ve added the egg and flour as specified. The egg is crucial for binding, and the flour helps absorb moisture and adds structure. Also, make sure you’ve drained all excess grease from the cooked sausage; too much fat can prevent the mixture from binding properly. Lastly, ensure you’re rolling the balls firmly to create a compact structure before baking.
Can I make these cheese balls ahead of time?
Absolutely! These cheese balls are fantastic for make-ahead preparation. You can prepare the entire mixture, form the balls, and then either refrigerate them for up to 24 hours before baking, or freeze them for longer storage. If refrigerating, cover them tightly. If freezing, arrange them on a baking sheet to freeze solid, then transfer to a freezer-safe bag. You can bake them directly from frozen, adding an extra 5-10 minutes to the baking time, or until golden brown and cooked through.
Why aren’t my cheese balls getting crispy?
Several factors can prevent your cheese balls from achieving that desired crispiness. First, ensure your oven is preheated to the correct temperature; a hot oven is key for crisping. Second, make sure you haven’t overcrowded the baking sheet. If the balls are too close together, they will steam rather than bake and crisp. Leaving space allows for proper air circulation. Third, ensure all excess grease has been thoroughly drained from the sausage; residual fat can make them soggy. Finally, baking for the full recommended time, or until they reach a deep golden-brown color, is essential for maximum crispness.