Instructions
- Preheat your oven to 350°F (175°C). Line two large baking sheets with parchment paper or silicone baking mats. This is crucial for easy removal and preventing sticking.
- In a large bowl, combine the melted butter, granulated sugar, and brown sugar. Whisk vigorously for about 1-2 minutes until the mixture is well combined, glossy, and slightly thickened. This step helps create that desirable crinkly top.
- Add the eggs one at a time, whisking well after each addition until fully incorporated. The mixture should be smooth and emulsified. Stir in the vanilla extract.
- In a separate medium bowl, whisk together the all-purpose flour, unsweetened cocoa powder, baking powder, and salt. Ensure there are no lumps of cocoa powder.
- Gradually add the dry ingredients to the wet ingredients, mixing on low speed or with a spatula until just combined. Be careful not to overmix, as this can lead to tough cookies.
- Fold in 1 cup of the semi-sweet chocolate chips and all of the milk chocolate chips (if using) until evenly distributed throughout the dough. Reserve the remaining ½ cup of semi-sweet chocolate chips for topping.
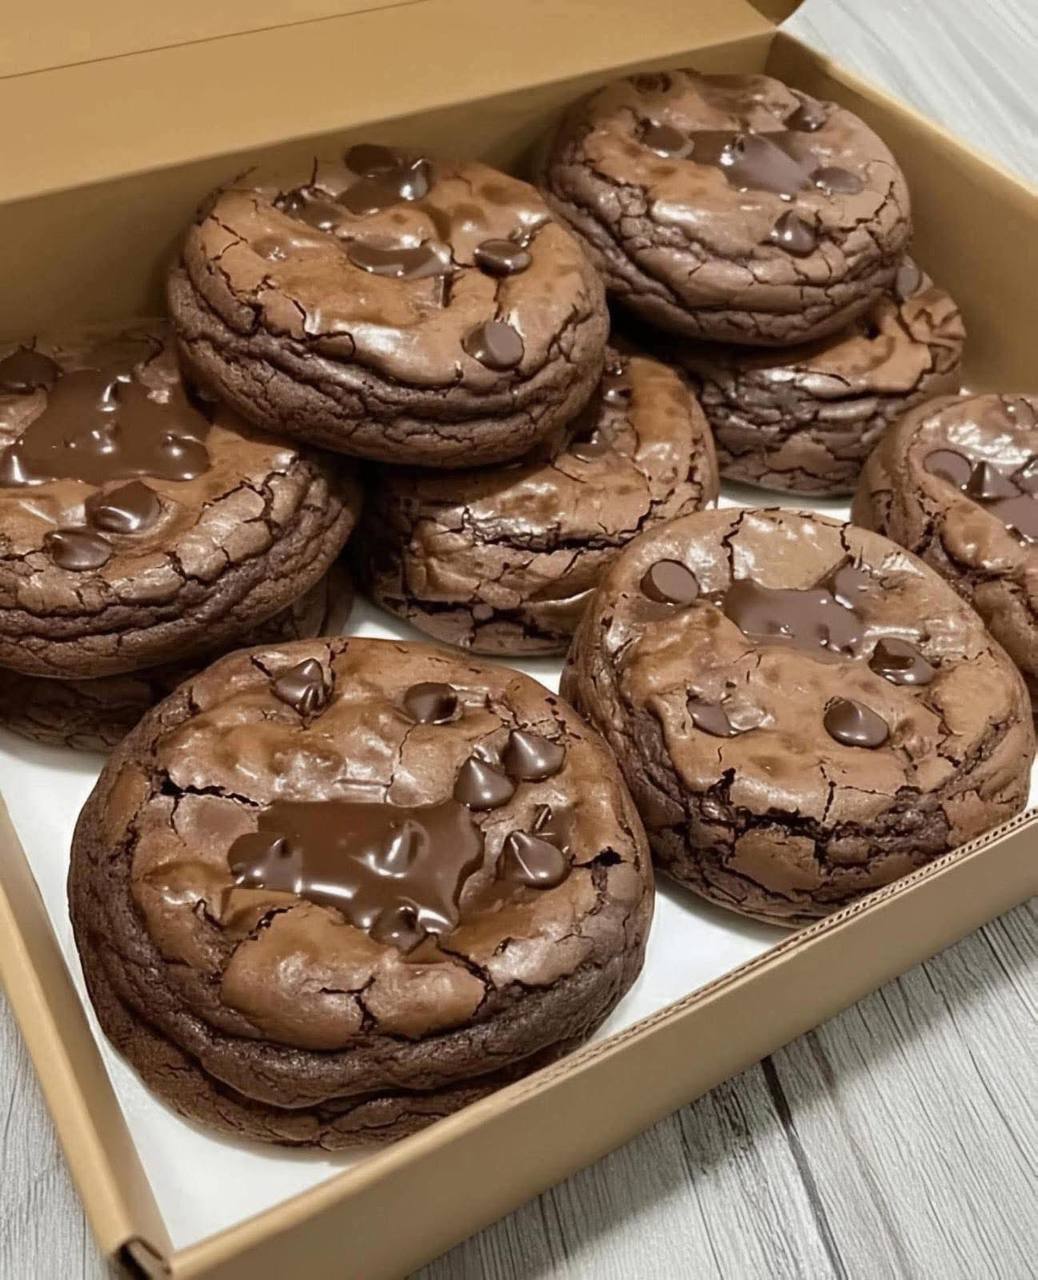
- Scoop rounded tablespoons of dough onto the prepared baking sheets, leaving about 2 inches between each cookie. A cookie scoop works best for uniform sizing.
- Press a few of the reserved ½ cup semi-sweet chocolate chips onto the top of each cookie dough ball. This creates those beautiful melted chocolate pools on the surface after baking.
- Bake for 10-12 minutes, or until the edges are set and slightly firm, but the centers still look slightly soft and gooey. Remember, these are meant to be fudgy, so underbaking slightly is key to a chewy texture. The cookies will continue to set as they cool.
- Remove the baking sheets from the oven and let the cookies cool on the sheets for 5-10 minutes before transferring them to a wire rack to cool completely. This prevents them from breaking apart and allows them to firm up.
- Enjoy your warm, fudgy Double Chocolate Brownie Cookies!
Cooking Tips and Variations
For truly perfect Double Chocolate Brownie Cookies, quality ingredients are your best friend. Opt for a good quality cocoa powder, ideally Dutch-processed, as it provides a darker color and a less bitter, richer chocolate flavor that really shines through. Don’t skimp on the chocolate chips either; choose a brand you love to eat on its own. Using a mix of semi-sweet and milk chocolate chips can add an extra layer of complexity and creaminess to the cookies. Another crucial tip is to avoid overmixing the dough once the flour is added. Overmixing develops the gluten in the flour, leading to tough, cake-like cookies instead of the desired fudgy, chewy texture. Mix until just combined, and then stop.
One of the best ways to ensure a thick, chewy cookie that doesn’t spread too much is to chill the dough. While this recipe can be baked immediately, chilling the dough for at least 30 minutes, or even an hour, allows the butter to solidify and the flavors to meld, resulting in a more robust and flavorful cookie with less spread. If you’re in a hurry, you can skip this step, but for the absolute best results, a little chill time goes a long way. When baking, keep a close eye on the cookies. The key to a fudgy center is not to overbake them. They should look slightly underdone in the middle when you pull them out of the oven, as they will continue to firm up as they cool on the baking sheet. The edges should be set and slightly firm, but the center should still be soft and gooey. If they look completely firm and dry, they’ve likely been overbaked and will be less fudgy.
For variations, consider adding a pinch of espresso powder to the dry ingredients. Espresso doesn’t make the cookies taste like coffee; instead, it enhances and deepens the natural chocolate flavor, making it even more intense. You can also experiment with different types of chocolate chips – white chocolate, dark chocolate, or even peanut butter chips can add an interesting twist. A sprinkle of flaky sea salt on top of the cookies right after they come out of the oven is another fantastic addition. The salt crystals provide a delightful contrast to the sweetness of the chocolate and really elevate the flavor profile. For an extra luxurious touch, try adding chopped toasted nuts like walnuts or pecans to the dough for added texture and flavor. Just remember to adjust your baking time slightly if adding extra ingredients, as they can sometimes alter the dough’s consistency and baking performance.
Finally, for that picture-perfect look, pressing extra chocolate chips onto the top of the cookie dough balls before baking is a simple yet effective trick. As the cookies bake, these chips melt beautifully, creating those irresistible pools of chocolate that make the cookies look incredibly appetizing. Don’t crowd your baking sheets; leave enough space between each cookie for even baking and proper airflow. If your oven tends to bake unevenly, rotate the baking sheets halfway through the baking time. Always use parchment paper or silicone baking mats; they prevent sticking and make cleanup a breeze. Following these tips will ensure your Double Chocolate Brownie Cookies are consistently perfect, fudgy, and utterly delicious every time you bake them.
Storage and Reheating
Proper storage is key to keeping your Double Chocolate Brownie Cookies fresh and fudgy. Once completely cooled, store the cookies in an airtight container at room temperature. They will remain fresh and delicious for 3-5 days. To maintain their soft, chewy texture, you can place a slice of plain bread in the container with the cookies; the bread will absorb any excess moisture, keeping the cookies soft. Avoid storing them in the refrigerator, as the cold air can dry them out and make them hard. If you need to store them for longer, these cookies freeze beautifully.
To freeze the baked cookies, allow them to cool completely. Then, arrange them in a single layer on a baking sheet and freeze until solid (about 1-2 hours). Once frozen, transfer the cookies to a freezer-safe airtight container or a heavy-duty freezer bag, separating layers with parchment paper to prevent sticking. They can be stored in the freezer for up to 3 months. When you’re ready to enjoy them, simply take out the desired number of cookies and let them thaw at room temperature for about 30-60 minutes. They will taste almost as good as freshly baked.
If you want to enjoy a warm, gooey cookie experience, you can gently reheat the stored cookies. For room temperature cookies, place them on a microwave-safe plate and microwave for 10-15 seconds, or until just warmed through and the chocolate chips are slightly melted. Be careful not to overheat, as this can make them tough. Alternatively, you can reheat them in a preheated oven at 300°F (150°C) for 5-7 minutes, or until warmed. If reheating from frozen, you can microwave them for 30-45 seconds, or bake them in a preheated oven at 300°F (150°C) for 10-15 minutes, until warm and fudgy in the center. Reheating brings back that delightful fresh-baked aroma and texture, making them an even more indulgent treat.
Frequently Asked Questions
Why are my brownie cookies not fudgy?
The most common reason for brownie cookies not being fudgy is overbaking. These cookies are meant to be slightly underbaked when you pull them from the oven, as they continue to cook and set as they cool on the baking sheet. If they look completely firm and dry in the center when you take them out, they’re likely overdone. Ensure your oven temperature is accurate and check for doneness at the lower end of the baking time range. Also, using too much flour or not enough fat (butter) can lead to a drier texture, so make sure to measure ingredients accurately.
Can I use a different type of chocolate for the chips?
Absolutely! While semi-sweet chocolate chips provide a classic balanced flavor, you can certainly experiment. Dark chocolate chips will yield a richer, more intense chocolate flavor, while milk chocolate chips will make the cookies sweeter and creamier. White chocolate chips can also be used for a contrasting flavor and color. You can even use chopped chocolate bars instead of chips for larger, more irregular pockets of melted chocolate, which can be very appealing. Feel free to mix and match different types of chocolate to customize the flavor profile to your liking.
How can I prevent my cookies from spreading too much?
There are a few key tricks to prevent excessive spreading. First, ensure your butter isn’t too hot when you mix it with the sugars; it should be melted but not scorching. Second, chilling the dough for at least 30 minutes (or even an hour) before baking is highly recommended, as it solidifies the butter and prevents the cookies from spreading too quickly in the oven. Third, avoid greasing your parchment paper or silicone mats, as this can also contribute to spreading. Finally, make sure your baking powder is fresh and active, as it helps give the cookies structure and lift. If you find your cookies are still spreading, try adding an extra tablespoon or two of flour to the dough, being careful not to overmix.
Can I make the dough ahead of time?
Yes, you can definitely make the cookie dough ahead of time! This is a great tip for meal prepping desserts or for fresh-baked cookies on demand. Prepare the dough as instructed, then cover the bowl tightly with plastic wrap and refrigerate for up to 2-3 days. When you’re ready to bake, scoop the dough onto prepared baking sheets and bake as usual, adding an extra minute or two to the baking time as the dough will be cold. You can also scoop the dough balls onto a baking sheet, freeze them until solid, and then transfer them to a freezer-safe bag. Bake from frozen, adding an extra 3-5 minutes to the baking time, for freshly baked cookies anytime.