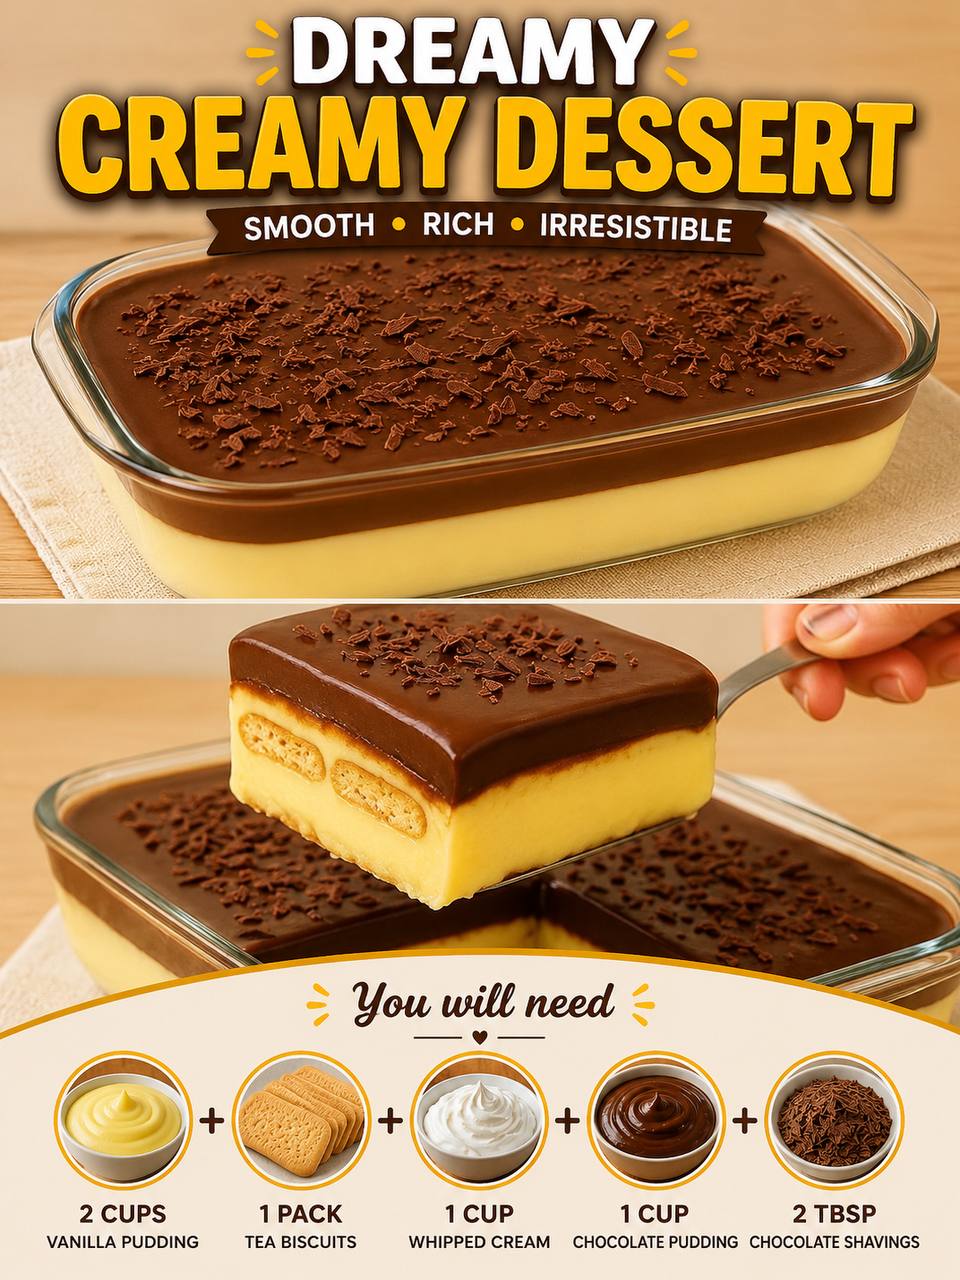
Instructions
- Prepare the Puddings: If using instant pudding mixes, follow package directions to prepare both the vanilla pudding and the chocolate pudding. Allow them to set slightly in the refrigerator for about 10-15 minutes, or until they reach a pourable but thickened consistency. If making from scratch, ensure they are cooled to room temperature before use.
- Prepare the Whipped Cream: If using homemade whipped cream, ensure it’s freshly whipped to stiff peaks and lightly sweetened. If using store-bought, ensure it’s chilled and ready to use.
- First Layer – Vanilla Pudding: Pour the prepared vanilla pudding evenly into the bottom of a rectangular glass baking dish (approximately 8×8 or 9×13 inches, depending on desired thickness of layers). Use a spatula to gently spread it into an even layer.
- Second Layer – Tea Biscuits: Carefully arrange a single layer of tea biscuits over the vanilla pudding. If you prefer a softer biscuit texture, you can quickly dip each biscuit in milk or coffee for 1-2 seconds before placing it over the pudding. Ensure the biscuits cover the entire surface of the vanilla pudding layer, breaking them as needed to fit.
- Third Layer – Whipped Cream: Gently spread the prepared whipped cream over the layer of tea biscuits. Use a spatula to create an even, smooth layer, being careful not to disturb the biscuits underneath.
- Fourth Layer – Chocolate Pudding: Pour the prepared chocolate pudding evenly over the whipped cream layer. Gently spread it out with a spatula to cover the entire surface, ensuring a smooth finish.
- Garnish with Chocolate Shavings: Sprinkle the chocolate shavings evenly over the top chocolate pudding layer. You can use a vegetable peeler on a chocolate bar for fresh shavings or use pre-made ones.
- Chill and Set: Cover the baking dish tightly with plastic wrap. Refrigerate for at least 4 hours, but preferably overnight. This chilling time is crucial for the puddings to fully set, for the biscuits to soften, and for the flavors to meld beautifully.
- Serve: Once thoroughly chilled and set, remove from the refrigerator. Cut into squares or rectangles and serve directly from the dish. Enjoy your Dreamy Creamy Dessert!
Cooking Tips and Variations
Pudding Perfection: When preparing instant pudding mixes, always use cold milk to ensure it sets properly. Whisk vigorously for the recommended time to avoid lumps. If making pudding from scratch, stir constantly over medium heat until thickened to prevent scorching and achieve a smooth consistency. Allow puddings to cool slightly before layering; if they are too hot, they can melt the whipped cream, and if too cold and thick, they might be harder to spread evenly.
Biscuit Softening: The moisture from the pudding layers will naturally soften the tea biscuits over time. However, if you prefer a very soft biscuit or are short on chilling time, a quick dip in milk (dairy or non-dairy) or even a light coffee for a mocha twist, before layering, can speed up the softening process. Don’t over-dip, or the biscuits will become soggy and fall apart.
Layering Technique: For neat, distinct layers, apply each layer gently and evenly. Use an offset spatula or the back of a spoon to spread the puddings and whipped cream. Take your time to ensure each layer is smooth and reaches the edges of the dish. A clear glass dish is ideal for showcasing the beautiful strata of this dessert.
Chilling is Key: This is perhaps the most important tip. Adequate chilling time (at least 4 hours, but ideally overnight) allows the puddings to fully set, the biscuits to absorb moisture and soften to a cake-like texture, and all the flavors to meld together. Rushing this step will result in a less firm and less flavorful dessert.
Presentation Matters: While the layers themselves are stunning, you can elevate the presentation further. Besides chocolate shavings, consider a sprinkle of cocoa powder, a few fresh berries (raspberries or strawberries), or a dollop of extra whipped cream on each serving for an elegant touch.
Pudding Flavor Variations: Don’t limit yourself to vanilla and chocolate! Experiment with other pudding flavors. Butterscotch, banana, coconut, or even pistachio puddings can create exciting new flavor profiles. You could also do an all-chocolate or all-vanilla version for a monochromatic look.
Biscuit Alternatives: Graham crackers are a popular choice and work wonderfully, offering a slight honeyed flavor. Ladyfingers can provide a more delicate, cake-like texture. Shortbread cookies offer a buttery crumb. For a gluten-free option, look for gluten-free tea biscuits or graham crackers.
Topping Ideas: Beyond chocolate shavings, consider toasted chopped nuts (pecans, walnuts), a drizzle of caramel or hot fudge sauce, shredded coconut, or fresh fruit like sliced bananas or berries. A light dusting of powdered sugar can also add a touch of simple elegance.
Dairy-Free Options: This dessert can easily be made dairy-free. Use plant-based milks (almond, soy, oat) for the puddings (ensure the pudding mix is dairy-free, or make from scratch with plant milk). For whipped cream, use a chilled can of full-fat coconut cream (scoop out the thick cream, leaving the liquid behind, then whip with a sweetener) or a store-bought dairy-free whipped topping.
Spice It Up: A pinch of cinnamon or a tiny dash of chili powder in the chocolate pudding can add an unexpected depth of flavor. A splash of coffee liqueur or rum in the chocolate pudding, or a hint of orange zest in the vanilla, can also add a gourmet touch.
Portion Control: For individual servings, prepare this dessert in small ramekins or clear glasses. Layering in individual portions makes for a beautiful and easy-to-serve presentation at parties.
Storage and Reheating
Storage: This Dreamy Creamy Dessert is best stored in the refrigerator. Keep it covered tightly with plastic wrap or in an airtight container to prevent it from absorbing odors from other foods and to keep the layers fresh and moist. When stored properly, it will last for 3-4 days in the refrigerator. The biscuits will continue to soften over time, making the dessert even more cake-like.
Freezing: Freezing this dessert is generally not recommended. The texture of the puddings and whipped cream can change significantly upon thawing, becoming watery or grainy. The biscuits may also become mushy. It is best enjoyed fresh and chilled from the refrigerator.
Reheating: This is a cold dessert and should not be reheated. Its charm lies in its cool, creamy, and refreshing nature. Serve it directly from the refrigerator for the best experience.
Make Ahead: This dessert is an excellent candidate for making ahead! In fact, it improves with age as the flavors meld and the biscuits soften. Prepare it the day before your event, cover it, and let it chill overnight. This ensures it’s perfectly set and ready to serve, making entertaining much less stressful.
Serving Leftovers: Simply take out the dish from the refrigerator, cut a portion, and enjoy. No special preparation is needed. If the chocolate shavings on top look a bit dull, you can sprinkle a few fresh ones on top of the individual serving.
Frequently Asked Questions
Can I use homemade pudding instead of instant mix?
Absolutely! Using homemade vanilla and chocolate pudding will elevate the flavor and richness of this dessert even further. Just ensure the puddings are fully cooled to room temperature before layering to prevent them from melting the whipped cream or making the biscuits soggy. Follow your favorite scratch pudding recipes, making sure they are a good, thick consistency when cooled.
What kind of tea biscuits should I use?
Any plain, rectangular, relatively firm tea biscuit will work well. Brands like Maria biscuits, Rich Tea biscuits, or similar plain butter cookies are excellent choices. They are designed to soften beautifully when exposed to moisture, creating a cake-like texture after chilling. Avoid overly crumbly or very soft cookies, as they might disintegrate too quickly.
My pudding didn’t set properly, what happened?
Several factors can cause pudding not to set. If using instant pudding mix, ensure you used cold milk and whisked vigorously for the full recommended time. Not enough whisking or using warm milk can prevent it from thickening. For homemade pudding, not cooking it long enough or not using enough cornstarch/flour as a thickener can be issues. Adequate chilling time is also crucial for both types of pudding to fully firm up.
Can I make this dessert in individual cups?
Yes, making this dessert in individual clear cups or ramekins is a fantastic idea for portion control and elegant presentation! Simply layer the ingredients in the same order into individual serving dishes. This works especially well for parties or gatherings, as guests can easily grab their own dessert. Adjust the amount of each layer to fit your chosen cups.