Instructions
- Line an 8×8-inch baking dish with parchment paper, leaving an overhang on the sides to easily lift the fudge out later. This step is crucial for easy removal and clean-up.
- In a large microwave-safe bowl, combine the sweetened condensed milk and the creamy peanut butter. Make sure to scrape all the peanut butter out of the measuring cup for accurate proportions.
- Heat the mixture in the microwave on high for 1 minute.
- Remove the bowl from the microwave and stir the mixture vigorously with a spatula until it’s well combined and smooth. The mixture might be quite thick, so put some muscle into it.
- If the mixture is not completely smooth and uniform, return it to the microwave for another 30 seconds. Stir again until everything is fully incorporated and the fudge has a glossy, consistent texture. Avoid over-heating; you just want it warm enough to combine.
- Pour the hot peanut butter fudge mixture into the prepared 8×8-inch baking dish.
- Using the back of your spatula or a spoon, spread the fudge evenly into the pan, making sure to reach all the corners and create a flat, smooth top.
- Place the baking dish in the refrigerator and chill for at least 2-3 hours, or until the fudge is completely firm and set. For best results, chilling overnight is ideal.
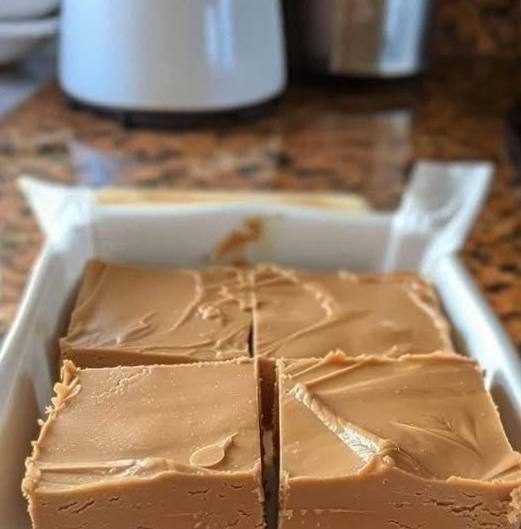
- Once the fudge is firm, use the parchment paper overhangs to carefully lift the entire slab of fudge out of the pan and onto a cutting board.
- Using a sharp, warm knife (you can warm it by running it under hot water and wiping it dry), cut the fudge into 1-inch squares. Clean the knife between cuts for the cleanest edges.
- Serve immediately or store for later enjoyment.
Cooking Tips and Variations
Achieving the perfect consistency for this 2-ingredient peanut butter fudge is incredibly simple, but a few tips can make all the difference. When melting the ingredients, it’s best to use a microwave-safe bowl and heat in short intervals, stirring thoroughly after each. This prevents scorching and ensures that the sweetened condensed milk and peanut butter combine into a beautifully smooth, uniform mixture. Don’t rush the stirring process; thorough mixing is key to a consistent fudge texture. If your mixture seems too thick to stir easily after the initial heating, a few more seconds in the microwave (15-30 seconds at a time) can help loosen it up, but be careful not to overheat, as this can make the fudge oily or grainy. The goal is just warm enough to combine evenly. Lining your baking dish with parchment paper is absolutely essential for easy removal; without it, you might struggle to get the fudge out cleanly. Ensure the paper overhangs the sides of the pan so you can use it as handles. After spreading the fudge into the prepared pan, use a spatula to get a nice, even surface. This not only looks better but also ensures consistent chilling and texture throughout the fudge. Finally, patience is a virtue when it comes to chilling. Resist the urge to cut into the fudge before it’s fully set. A minimum of 2-3 hours in the refrigerator is necessary, but overnight chilling often yields the firmest, most perfect squares.
While this recipe is fantastic in its simplicity, it also serves as an excellent canvas for creative variations. To add a delightful crunch and extra peanut flavor, you can swirl in ½ cup of chopped roasted peanuts or peanut butter chips during the final stir before pouring into the pan. For the chocolate lovers, a ½ cup of semi-sweet chocolate chips or milk chocolate chips can be folded in, creating a classic peanut butter and chocolate combination. You could also melt about ⅓ cup of chocolate chips separately with a teaspoon of coconut oil and drizzle it over the top of the chilled fudge before cutting for a beautiful marbled effect. Another popular variation is to sprinkle a pinch of flaky sea salt over the top of the fudge just after pouring it into the pan; this enhances the sweetness and adds a gourmet touch. If you enjoy a bit of texture, consider using a good quality chunky peanut butter instead of creamy. Just be aware that chunky peanut butter will result in a less smooth, more rustic fudge. For a different flavor profile, you could experiment with almond butter or cashew butter, though the texture might vary slightly due to differences in fat content and consistency. Don’t be afraid to get creative with sprinkles for a festive look, especially around holidays! Just sprinkle them on top before chilling. A teaspoon of vanilla extract can also be stirred in with the peanut butter and condensed milk for an added layer of flavor, although it technically makes it a 3-ingredient fudge.
Storage and Reheating
Storing your delicious 2-ingredient peanut butter fudge properly is key to maintaining its fresh taste and delightful texture. Because it contains sweetened condensed milk and relies on chilling to set, this fudge should always be stored in the refrigerator. After cutting the fudge into squares, place them in an airtight container. You can layer the fudge squares, separating each layer with a piece of parchment paper or wax paper to prevent them from sticking together. Stored this way in the refrigerator, the peanut butter fudge will remain fresh and enjoyable for up to 2 weeks. While it lasts a long time, its irresistible nature means it rarely stays around that long!
This type of fudge is primarily a cold or room-temperature dessert, so reheating is generally not recommended or necessary. The beauty of this no-bake fudge is its firm, yet melt-in-your-mouth texture when chilled. If you were to reheat it, it would revert to its liquid state, and while it would still taste good, it wouldn’t have the desired fudgy consistency. If you find the fudge too firm straight from the refrigerator, simply let it sit at room temperature for 10-15 minutes before serving. This will allow it to soften slightly, enhancing its creamy texture without compromising its structure. For best enjoyment, serve it chilled or at cool room temperature.
Yes, this peanut butter fudge freezes beautifully, making it an excellent candidate for meal prepping desserts or making a large batch for future cravings. To freeze, arrange the cut fudge squares in a single layer on a baking sheet lined with parchment paper. Place the baking sheet in the freezer for about 1-2 hours, or until the fudge is solid. This flash-freezing prevents the squares from sticking together. Once solid, transfer the frozen fudge squares to a freezer-safe airtight container or a heavy-duty freezer bag. You can stack them, separating layers with parchment paper if desired. Frozen peanut butter fudge can be stored for up to 3 months. When you’re ready to enjoy it, simply remove the desired number of squares from the freezer and let them thaw in the refrigerator for a few hours or at room temperature for about 30-60 minutes until they reach your preferred consistency. They will taste just as fresh and delicious as when they were first made!
Frequently Asked Questions
Can I use natural peanut butter for this recipe?
While you can try, it’s generally not recommended for this specific 2-ingredient fudge. Natural peanut butter (especially the kind that separates) has a different oil-to-solids ratio and can result in a greasier, less firm fudge that might not set properly or could become crumbly. Creamy, processed peanut butter (like Jif or Skippy) works best because its emulsifiers and stabilizers ensure a consistent, smooth, and firm texture.
Why did my fudge turn out too soft or too hard?
If your fudge is too soft, it might not have been chilled long enough, or the ratio of ingredients might be slightly off (too much condensed milk or not enough peanut butter). Ensure you’re using the exact measurements and chill for at least 2-3 hours, preferably longer. If it’s too hard or crumbly, it could be due to overheating the mixture in the microwave, which can cause the sugars to crystallize or the peanut butter oils to separate. It might also happen if you used a very dry or low-fat peanut butter. Stick to creamy, full-fat varieties and heat just until combined and smooth.
Do I need to add salt?
Most commercial creamy peanut butters already contain salt, which perfectly balances the sweetness of the condensed milk. Therefore, additional salt is typically not needed. However, if you are using an unsalted peanut butter or prefer a more pronounced sweet-and-salty flavor, you can stir in ¼ to ½ teaspoon of fine sea salt along with the peanut butter and condensed milk before heating, or sprinkle a pinch of flaky sea salt on top before chilling for a gourmet touch.