This looks like a delicious and incredibly easy dessert! Here’s an outline and key facts for your recipe article:
Easy Dessert Without Gelatin With Just 3 Simple Ingredients
Introduction
Craving something sweet, creamy, and utterly delightful but short on time and ingredients? Look no further! This incredible no-bake dessert is about to become your new go-to for satisfying those sudden sugar cravings. Imagine a velvety, mousse-like texture that practically melts in your mouth, all whipped up in minutes with just three humble ingredients. Yes, you read that right – three! And the best part? Absolutely no gelatin required, making it accessible to everyone and foolproof for even the most novice of dessert makers.
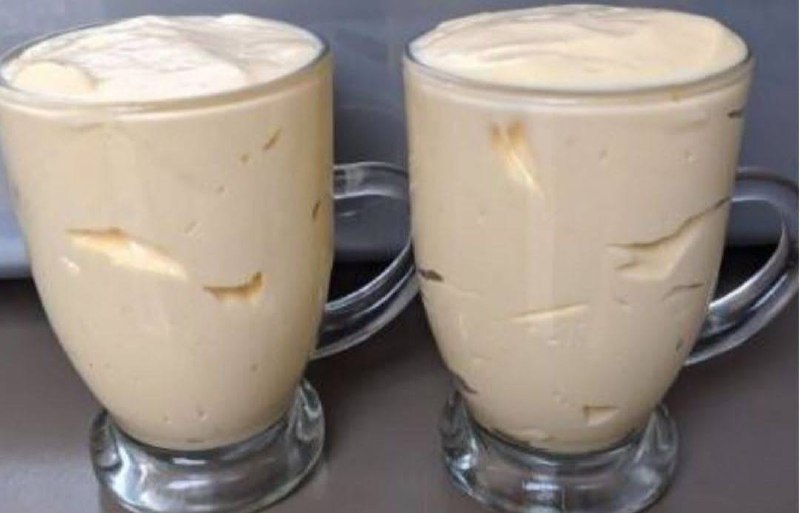
This isn’t just any simple sweet treat; it’s a revelation in effortless indulgence. The beauty lies in its simplicity, transforming everyday pantry staples into a sophisticated, rich dessert that looks far more complicated than it is. Its smooth, almost ethereal texture and subtly sweet flavor make it a perfect finale to any meal, whether you’re treating yourself on a quiet weeknight or need a quick yet elegant dessert for an impromptu gathering. Served beautifully in individual glasses, its visual appeal is just as captivating as its taste, promising a luxurious experience with every spoonful.
Prepare to be amazed by how easily you can create something so decadent. This recipe is a testament to the fact that you don’t need a pantry full of exotic items or hours in the kitchen to achieve dessert perfection. It’s quick, it’s creamy, it’s no-bake, and it’s destined to become a beloved staple in your recipe repertoire. Get ready to impress yourself and anyone lucky enough to share in this effortlessly delicious creation!
Nutritional Information
Per serving (approximate values, based on 6 servings):
- Calories: 390 kcal
- Protein: 5g
- Carbohydrates: 40g
- Fat: 25g
- Fiber: 0g
- Sodium: 90mg
Ingredients
- 1 (14-ounce) can Sweetened Condensed Milk: This provides both sweetness and a crucial thickening agent without needing to cook. Its rich, syrupy consistency is key to the dessert’s body.
- 2 cups (480ml) Cold Heavy Cream (or Whipping Cream): The star for creating that light, airy, and creamy mousse-like texture. When whipped, it incorporates air, giving the dessert its fluffy consistency.
- 1/2 cup (120ml) Fresh Lemon Juice (or Lime Juice): The magic ingredient! The acidity reacts with the proteins in the sweetened condensed milk, causing it to thicken and set without any heat or gelatin. It also adds a wonderful bright, tangy counterpoint to the sweetness.
Instructions
- Chill Your Equipment: For best results when whipping cream, place a large mixing bowl and your whisk attachments (from a hand mixer or stand mixer) in the freezer for at least 10-15 minutes before you begin. This helps the cream whip up faster and achieve maximum volume.
- Combine Condensed Milk and Citrus: In your chilled large mixing bowl, pour in the entire can of sweetened condensed milk. Add the fresh lemon juice (or lime juice) to the condensed milk. Stir gently with a whisk or spatula for about 30 seconds. You’ll notice the mixture will start to thicken almost immediately as the acid reacts with the milk. Don’t worry if it looks a little clumpy at this stage; it will smooth out.
- Whip the Cream: In a separate, very cold bowl (or if you only have one large bowl, carefully scrape the condensed milk mixture into another bowl and clean your main bowl), pour in the cold heavy cream. Using an electric hand mixer or a stand mixer with the whisk attachment, beat the heavy cream on medium-high speed until stiff peaks form. This means when you lift the whisk, the cream holds its shape firmly. Be careful not to over-whip, or it can become grainy.
- Gently Fold Them Together: Add about one-third of the whipped cream to the thickened condensed milk and citrus mixture. Gently fold it in using a spatula. This step is called “lightening” the base and helps to make the final mixture smoother and easier to combine.
- Incorporate Remaining Cream: Add the rest of the whipped cream to the bowl with the condensed milk mixture. Gently fold everything together until no streaks of white cream remain and the mixture is uniformly combined and airy. Be careful not to deflate the whipped cream; the goal is to keep as much air in as possible for that light, mousse-like texture.
- Portion and Chill: Spoon or pipe the creamy dessert into individual serving glasses, ramekins, or a larger serving dish. Smooth the tops if desired. Cover the desserts loosely with plastic wrap and refrigerate for at least 4 hours, or preferably overnight, to allow them to fully set and chill thoroughly. The longer it chills, the firmer and more delicious it will become.
- Serve and Enjoy: Once fully chilled and set, your easy 3-ingredient dessert is ready to be enjoyed! Garnish as desired before serving.
Cooking Tips and Variations
Achieving that perfect, creamy, mousse-like texture is surprisingly simple with this recipe, but a few pro tips can elevate your dessert from good to absolutely divine. Firstly, the temperature of your heavy cream is paramount. Always ensure your heavy cream is very cold, straight from the refrigerator, and consider chilling your mixing bowl and whisk attachments for 10-15 minutes beforehand. This helps the cream whip up faster and achieve maximum volume and stability, which is crucial for the light and airy consistency of this dessert. When folding the whipped cream into the condensed milk mixture, be gentle. The goal is to incorporate the ingredients without deflating all the lovely air you’ve just whipped into the cream. Use a spatula and a light hand, folding from the bottom up until just combined, stopping as soon as no streaks remain.
While delicious on its own, this dessert is a fantastic canvas for various flavor explorations. For a more intense citrus kick, you can increase the lemon or lime juice slightly, or add a teaspoon of citrus zest to the condensed milk mixture. If you want to venture beyond citrus, consider a fruit puree as your third ingredient. Mango puree, passion fruit puree, or even a smooth banana puree can create a wonderfully tropical or subtly sweet dessert. Just ensure the puree is thick and concentrated to maintain the dessert’s structure. For example, use about 1/2 to 3/4 cup of a thick, unsweetened fruit puree. You can also add extracts: a teaspoon of vanilla extract, almond extract, or peppermint extract can completely transform the flavor profile. For a chocolate version, you could gently fold in a few tablespoons of unsweetened cocoa powder along with the condensed milk, or even swirl in some melted and cooled chocolate. A pinch of ground cinnamon or cardamom can also add a warm, exotic touch.
Presentation is key for this elegant dessert. While it tastes fantastic straight from the bowl, serving it in clear, individual glasses or ramekins really highlights its beautiful, rich texture. Garnish generously! Fresh berries like raspberries, blueberries, or sliced strawberries add a burst of color and freshness. A sprinkle of chocolate shavings, a dusting of cocoa powder, or a dollop of extra whipped cream can make it feel extra special. For a textural contrast, consider adding a sprinkle of crushed nuts, granola, or even a crumbled cookie on top just before serving. If you’re feeling fancy, a sprig of fresh mint can add a gourmet touch. Remember, this dessert is perfect for making ahead, which means less stress when entertaining!
Storage and Reheating
This delightful dessert is a fantastic make-ahead option, as it requires chilling to fully set and develop its creamy texture. Once prepared and spooned into individual serving dishes or a larger container, ensure it is covered loosely with plastic wrap. This prevents a skin from forming on the surface and protects it from absorbing any odors from the refrigerator. The dessert will keep well in the refrigerator for up to 3-4 days. After a few days, the texture might soften slightly, but it will still be perfectly enjoyable. It’s best consumed within this timeframe to ensure optimal freshness and consistency.
Because this is a no-bake, chilled dessert with a whipped cream base, it is not suitable for reheating. Reheating would cause the whipped cream to melt and separate, ruining the delicate, mousse-like texture. This dessert is designed to be served cold, straight from the refrigerator. Freezing is also not recommended for the finished dessert. While the ingredients themselves can be frozen separately (like plain heavy cream), the combined, set dessert will likely develop an icy, grainy texture upon thawing, losing its signature smoothness and creaminess. Therefore, always store it in the refrigerator and serve it chilled for the best experience.
Frequently Asked Questions
Can I make this dessert dairy-free?
Yes, you can! To make this dessert dairy-free, you would need to find dairy-free alternatives for both the sweetened condensed milk and the heavy cream. Look for sweetened condensed coconut milk or oat milk condensed milk, and use a full-fat canned coconut cream (chilled, with the thick cream scooped off the top) or a plant-based whipping cream alternative. The method would remain the same, but the flavor profile might have a slight coconut or oat undertone, which can be delicious!
What if my dessert doesn’t set properly?
If your dessert seems too thin after the recommended chilling time, there are a few potential reasons. First, ensure your heavy cream was whipped to stiff peaks; under-whipped cream won’t provide enough structure. Second, make sure you used fresh lemon or lime juice, as the acidity is crucial for the reaction with the condensed milk. If it’s slightly soft, an extended chilling time (even overnight) can often help. If it’s very runny, it might be due to not enough acidity or the cream not being properly whipped. Unfortunately, once mixed and chilled, it’s difficult to “fix” a runny batch, but you can still enjoy it as a sauce or a pourable pudding!
Can I prepare this dessert ahead of time for a party?
Absolutely! This dessert is an ideal make-ahead option, perfect for entertaining. In fact, making it ahead allows it sufficient time to chill and set properly, resulting in the best possible texture and flavor. You can prepare it up to 2-3 days in advance and store it covered in the refrigerator. This frees up your time on the day of your event, allowing you to focus on other preparations or simply enjoy your guests. Just add your garnishes right before serving for the freshest presentation.
What’s the best way to ensure my heavy cream whips up well?
The key to perfectly whipped heavy cream is coldness! Start with heavy cream that’s very cold, straight from the refrigerator. For an extra boost, place your mixing bowl (preferably metal or glass) and your whisk attachment (from a hand mixer or stand mixer) in the freezer for 10-15 minutes before you begin. The colder environment helps the fat molecules in the cream stabilize and create those beautiful, stiff peaks quickly. Also, avoid over-whipping; once stiff peaks form, stop, as over-whipping can turn the cream grainy and eventually into butter.