Introduction
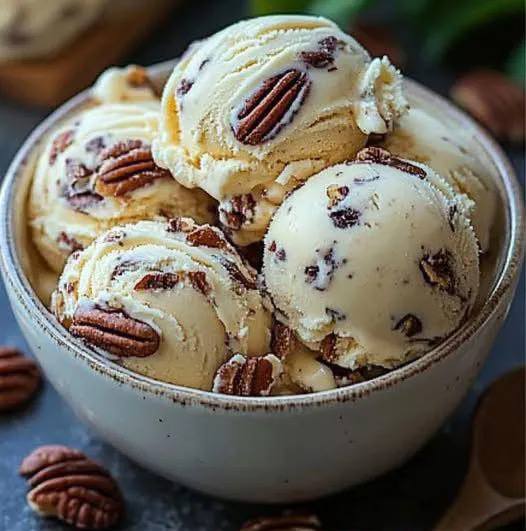
There’s something undeniably magical about a scoop of butter pecan ice cream. It conjures images of sun-drenched afternoons, family gatherings, and that comforting taste of pure indulgence. This classic flavor, with its rich, creamy base and delightfully crunchy, buttery pecans, holds a special place in the hearts of dessert lovers everywhere. While store-bought versions can certainly hit the spot, there’s an unparalleled joy and superior flavor that comes from crafting this beloved treat right in your own kitchen. Forget the artificial flavors and stabilizers; homemade butter pecan ice cream offers a freshness and depth that simply can’t be replicated, giving you complete control over every delicious ingredient.
This recipe isn’t just about making ice cream; it’s about creating an experience. We’ll guide you through the process of building a luxuriously smooth, custard-style base – the foundation of any truly great ice cream. Then, we’ll dive into the secret weapon: perfectly toasted pecans, bathed in butter, which add that signature nutty crunch and irresistible aroma. A hint of vanilla, perhaps a whisper of caramel notes from the browned butter, ties it all together into a symphony of flavors and textures that will have you reaching for a second (or third!) scoop. Get ready to transform simple ingredients into a dessert that tastes like a dream.
Making ice cream from scratch might seem daunting, but with this step-by-step guide, you’ll discover it’s a rewarding and surprisingly straightforward process. We’ll cover everything from selecting the finest ingredients to mastering the art of the ice cream maker, ensuring your homemade butter pecan ice cream is not just good, but absolutely spectacular. Prepare yourself for an adventure in flavor, where freshness reigns supreme and every spoonful is a testament to the love and care you put into creating this ultimate sweet treat. Let’s churn up some delicious memories!
Nutritional Information
Per serving (approximate values):
- Calories: 350-400
- Protein: 5-7g
- Carbohydrates: 30-35g
- Fat: 25-30g
- Fiber: 1-2g
- Sodium: 80-100mg
Ingredients
- 2 cups (480ml) heavy cream
- 1 cup (240ml) whole milk
- 3/4 cup (150g) granulated sugar, divided
- 1/4 teaspoon salt
- 5 large egg yolks
- 1 teaspoon pure vanilla extract
- 1 1/2 cups (170g) pecan halves, roughly chopped
- 4 tablespoons (56g) unsalted butter
- 1 tablespoon light brown sugar (optional, for pecans)
Instructions
- Prepare the Pecans: In a medium skillet, melt the 4 tablespoons of unsalted butter over medium heat. Add the roughly chopped pecans and cook, stirring frequently, for 5-7 minutes, or until the pecans are fragrant and lightly toasted. Be careful not to burn them. If using, sprinkle in the 1 tablespoon of light brown sugar and a tiny pinch of salt during the last minute of cooking, stirring until the sugar dissolves and coats the pecans. Remove from heat and spread the pecans in a single layer on a parchment-lined baking sheet or plate to cool completely. This step is crucial for preventing soggy pecans in your ice cream and enhancing their nutty flavor. Once cool, they will be delightfully crunchy.
- Start the Custard Base: In a medium saucepan, combine the heavy cream, whole milk, 1/2 cup (100g) of the granulated sugar, and 1/4 teaspoon of salt. Heat over medium heat, stirring occasionally, until the mixture is hot and steaming, but not boiling. You’ll see small bubbles forming around the edges. Remove from heat.
- Temper the Egg Yolks: In a separate medium bowl, whisk together the 5 large egg yolks with the remaining 1/4 cup (50g) of granulated sugar until light in color and slightly thickened. This process is called “tempering” and it prevents the eggs from scrambling when added to the hot cream.
- Combine and Cook the Custard: Slowly drizzle about 1/2 cup of the hot cream mixture into the egg yolk mixture, whisking constantly. This gradually brings the temperature of the egg yolks up. Once combined, pour the tempered egg yolk mixture back into the saucepan with the remaining hot cream mixture.
- Thicken the Custard: Return the saucepan to medium-low heat. Cook, stirring constantly with a heatproof spatula or wooden spoon, until the custard thickens enough to coat the back of the spoon (meaning when you run your finger across the spoon, it leaves a clear path). This typically takes 8-12 minutes. Do not let it boil, as this can curdle the eggs. If you have a thermometer, aim for a temperature between 170-175°F (77-79°C).
- Add Vanilla and Chill: Remove the custard from the heat and stir in the 1 teaspoon of pure vanilla extract. Pour the custard through a fine-mesh sieve into a clean bowl. This removes any small bits of cooked egg and ensures a silky-smooth base. Cover the bowl with plastic wrap, pressing it directly onto the surface of the custard to prevent a skin from forming. Chill the custard thoroughly in the refrigerator for at least 4 hours, or preferably overnight, until it is very cold. This chilling step is absolutely vital for achieving the best texture in your ice cream.
- Churn the Ice Cream: Once the custard base is completely chilled, pour it into your ice cream maker’s freezer bowl and churn according to the manufacturer’s instructions. This typically takes 20-30 minutes. The ice cream will be soft-serve consistency when it’s done churning.
- Incorporate Pecans and Freeze: During the last 5 minutes of churning, or immediately after churning, add the cooled, toasted butter pecans to the ice cream maker. Let it churn for another minute or two to distribute them evenly, or gently fold them in by hand.
- Final Freezing (Ripening): Transfer the soft ice cream to a freezer-safe container. Press a piece of parchment paper or plastic wrap directly onto the surface of the ice cream to prevent ice crystals from forming. Cover the container tightly and freeze for at least 2-4 hours, or until firm enough to scoop. This final freezing period is often called “ripening” and allows the ice cream to develop its full flavor and ideal texture.
- Serve and Enjoy: When ready to serve, let the ice cream sit at room temperature for a few minutes to soften slightly, making it easier to scoop. Enjoy your homemade butter pecan ice cream!
Cooking Tips and Variations
The Importance of Chilling: We cannot stress this enough – a thoroughly chilled ice cream base is the secret to a smooth, creamy texture. If your base isn’t cold enough before churning, the ice cream maker won’t be able to freeze it efficiently, leading to a grainy or icy result. Plan ahead and allow at least 4 hours, but ideally overnight, for chilling.
Toasting the Pecans Right: Don’t skip the step of toasting the pecans in butter. This process deepens their flavor, adds a lovely nutty aroma, and gives them a satisfying crunch that holds up beautifully in the ice cream. A tiny pinch of salt or brown sugar during toasting can elevate their taste even further. Ensure they are completely cool before adding them to the ice cream to prevent melting the base.
Tempering Eggs for Silky Custard: When making a custard base, tempering the egg yolks is crucial. Slowly adding a small amount of hot liquid to the yolks while whisking vigorously brings their temperature up gradually, preventing them from scrambling. If you accidentally scramble them, don’t despair! You can strain the custard through a fine-mesh sieve, though the texture might not be quite as smooth.
Don’t Overcook the Custard: While you want the custard to thicken, boiling it can cause the eggs to curdle. Cook it gently over medium-low heat, stirring constantly, until it coats the back of a spoon. If you have a thermometer, aim for 170-175°F (77-79°C). The custard will continue to thicken slightly as it cools.
Quality Ingredients Matter: Since this recipe uses a few core ingredients, the quality of each makes a big difference. Use fresh, high-quality heavy cream and whole milk, good-quality eggs, and pure vanilla extract (or even vanilla bean paste for visible specks and intensified flavor). Fresh pecans will also have a better, sweeter flavor.
Ice Cream Maker Best Practices: Always ensure your ice cream maker’s freezer bowl is completely frozen before you start. Most manufacturers recommend freezing it for at least 12-24 hours. Don’t overfill the machine, as the mixture will expand as it churns and incorporates air. If your machine is struggling, you might have too much liquid.
Achieving “Ripeness”: After churning, your ice cream will have a soft-serve consistency. While delicious, it needs a few hours in the freezer (this is called “ripening”) to firm up to a scoopable texture. This also allows the flavors to meld and deepen. Pressing plastic wrap directly onto the surface of the ice cream in the storage container helps prevent ice crystals from forming.
Flavor Variations:
- Bourbon Butter Pecan: Add 1-2 tablespoons of good quality bourbon to the custard base after it’s cooked and cooled slightly, before chilling. The alcohol adds a wonderful depth of flavor.
- Brown Butter Pecan: Instead of just melting the butter for the pecans, brown it slightly first. Cook the butter over medium heat until it turns a nutty brown color and smells fragrant. Then add the pecans. This adds an extra layer of caramelized, toasted flavor.
- Caramel Swirl: Swirl in some homemade or high-quality store-bought caramel sauce during the last few minutes of churning, or when transferring to the freezer container. This adds a delightful ribbon of caramel throughout.
- Spiced Pecans: Add a pinch of cinnamon or nutmeg along with the brown sugar when toasting the pecans for a subtle warmth.
- Maple Pecan: Substitute a portion of the granulated sugar with maple syrup (up to 1/4 cup) in the custard base, and toast the pecans in maple butter for an even more pronounced maple flavor.
Storage and Reheating
Storage: Homemade ice cream is best enjoyed within 1-2 weeks for optimal freshness and texture. Store it in a very airtight, freezer-safe container. Plastic wrap pressed directly onto the surface of the ice cream before sealing the container can help prevent ice crystals from forming and reduce freezer burn. Keep it in the coldest part of your freezer, away from the door, where temperatures fluctuate less.
Reheating (Softening): You don’t “reheat” ice cream in the traditional sense, but you do need to soften it to make it scoopable. If your ice cream is rock solid from being in the freezer for a while, simply remove it from the freezer and let it sit on the counter at room temperature for 5-15 minutes before serving. The exact time will depend on how cold your freezer is and the temperature of your kitchen. For a quick soften, you can also microwave a scoop for 10-15 seconds, but be careful not to melt it completely.
Frequently Asked Questions
Why is my homemade ice cream icy or grainy?
Icy or grainy ice cream usually stems from a few common issues. The most frequent culprit is not chilling the custard base thoroughly enough before churning. A warm base means the ice cream maker struggles to freeze it quickly, leading to larger ice crystals. Another reason could be an imbalance in ingredients (too much water, not enough fat or sugar), or not churning long enough, which doesn’t incorporate enough air. Make sure your freezer bowl is super cold, your base is fully chilled, and you’re churning until it reaches a soft-serve consistency.
Can I make this recipe without an ice cream maker?
While an ice cream maker is highly recommended for the creamiest results, you can make a “no-churn” version. After the custard base is chilled, fold in 2 cups of stiffly whipped heavy cream. Then, fold in the prepared pecans. Pour the mixture into a freezer-safe container, cover tightly, and freeze for at least 6 hours, stirring vigorously every 30-45 minutes for the first 2-3 hours to break up ice crystals. This method works, but the texture won’t be quite as smooth and airy as a churned ice cream.
How do I prevent my pecans from becoming soggy in the ice cream?
The key to keeping your pecans crunchy is to toast them properly in butter until they are fragrant and slightly browned, and then ensure they are completely cooled before adding them to the ice cream. The toasting process drives out moisture and creates a protective barrier. Also, adding them towards the end of the churning process, or when transferring to the freezer container, minimizes their exposure to the liquid base before it fully freezes.
My custard looks like it’s curdling, what went wrong?
Curdling usually happens if the custard is cooked too quickly over high heat, or if the egg yolks weren’t properly tempered before being added to the hot cream. If you see small bits of cooked egg, immediately remove the saucepan from the heat. You can try straining the custard through a fine-mesh sieve to remove the curds, which will save the flavor, though the texture might not be perfectly smooth. Next time, cook slowly over medium-low heat, stirring constantly, and ensure the tempering process is done carefully.