Introduction
There’s a certain magic to unwrapping a Ferrero Rocher – that delicate crunch, the creamy hazelnut filling, and the satisfying richness of chocolate. It’s a moment of pure, unadulterated indulgence. What if we told you that same luxurious experience, that iconic combination of flavors and textures, could be effortlessly recreated right in your own kitchen? Prepare to elevate your dessert game and delight your senses with these Homemade Ferrero Rocher Hazelnut Truffles. These aren’t just any truffles; they are a homage to a beloved classic, crafted with love and fresh ingredients, promising an even more profound depth of flavor and a truly personalized touch.
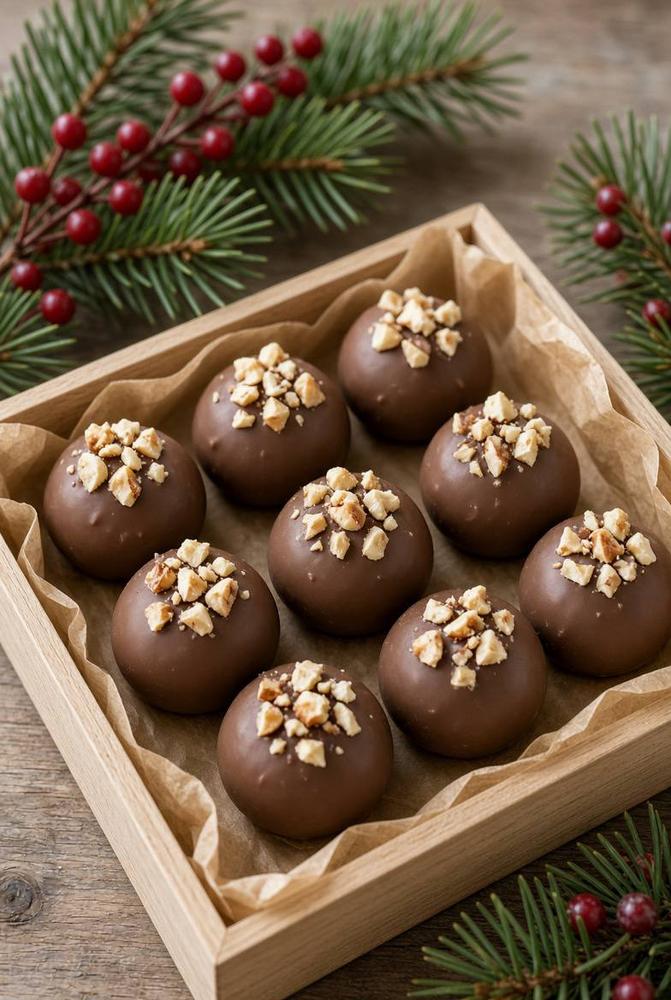
Imagine biting into a perfectly spherical truffle, its smooth, glossy chocolate shell giving way to a rich, velvety chocolate-hazelnut core, studded with delicate crunch, all crowned with toasted hazelnut pieces. These truffles are designed to deliver that exact sensation. They’re an elegant, gourmet treat that looks and tastes like it came from a high-end chocolatier, yet the process is surprisingly straightforward and incredibly rewarding. Perfect for holiday gatherings, special occasions, or simply as a luxurious pick-me-up on a quiet evening, these homemade delights embody sophistication and comfort in every bite.
Beyond their irresistible taste, these Ferrero Rocher-inspired truffles offer the joy of customization and the satisfaction of homemade goodness. You control the quality of your chocolate, the freshness of your hazelnuts, and the balance of sweetness. This recipe transforms simple ingredients into an extraordinary dessert, making it an ideal candidate for thoughtful edible gifts during the festive season. Encased in a charming box lined with parchment and adorned with seasonal greenery, these truffles become more than just a sweet treat – they become a gesture of warmth and affection, a testament to the care you’ve put into creating something truly special.
Nutritional Information
Per serving (approximate values, based on 20 truffles):
- Calories: 250 kcal
- Protein: 4g
- Carbohydrates: 20g
- Fat: 18g
- Fiber: 2g
- Sodium: 30mg
Ingredients
- 1 ½ cups (about 200g) whole hazelnuts, divided
- 1 cup (240ml) heavy cream
- 12 ounces (340g) good quality milk chocolate, finely chopped, divided
- 4 ounces (115g) dark chocolate (60-70% cacao), finely chopped
- ¼ cup (60g) unsalted butter, softened
- 2 tablespoons (30g) powdered sugar, sifted
- 1 teaspoon vanilla extract
- Pinch of sea salt
- 2 tablespoons (30g) hazelnut butter or Nutella (optional, for extra flavor)
- 2 cups (340g) milk chocolate or semi-sweet chocolate chips/wafers (for coating)
- 1 tablespoon coconut oil or shortening (optional, for smoother coating)
- Crispy wafer crumbs (e.g., from ice cream cones or pizzelle), about ½ cup (optional, for inner crunch)
Instructions
- Toast the Hazelnuts: Preheat your oven to 350°F (175°C). Spread 1 cup of the whole hazelnuts in a single layer on a baking sheet. Toast for 10-12 minutes, or until fragrant and their skins begin to crack. Watch carefully to prevent burning. Remove from the oven, let cool slightly, then transfer to a clean kitchen towel. Rub vigorously to remove most of the skins. Discard skins. Roughly chop ½ cup of the toasted hazelnuts for the topping and set aside. The remaining ½ cup of toasted hazelnuts will be used for the truffle base.
- Prepare the Ganache Base: In a medium heatproof bowl, combine the 12 ounces of finely chopped milk chocolate and 4 ounces of finely chopped dark chocolate. In a small saucepan, heat the heavy cream over medium heat until it just begins to simmer around the edges (do not boil). Pour the hot cream over the chopped chocolate. Let it sit for 5 minutes without stirring to allow the chocolate to melt.
- Form the Truffle Mixture: After 5 minutes, gently stir the chocolate and cream mixture from the center outwards until completely smooth and emulsified. This is your ganache. Add the softened unsalted butter, sifted powdered sugar, vanilla extract, and pinch of sea salt to the ganache. Stir until the butter is fully incorporated and the mixture is smooth. If using, stir in the hazelnut butter or Nutella.
- Incorporate Hazelnuts for the Core: Take the remaining ½ cup of toasted, skinned hazelnuts and finely chop them, or pulse them in a food processor until they form a coarse meal (avoid making a paste). Stir these finely chopped hazelnuts into the chocolate ganache mixture. If you want an authentic Ferrero Rocher crunch, gently fold in the optional crispy wafer crumbs at this stage.
- Chill the Mixture: Cover the bowl with plastic wrap and refrigerate for at least 2-3 hours, or until the mixture is firm enough to roll. You can also place it in the freezer for 30-45 minutes for a quicker set, but watch it closely.
- Roll the Truffles: Line a baking sheet with parchment paper. Using a small cookie scoop or two spoons, scoop out portions of the chilled truffle mixture. Roll each portion between your palms to form smooth, uniform spheres, about 1-1.5 inches in diameter. If the mixture becomes too sticky, chill your hands under cold water or lightly dust them with cocoa powder. Place the rolled truffles on the prepared baking sheet. Once all truffles are rolled, return the baking sheet to the refrigerator for another 30 minutes to firm up.
- Prepare the Chocolate Coating: In a separate microwave-safe bowl or a double boiler, melt the 2 cups of milk or semi-sweet chocolate chips/wafers. If using a microwave, heat in 30-second intervals, stirring well after each, until smooth. If using a double boiler, stir constantly until melted. If desired, stir in the coconut oil or shortening for a smoother, thinner coating.
- Coat the Truffles: Take the chilled truffles out of the refrigerator. Using a fork or a specialized dipping tool, dip one truffle at a time into the melted chocolate, ensuring it’s fully coated. Lift the truffle out, gently tap the fork against the side of the bowl to remove excess chocolate, and immediately transfer it back to the parchment-lined baking sheet.
- Add Hazelnut Topping: While the chocolate coating is still wet, sprinkle generously with the reserved roughly chopped hazelnuts. Press gently to help them adhere. Repeat with the remaining truffles, working quickly before the chocolate sets.
- Final Chill: Once all truffles are coated and topped, return the baking sheet to the refrigerator for at least 30 minutes to allow the chocolate coating to fully set.
- Serve and Store: Once firm, the truffles are ready to be enjoyed! Store them in an airtight container in a cool, dry place or in the refrigerator.
Cooking Tips and Variations
Achieving that gourmet touch with your Homemade Ferrero Rocher Hazelnut Truffles is all about attention to detail and a willingness to experiment. Here are some tips to ensure your truffles are nothing short of spectacular, along with delightful variations to keep things exciting.
Tips for Success:
- Quality Ingredients are Key: Just like with any simple recipe, the better your ingredients, the better your end product. Invest in high-quality chocolate (milk and dark) that you enjoy eating on its own. Fresh hazelnuts will provide the most vibrant, nutty flavor.
- Toast Those Hazelnuts: This step is non-negotiable! Toasting hazelnuts intensifies their flavor and makes them easier to skin, leading to a much richer taste in your truffles. Don’t skip it!
- Don’t Overheat Your Cream: When making the ganache, heat the heavy cream until it just simmers. Boiling can scorch the cream and affect the final texture and flavor of your ganache.
- Patience with Chilling: Rushing the chilling process for the truffle mixture will make it difficult to roll. A properly chilled ganache will be firm enough to handle without melting too quickly in your hands. If it gets too soft while rolling, pop it back in the fridge for a few minutes.
- Keep Your Hands Cool: When rolling the truffles, cool hands are your best friend. If your hands get warm and the mixture starts to stick, run them under cold water, dry thoroughly, or even lightly dust them with cocoa powder.
- Temperature Control for Coating: The melted chocolate for coating should be warm enough to be fluid but not hot. If it’s too hot, it can melt your truffle centers. If it’s too cool, it will be too thick and difficult to get a smooth, even coating. Aim for around 90-92°F (32-33°C) for milk chocolate.
- Work Quickly When Coating: Once a truffle is dipped, immediately sprinkle it with chopped hazelnuts. The chocolate sets quickly, especially on a cold truffle, so you need to be swift to ensure the nuts adhere well.
- Use a Dipping Tool: A candy dipping fork or even a regular kitchen fork with the middle tines bent can make the coating process much easier and cleaner. It allows excess chocolate to drip off, preventing a thick, clumpy coating.
- Parchment Paper is Your Friend: Always line your baking sheets with parchment paper to prevent sticking, both when chilling the rolled truffles and after they’ve been coated.
Delicious Variations:
- Dark Chocolate Obsession: For a more intense, less sweet truffle, use a higher percentage of dark chocolate (70-80% cacao) for both the ganache base and the outer coating. You can also omit the milk chocolate entirely for a truly robust flavor.
- White Chocolate Dream: Swap out the milk chocolate for good quality white chocolate in the ganache and coating. Pair with macadamia nuts or pistachios for a different flavor profile.
- Nutty Alternatives: While hazelnut is classic, feel free to experiment with other nuts. Almonds, pistachios, or even pecans can be used in the core and as a topping for unique flavor combinations. Toast them first for best results.
- Boozy Bliss: Add a tablespoon or two of hazelnut liqueur (Frangelico), rum, brandy, or a coffee liqueur to the ganache mixture for an adult-friendly treat. Adjust the amount to your taste.
- Spiced Sensation: Incorporate a pinch of cinnamon, a tiny dash of cayenne pepper (for a subtle kick), or a touch of espresso powder into the ganache to add complexity and warmth.
- Citrus Zest: A little orange or tangerine zest folded into the ganache can brighten the flavors beautifully, especially when paired with dark chocolate.
- Coconut Crunch: For an extra layer of texture and flavor, roll the truffles in toasted shredded coconut instead of or in addition to hazelnuts.
- Double Crunch: To mimic the original Ferrero Rocher even more closely, consider adding finely crushed wafer cookies (like pirouettes or ice cream cones) to the ganache mixture for an additional crispy layer inside.
Storage and Reheating
Proper storage is crucial for maintaining the freshness, texture, and exquisite flavor of your Homemade Ferrero Rocher Hazelnut Truffles. These delicate treats are best enjoyed at their peak, and knowing how to store them correctly ensures every bite is as good as the first.
Storage:
- Room Temperature (Short-Term): If you plan to consume the truffles within 2-3 days and your kitchen is cool (below 70°F or 21°C) and dry, you can store them in an airtight container at room temperature. Place them in a single layer or separate layers with parchment paper to prevent them from sticking together or damaging their delicate coating. Keep them away from direct sunlight or any heat sources, as this can cause the chocolate to melt or bloom (develop a grayish film).
- Refrigerator (Longer-Term): For longer storage, or if your kitchen is warm, the refrigerator is your best bet. Place the truffles in an airtight container, again separating layers with parchment paper. Stored this way, they will remain fresh for up to 2-3 weeks. The cold temperature helps to keep the chocolate firm and prevents the ganache from becoming too soft.
- Freezer (Extended Storage): For extended storage, truffles can be frozen. Arrange the set truffles in a single layer on a baking sheet and freeze until solid (about 1-2 hours). Once frozen, transfer them to a freezer-safe airtight container or a heavy-duty freezer bag. Separate layers with parchment paper to prevent sticking. They can be stored in the freezer for up to 2-3 months. Freezing is an excellent option if you’re making a large batch for future entertaining or gifting.
Reheating (Thawing):
- From Refrigerator: Truffles stored in the refrigerator are best enjoyed at room temperature. Remove them from the fridge about 15-30 minutes before serving. This allows the ganache to soften slightly and the chocolate coating to lose its chill, resulting in a creamier, more melt-in-your-mouth texture and a more pronounced flavor.
- From Freezer: When thawing frozen truffles, transfer them to the refrigerator first and let them thaw overnight. Once thawed in the fridge, take them out and let them come to room temperature for about 15-30 minutes before serving, just like refrigerated truffles. Do not attempt to thaw them quickly at room temperature or in the microwave, as this can cause condensation to form on the chocolate, leading to a dull or spotted appearance, and can also affect the texture.
Important Considerations:
- Airtight is Key: Always use an airtight container regardless of your storage method. This prevents the truffles from absorbing odors from other foods and protects them from moisture and air, which can cause the chocolate to bloom or the hazelnuts to go stale.
- Avoid Temperature Fluctuations: Drastic changes in temperature can cause chocolate to bloom (a white or grayish film on the surface), which is harmless to eat but affects the visual appeal. Try to keep storage temperatures consistent.
- Humidity: Chocolate is sensitive to humidity. Store truffles in a dry environment to prevent the chocolate from becoming sticky or developing a sugary bloom.
Frequently Asked Questions
Can I make these truffles ahead of time for a special occasion?
Absolutely! These homemade Ferrero Rocher truffles are an excellent make-ahead dessert. You can prepare the ganache base and roll the truffles up to a week in advance, storing them covered in the refrigerator. Then, on the day you plan to serve or gift them, simply melt your coating chocolate, dip, decorate, and chill for a final set. For even longer planning, the fully coated truffles can be frozen for up to 2-3 months, making them perfect for holiday gifting or future celebrations.
Why did my chocolate coating seize or become thick and clumpy?
Chocolate seizing is usually caused by even a tiny drop of water or steam coming into contact with the melting chocolate. Ensure all your equipment (bowls, spatulas) are completely dry. Overheating the chocolate can also cause it to seize or become grainy. When melting, use gentle heat (microwave in short bursts or a double boiler) and stir frequently. If it does seize, sometimes you can rescue it by stirring in a tablespoon or two of hot cream or vegetable oil until smooth, but it may affect the final texture and gloss.
My truffles are too soft and difficult to roll. What went wrong?
The most common reason for soft truffles is insufficient chilling time for the ganache base. The mixture needs to be firm enough to hold its shape when rolled. If your kitchen is warm, this can also contribute to softness. Pop the ganache back into the refrigerator (or even the freezer for 15-20 minutes) until it’s firm enough to handle without melting quickly in your hands. You can also try chilling your hands under cold water before rolling to prevent the warmth from your hands from softening the mixture.
Can I use store-bought hazelnut spread instead of hazelnut butter?
Yes, you can definitely use a store-bought hazelnut spread, such as Nutella, for an extra boost of hazelnut flavor in your truffle base. Just be aware that most hazelnut spreads are sweeter than pure hazelnut butter, so you might want to slightly reduce the amount of powdered sugar in the recipe to balance the sweetness according to your preference. If you prefer a less sweet truffle, look for a hazelnut butter that contains only hazelnuts, or make your own by blending toasted hazelnuts until smooth.