Instructions
- Prepare the Strawberries: Thoroughly wash the fresh strawberries. Hull them by removing the green leafy tops and the small white core. Quarter the strawberries to expose more surface area, which helps in the infusion process. If your strawberries are very large, you can cut them into even smaller pieces.
- Combine Strawberries and Alcohol: Place the prepared strawberry pieces into a large, clean, airtight glass jar (a 1-liter or larger Mason jar works well). Pour the vodka, brandy, or grain alcohol over the strawberries, ensuring they are completely submerged. If using a vanilla bean or lemon zest, add it to the jar at this stage.
- Macerate (Infuse): Seal the jar tightly and store it in a cool, dark place, away from direct sunlight. Allow the strawberries to infuse in the alcohol for at least 2 to 4 weeks. For a more intense strawberry flavor, you can let it infuse for up to 6 weeks. Shake the jar gently every few days to redistribute the contents. You’ll notice the alcohol gradually turning a beautiful ruby red color as it extracts the strawberry essence.
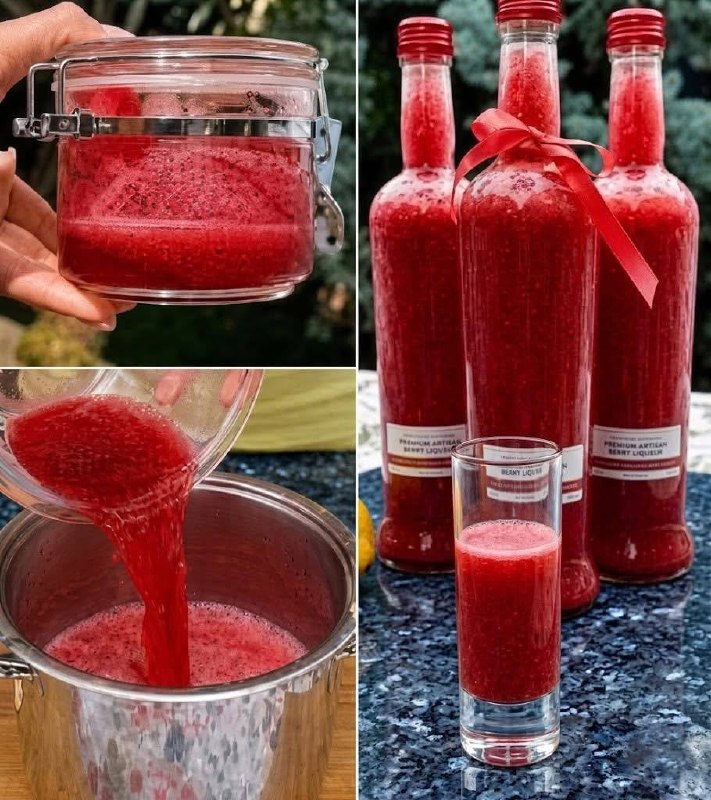
- Strain the Mixture (First Strain): After the desired infusion time, it’s time to separate the solids from the liquid. Line a fine-mesh sieve with several layers of cheesecloth (or use a coffee filter for extra clarity) and place it over a large bowl or pitcher. Carefully pour the entire contents of the jar through the cheesecloth-lined sieve. Allow the liquid to drain naturally; do not press on the strawberries, as this can release bitter flavors and make the liqueur cloudy. Discard the solids.
- Prepare the Simple Syrup: In a small saucepan, combine 1 cup of water and 1 cup of granulated sugar. Heat over medium heat, stirring constantly, until the sugar is completely dissolved and the mixture is clear. Do not boil vigorously. Remove from heat and let the simple syrup cool completely to room temperature.
- Combine Infused Alcohol and Simple Syrup: Once the simple syrup has cooled, slowly add it to the strawberry-infused alcohol. Start with 1 cup of simple syrup and taste the mixture. If you prefer a sweeter liqueur, add more simple syrup incrementally (up to another cup), tasting after each addition until you reach your desired sweetness level.
- Strain Again (Optional, for Clarity): For an exceptionally clear liqueur, you can perform a second straining. Line a clean fine-mesh sieve with a new coffee filter or several fresh layers of cheesecloth. Slowly pour the combined liqueur through, allowing it to drip without forcing it. This step can take some time but will result in a beautifully clear final product.
- Bottle and Age: Using a funnel, carefully transfer the homemade strawberry liqueur into clean, sterilized glass bottles with airtight seals. Store the bottled liqueur in a cool, dark place. While it can be enjoyed immediately, the flavors will deepen and meld beautifully if allowed to age for an additional 1 to 3 months. This aging process is crucial for a smoother, more complex taste.
Cooking Tips and Variations
For the best possible homemade strawberry liqueur, always start with the highest quality ingredients. Choose fresh, ripe, and fragrant strawberries; avoid any that are bruised or moldy. The ripeness of the berries directly impacts the flavor intensity of your final product. When selecting your alcohol, an 80-proof vodka is a neutral choice that allows the strawberry flavor to shine. However, a good quality brandy can add a lovely depth and warmth, while grain alcohol like Everclear will extract flavors more intensely but may require more dilution with simple syrup later.
Adjusting the sweetness is key to personal preference. The recipe suggests 1 to 2 cups of sugar for the simple syrup. Start with 1 cup and then add more gradually until you find your perfect balance. Remember that the liqueur’s sweetness will feel different after it has aged, so err on the side of slightly less sweet initially if you plan to age it for a long period.
Experiment with flavor variations to truly make this recipe your own. Adding a split vanilla bean during the infusion process imparts a warm, aromatic note that complements the strawberries beautifully. Alternatively, the zest of one lemon (be careful to avoid the bitter white pith) can brighten the liqueur with a citrusy lift. For a more herbaceous twist, a sprig of fresh mint or basil can be added during the last week of infusion, but be sure to remove it before bottling to prevent overpowering the strawberry flavor. Always taste test frequently when adding variations to ensure you achieve the desired profile.
To achieve a crystal-clear liqueur, don’t rush the straining process. Allow Gravity to do its work. If after the initial straining and settling you still notice some cloudiness, you can try filtering it again through a clean coffee filter or even a dedicated liqueur filter. Some people even put the strained liqueur in the freezer overnight; any sediment will freeze and can be skimmed off, though this is often unnecessary for home use.
Patience is truly a virtue with homemade liqueurs. While it’s tempting to taste it right away, allowing the liqueur to age for a few weeks or even months will significantly improve its smoothness and depth of flavor. The alcohol harshness will mellow, and the strawberry notes will become more integrated and nuanced. Store your bottles in a cool, dark place during this aging period.
Storage and Reheating
Homemade strawberry liqueur, when properly prepared and bottled, has an excellent shelf life. Store the sealed bottles in a cool, dark place, such as a pantry or cellar, away from direct sunlight. The liqueur will maintain its best quality for at least 1 to 2 years, and often much longer, especially if made with higher proof alcohol. The flavors will continue to mellow and develop over time, so don’t be afraid to let it age.
Once opened, bottles of strawberry liqueur can be stored in the refrigerator to prolong freshness, especially if your home environment is warm. While refrigeration isn’t strictly necessary for stability, it can help preserve the vibrant color and fresh fruit notes for longer after opening. Always ensure the bottles are tightly sealed to prevent evaporation and oxidation, which can diminish the flavor.
Reheating is not applicable for this product, as strawberry liqueur is typically served chilled or at room temperature. It is not designed to be heated, as heating can cause the delicate fruit flavors to dissipate and the alcohol to evaporate. If you desire a warmer drink, it’s best to use the liqueur as an ingredient in a hot cocktail rather than heating the liqueur directly.
Frequently Asked Questions
What kind of alcohol is best for making strawberry liqueur?
A neutral-tasting spirit like 80-proof vodka is generally recommended as it allows the strawberry flavor to shine through without competition. However, brandy can add a lovely warmth and complexity, while high-proof grain alcohol (like Everclear) will extract flavors more intensely but may require more dilution with simple syrup for a balanced taste. Choose a spirit that is unflavored and of decent quality.
How long does homemade strawberry liqueur last?
When stored in clean, sterilized, airtight bottles in a cool, dark place, homemade strawberry liqueur can last for 1 to 2 years, and often much longer. The high alcohol and sugar content act as natural preservatives. The flavors will continue to develop and mellow over time, making it even better with age. Once opened, storing it in the refrigerator can help maintain its freshness, though it’s not strictly necessary for safety.
Can I use frozen strawberries instead of fresh?
While fresh, ripe strawberries will always yield the best flavor and color, you can use frozen strawberries in a pinch. If using frozen, there’s no need to thaw them first; simply add them directly to the jar with the alcohol. Be aware that frozen strawberries may release more water, which could slightly dilute the final product, and the flavor might not be quite as vibrant as with fresh berries. Ensure they are unsweetened frozen strawberries.
Why is my homemade liqueur cloudy?
Cloudiness in homemade liqueur can be caused by several factors. It often happens if you press the fruit solids too hard when straining, releasing fine particles and pectin into the liquid. Using very ripe or overripe fruit can also contribute. To achieve a clearer liqueur, avoid pressing the fruit, strain through multiple layers of cheesecloth or a coffee filter, and consider a second, slower straining if necessary. Allowing the liqueur to settle for a few weeks after bottling can also help, as any remaining sediment will often fall to the bottom.