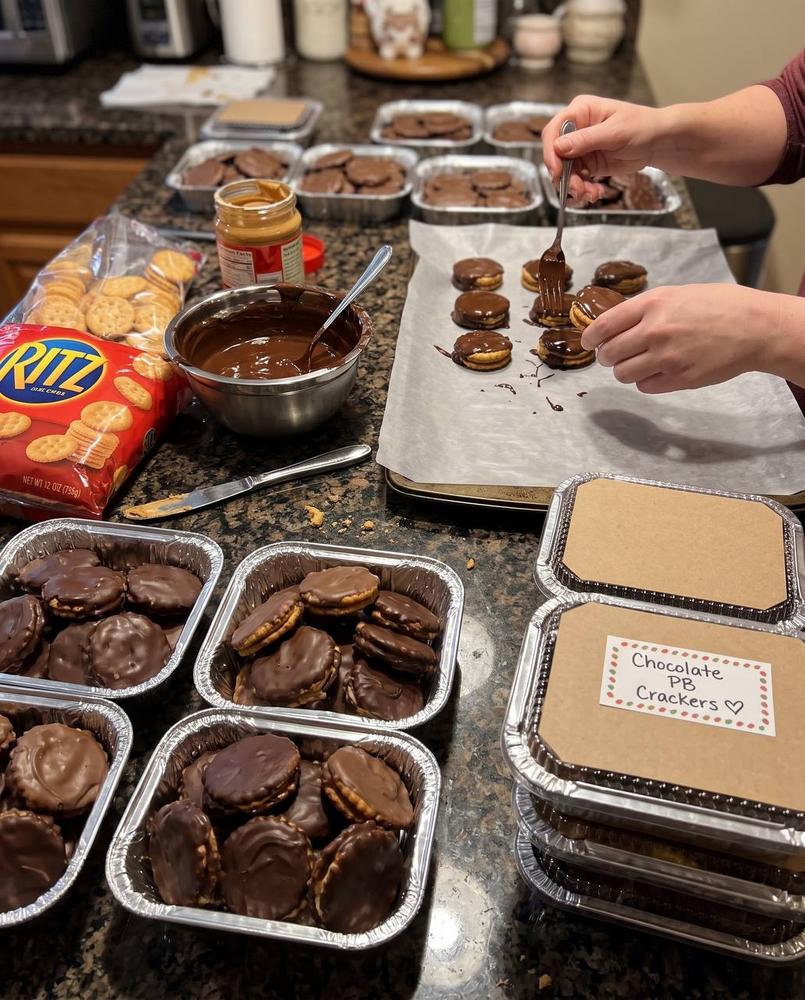
Introduction
There’s an undeniable magic that happens in the kitchen when simple ingredients transform into something truly extraordinary. It’s the kind of magic that often comes with a dusting of flour, the sweet aroma of melting chocolate, and the happy chatter of loved ones. Today, we’re diving into a recipe that embodies all of that and more: Irresistible Homemade Chocolate-Covered Peanut Butter Crackers. This isn’t just another sweet treat; it’s a timeless family tradition waiting to be made, a delightful fusion of salty and sweet that captivates taste buds of all ages, and an absolute joy to create.
These chocolate-covered candies are the epitome of simple indulgence. Imagine the crisp, buttery crunch of a RITZ cracker, generously slathered with creamy peanut butter, then enveloped in a luscious, smooth blanket of rich melted chocolate. The contrast of textures and flavors – the savory, slightly salty cracker, the nutty, sweet peanut butter, and the decadent chocolate – creates an addictive symphony that’s hard to resist. They’re incredibly easy to make, require no baking, and yield a substantial batch, making them perfect for holiday platters, thoughtful homemade gifts, or simply a delightful snack to share (or not share, we won’t tell!).
What makes this recipe truly special isn’t just its incredible taste; it’s the ease and joy of the process itself. It’s a fantastic activity to involve the whole family, from spreading the peanut butter to dipping the crackers into the glistening chocolate. The sight of these charming little confections, neatly packed into gift containers, evokes a sense of warmth and generosity. Whether you’re a seasoned baker or a kitchen novice, this recipe guarantees sweet success and promises to become a cherished part of your culinary repertoire, bringing smiles and satisfied sighs with every bite.
Nutritional Information
Per serving (approximate values, based on 1 sandwich cracker):
- Calories: 120-150
- Protein: 3-4g
- Carbohydrates: 10-15g
- Fat: 8-10g
- Fiber: 1-2g
- Sodium: 70-100mg
Ingredients
- 1 box (13.7 oz) RITZ Crackers (approximately 70-80 crackers)
- 1 jar (16 oz) creamy peanut butter (such as Jif or Skippy)
- 24 oz (approximately 4 cups) good quality melting chocolate (milk, semi-sweet, or dark chocolate chips/wafers)
- Optional: 1-2 tablespoons coconut oil or vegetable shortening (for thinning chocolate, if needed)
- Optional toppings: Sea salt flakes, sprinkles, chopped nuts, white chocolate for drizzling
Instructions
- Prepare Your Workstation: Line several baking sheets with parchment paper or wax paper. This will prevent the chocolate-covered candies from sticking and make cleanup much easier. Set these aside.
- Assemble the Peanut Butter Crackers: Take one RITZ cracker and spread a generous teaspoon (or to your preference) of creamy peanut butter onto its surface. Place another RITZ cracker on top, gently pressing down to create a neat sandwich. Repeat this process with the remaining crackers and peanut butter until all the crackers are sandwiched. You should have approximately 35-40 peanut butter cracker sandwiches.
- Chill the Crackers (Optional but Recommended): For easier dipping and to help the peanut butter set, place the assembled cracker sandwiches on one of the prepared baking sheets and refrigerate for about 15-20 minutes. This step helps prevent the peanut butter from oozing out during the dipping process.
- Melt the Chocolate: While the crackers are chilling, prepare your chocolate. You have two main methods:
- Microwave Method: Place the chocolate chips or wafers in a microwave-safe bowl. Microwave on high for 30 seconds, then stir. Continue microwaving in 15-20 second intervals, stirring well after each, until the chocolate is smooth and fully melted. Be careful not to overheat, as chocolate can seize. If using, stir in coconut oil or shortening to reach desired consistency.
- Double Boiler Method: Fill a saucepan with about an inch of water and bring it to a simmer. Place a heat-proof bowl over the saucepan, ensuring the bottom of the bowl does not touch the water. Add the chocolate to the bowl and stir constantly until it is completely melted and smooth. Remove from heat once melted. If using, stir in coconut oil or shortening.
Ensure your melted chocolate is smooth and free of lumps. Keep the chocolate warm over a very low heat or in a warm water bath if you’re working in a cool environment, to maintain its dippable consistency.
- Dip the Candies: Remove the chilled peanut butter cracker sandwiches from the refrigerator. Using a fork (a dinner fork works perfectly, or a candy dipping fork if you have one), carefully place one cracker sandwich into the melted chocolate.
- Coat Evenly: Gently submerge the cracker in the chocolate, ensuring it is fully coated. Lift the cracker out with the fork, allowing any excess chocolate to drip back into the bowl. You can gently tap the fork against the side of the bowl to encourage dripping and achieve a thinner, even coating.
- Place on Parchment: Carefully transfer the chocolate-covered cracker from the fork to a clean section of the parchment-lined baking sheet. Repeat this process with the remaining cracker sandwiches, leaving a small space between each one to prevent them from sticking together as they set.
- Add Optional Toppings: If desired, immediately after placing each dipped cracker on the parchment paper, sprinkle with a pinch of sea salt, colorful sprinkles, or chopped nuts. This must be done while the chocolate is still wet so the toppings adhere.
- Set the Candies: Once all the crackers are dipped and topped, place the baking sheets back into the refrigerator for at least 30-60 minutes, or until the chocolate is completely firm and set. You can also let them set at room temperature if your kitchen is cool, but this will take longer (1-2 hours).
- Final Packaging: Once completely set, gently peel the chocolate-covered peanut butter crackers off the parchment paper. They are now ready to be enjoyed, shared, or packaged for gifting.
Cooking Tips and Variations
Chocolate Melting Perfection: The key to beautiful chocolate-covered treats is perfectly melted chocolate. If using the microwave, always stir well between short intervals to prevent scorching. For a double boiler, ensure no water or steam gets into the chocolate, as even a tiny drop can cause it to seize and become grainy. If your chocolate is too thick, a teaspoon or two of coconut oil or vegetable shortening can help thin it out to a smoother, more dippable consistency without affecting the flavor.
Dipping Technique: A simple dinner fork is your best friend here. Use it to fully submerge the cracker, then lift it out, allowing the excess chocolate to drip off. A gentle tap against the side of the bowl helps achieve a cleaner, thinner coating. For a more rustic look, you can also hold the cracker with tongs and drizzle chocolate over it.
Peanut Butter Choice: While creamy peanut butter is recommended for ease of spreading and a smooth interior, feel free to experiment with crunchy peanut butter for an added textural element. Natural peanut butter might be a bit runnier; if using, chill the assembled crackers for a longer period to ensure it’s firm.
Crackers Beyond RITZ: While RITZ crackers offer that iconic buttery, salty crunch, don’t hesitate to try other cracker varieties! Graham crackers would create a s’mores-like candy, while saltine crackers could offer an even more pronounced salty contrast.
Flavor Variations:
- Nutty Delight: Mix finely chopped pecans, walnuts, or almonds into the peanut butter before spreading, or sprinkle them on top of the wet chocolate.
- Spice It Up: Add a pinch of cinnamon or a tiny dash of cayenne pepper to the peanut butter for a subtle kick.
- White Chocolate Drizzle: Once the main chocolate coating is set, melt some white chocolate and drizzle it decoratively over the candies for an elegant finish.
- Minty Fresh: Use mint-flavored chocolate for dipping, or add a drop of peppermint extract to your melted chocolate.
- Caramel Swirl: Drizzle warm caramel sauce over the set chocolate for an extra layer of decadence.
Making it a Family Affair: This recipe is wonderful for involving children. They can help spread the peanut butter, arrange the crackers, and even assist with sprinkling toppings (under supervision, of course!). It’s a fun way to create lasting memories in the kitchen.
Presentation for Gifting: The small foil containers with labels are perfect for gifting. Arrange the candies in a single layer, or stack them carefully with small squares of parchment paper between layers to prevent sticking. Tie with a festive ribbon for a charming homemade gift.
Storage and Reheating
Storage: These chocolate-covered peanut butter crackers are best stored in an airtight container. If your kitchen is cool (below 70°F or 21°C), they can be stored at room temperature for up to 5-7 days. However, to ensure the chocolate remains firm and shiny, and for optimal freshness, it is recommended to store them in the refrigerator. When refrigerated, they will stay fresh for up to 2-3 weeks. If stacking them in a container, place a piece of parchment paper or wax paper between layers to prevent them from sticking together.
Freezing: For longer storage, these candies freeze beautifully. Arrange them in a single layer on a baking sheet and freeze until solid (about 1-2 hours). Once frozen, transfer them to a freezer-safe airtight container or heavy-duty freezer bag, again separating layers with parchment paper. They can be stored in the freezer for up to 2-3 months. Thaw them in the refrigerator or at room temperature for about 15-30 minutes before serving.
Reheating: These are a no-bake treat and are meant to be enjoyed chilled or at room temperature. Reheating is not necessary or recommended as it would melt the chocolate and potentially make the crackers soggy. Simply take them out of storage and let them come to your desired temperature before indulging.
Frequently Asked Questions
What kind of chocolate is best for dipping?
For the smoothest finish and easiest melting, good quality melting wafers (also known as candy melts or compound chocolate) are excellent. If using chocolate chips or bars, semi-sweet or milk chocolate are popular choices. Dark chocolate provides a richer, less sweet contrast. For a truly professional look, consider tempering real chocolate, but for a simple homemade treat, melting wafers or quality chocolate chips with a bit of shortening work perfectly.
My chocolate seized and became thick and clumpy. What happened?
Chocolate seizing is usually caused by even a tiny amount of water or steam getting into the melted chocolate, or by overheating. If using the microwave, always stir well between short intervals to prevent overheating. If using a double boiler, ensure the bowl doesn’t touch the water and no steam escapes into the chocolate. Unfortunately, seized chocolate is difficult to rescue for dipping, so it’s best to start with a fresh batch.
Can I use natural peanut butter for this recipe?
Yes, you can use natural peanut butter, but be aware that it tends to be runnier than processed creamy peanut butter. This might make it a bit messier to spread and could cause it to ooze more easily. To mitigate this, make sure to stir your natural peanut butter very well before using, and chill your assembled cracker sandwiches for a longer period (at least 30 minutes) to firm up the peanut butter before dipping.
How far in advance can I make these?
These chocolate-covered peanut butter crackers can be made up to 1-2 weeks in advance if stored properly in an airtight container in the refrigerator. The crackers will maintain their crispness and the chocolate will stay firm. For best flavor and texture, consuming them within the first week is ideal, but they hold up very well for longer periods, especially if frozen.