Instructions
- Prepare Your Workspace: Preheat your oven to 350°F (175°C). Line two baking sheets with parchment paper or silicone baking mats.
- Cream Butter and Sugar: In a large mixing bowl, using an electric mixer (stand mixer with paddle attachment or hand mixer), cream together the softened unsalted butter and granulated sugar on medium speed until light, fluffy, and pale in color, about 2-3 minutes. This step is crucial for incorporating air and achieving the “meltaway” texture.
- Add Wet Ingredients: Beat in the egg yolk, vanilla extract, and fresh lemon zest until just combined. Scrape down the sides of the bowl to ensure everything is thoroughly mixed. The mixture should be fragrant and well-integrated.
- Combine Dry Ingredients: In a separate medium bowl, whisk together the all-purpose flour and salt. Ensure there are no lumps in the flour.
- Gradually Add Dry to Wet: With the mixer on low speed, gradually add the dry flour mixture to the wet butter mixture, mixing until just combined. Be careful not to overmix the dough, as this can develop the gluten too much and result in tough cookies. Stop mixing as soon as no dry streaks of flour remain. The dough will be soft and slightly crumbly, but should hold together when pressed.
- Form the Cookies: Roll the dough into small, uniform balls, about 1 inch in diameter. You can use a small cookie scoop for consistency. Place the dough balls about 1 inch apart on the prepared baking sheets. There’s no need to flatten them; they will spread slightly during baking.
- Bake the Cookies: Bake for 10-12 minutes, or until the edges are just set and very lightly golden. The centers may still look soft and slightly pale, which is exactly what you want for a meltaway texture. Do NOT overbake these cookies, as they will lose their signature tenderness.
- Cool Completely: Remove the baking sheets from the oven and let the cookies cool on the sheets for about 5 minutes. They will be very delicate when warm. After 5 minutes, carefully transfer the cookies to a wire rack to cool completely before glazing. This is essential for the glaze to set properly and not be absorbed by warm cookies.
- Prepare the Lemon Glaze: While the cookies are cooling, prepare the lemon glaze. In a small bowl, whisk together the powdered sugar and 3 tablespoons of fresh lemon juice. Start with 3 tablespoons and add more, 1/2 teaspoon at a time, until you reach a smooth, pourable consistency. The glaze should be thick enough to coat the back of a spoon but thin enough to drip slowly.
- Glaze the Cookies: Once the cookies are completely cool, dip the top of each cookie into the lemon glaze, or drizzle the glaze over the cookies with a spoon. Allow any excess glaze to drip off.
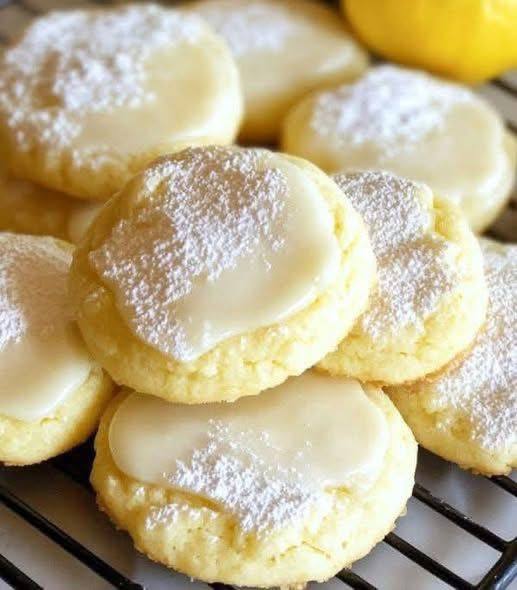
- Set the Glaze: Place the glazed cookies back on the wire rack over parchment paper (to catch drips) and let the glaze set completely, which will take about 30-60 minutes, depending on the humidity. For an extra touch, lightly dust with additional powdered sugar just before serving, if desired.
- Serve and Enjoy: Once the glaze is set, these delightful Lemon Meltaway Cookies are ready to be enjoyed!
Cooking Tips and Variations
To achieve the perfect “meltaway” texture, the butter temperature is paramount. Ensure your butter is truly softened, but not melted. It should give slightly when pressed with a finger, but not be greasy or oily. Over-creaming the butter and sugar is good, but overmixing the flour will result in tough cookies, so mix the flour in until just combined. Do not overbake these cookies; they should still look pale in the center when removed from the oven. Their delicate texture comes from being slightly underbaked. For the glaze, start with less lemon juice and add more gradually to get the perfect consistency—too thin and it will just soak into the cookie, too thick and it will be difficult to spread. Allow the cookies to cool completely before glazing, otherwise, the glaze will melt and not set properly.
For variations, you can easily adapt this recipe. Try using lime zest and juice instead of lemon for a vibrant Lime Meltaway Cookie. You could also add 1 teaspoon of poppy seeds to the cookie dough along with the flour for Lemon Poppy Seed Meltaways, adding a subtle crunch and visual appeal. A tiny pinch of cardamom added to the dry ingredients can introduce an unexpected and delightful aromatic note. For an extra layer of flavor, consider adding a touch of almond extract (1/4 teaspoon) to the cookie dough or glaze. You can also experiment with different citrus zests, such as orange, for a unique twist on this classic.
Storage and Reheating
Lemon Meltaway Cookies are best stored in an airtight container at room temperature. They will stay fresh and delicious for up to 3-5 days. If you live in a warm or humid climate, you might consider storing them in the refrigerator, but allow them to come to room temperature for about 15-20 minutes before serving for the best texture. The glaze can become sticky if exposed to too much humidity, so an airtight container is key. These cookies do not typically require reheating; they are designed to be enjoyed at room temperature, where their “meltaway” texture is at its peak. If you’ve stored them in the fridge, simply letting them sit out for a short while will bring them back to their ideal consistency.
For longer storage, you can freeze the unbaked cookie dough. Form the dough into a log, wrap it tightly in plastic wrap, and then in foil, and freeze for up to 2-3 months. When ready to bake, thaw the dough slightly, slice into rounds, and bake as directed, potentially adding a minute or two to the baking time. You can also freeze the baked, unglazed cookies in an airtight container for up to 1 month. Thaw them at room temperature and then glaze them fresh before serving. Freezing glazed cookies is not recommended as the glaze can become watery upon thawing.
Frequently Asked Questions
Why are my cookies not “meltaway” and instead are hard or chewy?
The most common reasons for cookies not having that signature “meltaway” texture are overmixing the flour into the dough or overbaking. When you overmix the flour, you develop the gluten too much, which makes the cookies tough. Only mix until just combined. Overbaking also dries out the cookies, making them hard. Remove them from the oven when the edges are just set and the centers still look soft and pale.
Can I make these cookies without an electric mixer?
While an electric mixer makes creaming the butter and sugar much easier and more effective for achieving the light, airy texture, you can technically make these cookies by hand. You’ll need to vigorously cream the softened butter and sugar with a sturdy whisk or a wooden spoon for a good 5-7 minutes until it’s very light and fluffy. This step is crucial for the “meltaway” quality, so don’t skimp on the mixing time and arm strength!
My lemon glaze is too thin/too thick. How do I fix it?
If your lemon glaze is too thin, gradually whisk in more powdered sugar, one tablespoon at a time, until it reaches your desired consistency. If it’s too thick, add a tiny amount of lemon juice (or even water), about 1/2 teaspoon at a time, whisking well after each addition, until it’s smooth and pourable. The goal is a glaze that coats a spoon but still drips slowly.
Can I use bottled lemon juice instead of fresh?
While fresh lemon juice and zest provide the best, brightest, and most authentic lemon flavor, you can use bottled lemon juice in a pinch for the glaze. However, for the cookie dough itself, always use fresh lemon zest as it contains essential oils that give a much more intense and aromatic flavor that bottled juice cannot replicate. The zest is key to the cookie’s overall lemon essence.