Instructions
- Prepare Your Workspace: Preheat your oven to 350°F (175°C). Line two baking sheets with parchment paper or silicone baking mats.
- Cream Butter and Sugar: In a large mixing bowl, using an electric mixer on medium speed, cream together the softened unsalted butter and granulated sugar until light and fluffy, about 2-3 minutes. Scrape down the sides of the bowl as needed.
- Add Lemon and Salt: Reduce the mixer speed to low. Add the fresh lemon zest, fresh lemon juice, and salt to the creamed butter mixture. Mix until just combined.
- Incorporate Flour: Gradually add the all-purpose flour to the wet ingredients, mixing on low speed until just combined and a soft dough forms. Be careful not to overmix, as this can develop gluten and make the cookies tough.
- Chill the Dough (Optional but Recommended): For best results and to prevent spreading, cover the dough with plastic wrap and refrigerate for 20-30 minutes. This step helps the cookies maintain their shape and enhances the meltaway texture.
- Shape the Cookies: Scoop out rounded tablespoons of dough and roll them into 1-inch balls. Place the balls about 1 inch apart on the prepared baking sheets. You can gently flatten them slightly with the palm of your hand if you prefer a flatter cookie, but they will spread a bit on their own.
- Bake the Cookies: Bake for 10-12 minutes, or until the edges are lightly golden and the centers appear set. The cookies should still be pale in color. Do not overbake, as this will result in a less “meltaway” texture.
- Cool the Cookies: Remove the baking sheets from the oven and let the cookies cool on the sheets for 5 minutes before carefully transferring them to a wire rack to cool completely.
- Prepare the Lemon Glaze: While the cookies are cooling, prepare the lemon glaze. In a small bowl, whisk together the sifted powdered sugar and 2 tablespoons of fresh lemon juice until smooth. If the glaze is too thick, add more lemon juice 1/2 teaspoon at a time until you reach a pourable but still thick consistency. If it’s too thin, whisk in a little more powdered sugar.
- Glaze the Cookies: Once the cookies are completely cool, dip the tops of each cookie into the lemon glaze, or drizzle the glaze over the cookies using a spoon.
- Allow Glaze to Set: Place the glazed cookies back on the wire rack with parchment paper underneath to catch any drips. Allow the glaze to set for at least 30 minutes, or until firm to the touch.
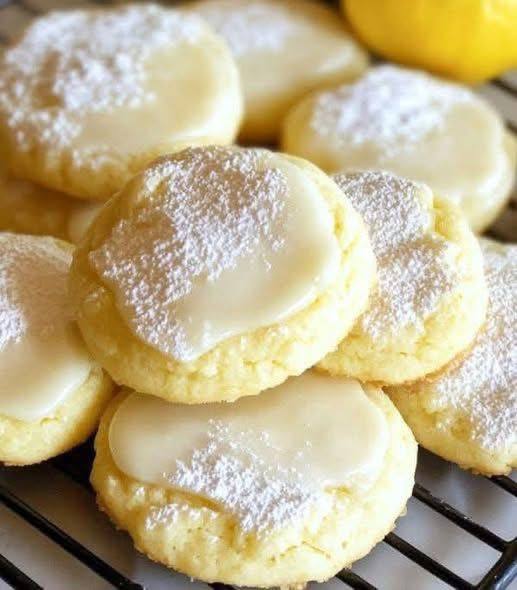
- Dust with Powdered Sugar (Optional): For an extra touch of sweetness and a beautiful finish, lightly dust the glazed cookies with additional powdered sugar once the glaze has fully set.
- Serve and Enjoy: Arrange on a platter and serve these delightful Lemon Meltaway Cookies!
Cooking Tips and Variations
Achieving the perfect “meltaway” texture is key to these cookies’ charm. Firstly, ensure your butter is truly at room temperature – soft enough to indent with a finger but not greasy or melted. This allows for proper creaming with the sugar, incorporating air and creating a light base. Overmixing the flour is the enemy of a tender cookie; as soon as the flour is just combined and no streaks remain, stop mixing. Chilling the dough, even for a brief 20-30 minutes, is a non-negotiable step for many bakers as it firms up the butter, preventing excessive spreading during baking and contributing to that delicate crumb. When baking, keep a close eye on them; these cookies should remain pale with only slightly golden edges. Overbaking will dry them out and diminish their meltaway quality.
For an intensified lemon flavor, consider rubbing the lemon zest into the granulated sugar with your fingertips before creaming it with the butter. This releases the essential oils from the zest, infusing the sugar with a deeper citrus aroma. Don’t skimp on fresh lemon juice – its bright acidity is crucial for both the cookie dough and the glaze. Bottled lemon juice simply won’t yield the same vibrant taste.
If you’re looking to experiment, a popular variation is to add 1-2 teaspoons of poppy seeds to the cookie dough along with the flour, creating Lemon Poppy Seed Meltaways. The tiny seeds add a subtle crunch and visual appeal. For a different citrus twist, you could substitute lime or orange zest and juice for the lemon, creating Lime Meltaways or Orange Meltaways. Just remember that the acidity and sweetness levels of other citrus fruits might vary, so you might need to slightly adjust the amount of juice in the glaze. For those who prefer a less sweet cookie, you can omit the final dusting of powdered sugar, letting the glaze be the primary sweetness.
Another tip for perfect glaze consistency: start with less lemon juice than you think you need for the glaze and add it gradually. You want a glaze that is thick enough to coat the back of a spoon but still pourable. If your glaze becomes too thin, simply whisk in a little more sifted powdered sugar until it reaches the desired consistency. Sifting the powdered sugar for the glaze is also critical to avoid lumps and achieve a silky-smooth finish. Finally, ensure your cookies are completely cool before glazing. Applying glaze to warm cookies will cause it to melt and absorb, rather than forming a distinct, beautiful layer.
Storage and Reheating
Lemon Meltaway Cookies are best enjoyed fresh, but they store remarkably well, allowing you to savor their delightful flavor for several days. Once the lemon glaze has fully set and hardened, transfer the cookies to an airtight container. Layer them between sheets of parchment paper if stacking to prevent them from sticking together or the glaze from smudging. Store the container at room temperature for up to 5-7 days. Keeping them in a cool, dry place away from direct sunlight will help maintain their texture and prevent the glaze from becoming sticky.
For longer storage, Lemon Meltaway Cookies can also be frozen. For unglazed cookies, arrange the baked and cooled cookies in a single layer on a baking sheet and freeze until solid. Once frozen, transfer them to a freezer-safe airtight container or heavy-duty freezer bag, layering with parchment paper. They can be stored in the freezer for up to 2-3 months. Thaw them at room temperature for an hour or two before glazing and serving.
If you wish to freeze glazed cookies, ensure the glaze is completely set and hardened before freezing. Follow the same method of freezing in a single layer first, then transferring to an airtight container with parchment paper between layers. While freezing glazed cookies is possible, the texture of the glaze might change slightly upon thawing, potentially becoming a little softer or stickier than when fresh. To thaw frozen glazed cookies, simply place them at room temperature for a few hours. There is no need to reheat these cookies; they are designed to be enjoyed at room temperature, where their meltaway texture is at its best.
To refresh cookies that have been stored for a few days at room temperature and have perhaps lost a tiny bit of their freshness, you can briefly warm them. Place them on a baking sheet and heat in a preheated oven at 250°F (120°C) for just 3-5 minutes. Be very careful not to overcook them, as this will dry them out. This brief warming can sometimes restore a bit of the initial tenderness, especially if they have gotten slightly firm. However, as mentioned, these cookies are truly best enjoyed at room temperature without reheating, allowing their delicate, crumbly texture to shine.
Frequently Asked Questions
Why are my Lemon Meltaway Cookies spreading too much?
Excessive spreading can be caused by several factors. First, ensure your butter is at the correct room temperature – soft but not melted. If it’s too warm, the dough will be too soft. Second, chilling the dough for at least 20-30 minutes before baking is crucial; this solidifies the butter and helps the cookies hold their shape. Third, make sure your oven temperature is accurate; an oven that isn’t hot enough can cause cookies to spread before they set. Lastly, too much leavening agent (though this recipe doesn’t use much) or overmixing the flour can also contribute to spreading.
Can I make these cookies gluten-free?
Yes, you can often adapt this recipe to be gluten-free. Substitute the all-purpose flour with a 1:1 gluten-free baking flour blend that contains xanthan gum. The “meltaway” texture relies on minimal gluten development, so a good gluten-free blend should work well. You might find the dough to be slightly more delicate, so handle it gently. Follow the same instructions for chilling and baking, and monitor the baking time as gluten-free flours can sometimes behave differently.
How can I make the lemon flavor even stronger?
To intensify the lemon flavor, there are a few tricks. First, really lean into the zest! Rub the lemon zest into the granulated sugar with your fingertips for a minute or two before adding the butter; this releases the essential oils for a more potent aroma. You can also add a tiny amount (1/4 to 1/2 teaspoon) of pure lemon extract to the cookie dough along with the lemon juice. For the glaze, ensure you are using fresh, concentrated lemon juice, and you can even add a pinch more lemon zest to the glaze for visual appeal and an extra flavor kick.