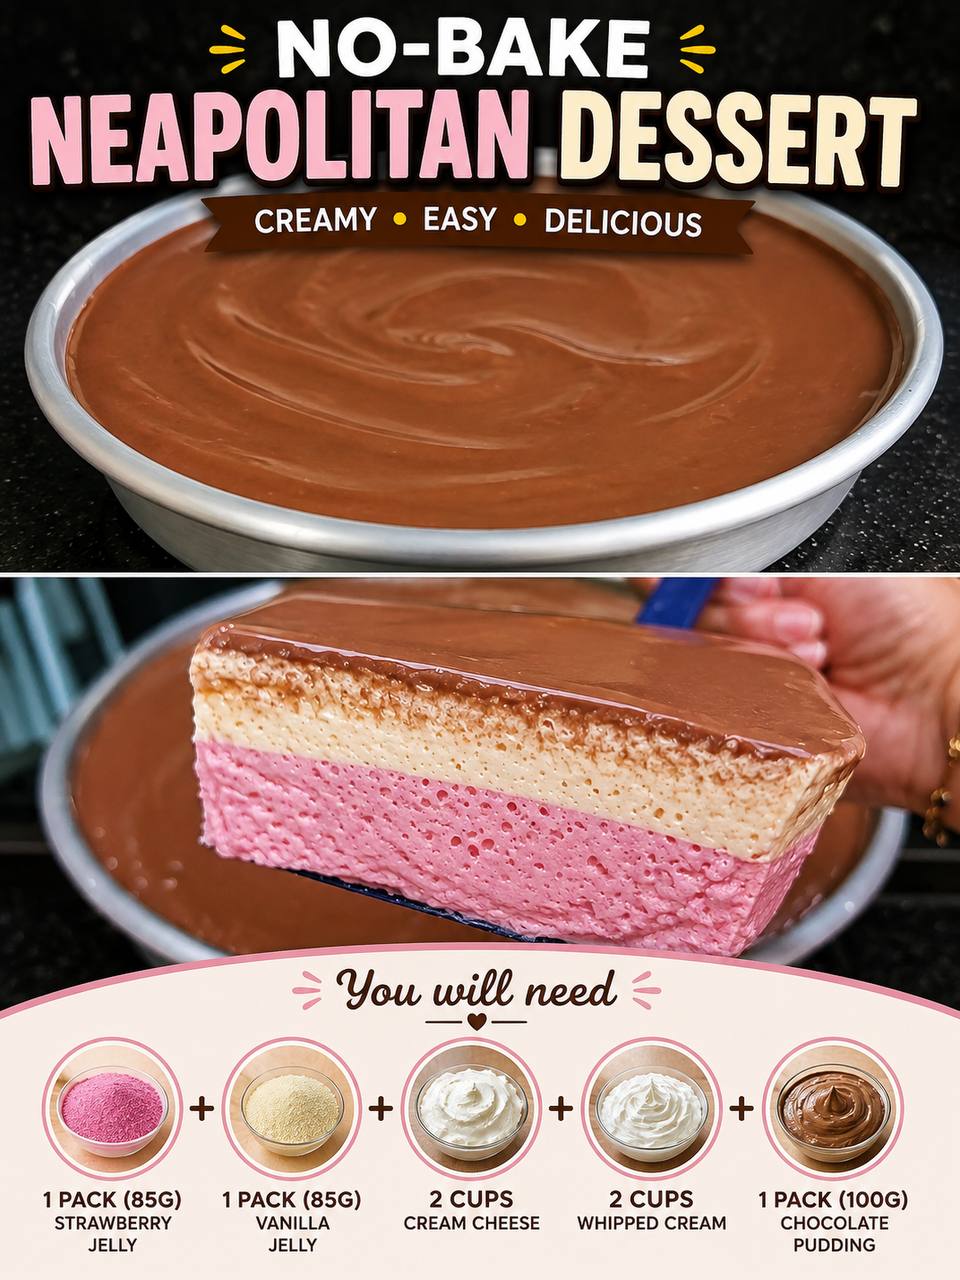
Instructions
- Prepare Your Pan: Lightly grease a 9-inch round springform pan or an 8×8 inch square baking dish with cooking spray or butter. You can also line the bottom with parchment paper for easier removal, if desired. Set aside.
- Prepare the Strawberry Layer: In a medium bowl, combine the strawberry jelly powder with 1 cup of boiling water. Whisk continuously until the jelly powder is completely dissolved. Add 1 cup of cold water and stir well. Allow the mixture to cool to room temperature, ensuring it does not start to set.
- Create the Strawberry Cream Base: In a large mixing bowl, beat 1 cup of the softened cream cheese with 1/4 cup of granulated sugar until smooth and creamy. In a separate bowl, whip 1 cup of the cold heavy whipping cream until stiff peaks form. Gently fold the whipped cream into the cream cheese mixture.
- Combine Strawberry Components: Once the cooled strawberry jelly mixture is at room temperature and still liquid, slowly pour it into the cream cheese and whipped cream mixture, folding gently until just combined. Be careful not to overmix.
- Set the Strawberry Layer: Pour the strawberry layer mixture into the prepared pan. Carefully spread it evenly. Place the pan in the refrigerator for at least 30-45 minutes, or until the layer is mostly set but still slightly tacky to the touch.
- Prepare the Vanilla Layer: While the strawberry layer is chilling, prepare the vanilla jelly. In a clean medium bowl, combine the vanilla jelly powder with 1 cup of boiling water. Whisk until completely dissolved. Add 1 cup of cold water and stir well. Allow to cool to room temperature.
- Create the Vanilla Cream Base: In another large mixing bowl, beat the remaining 1 cup of softened cream cheese with the remaining 1/4 cup of granulated sugar and 1/2 teaspoon of vanilla extract (if using) until smooth and creamy. In a separate bowl, whip the remaining 1 cup of cold heavy whipping cream until stiff peaks form. Gently fold the whipped cream into the cream cheese mixture.
- Combine Vanilla Components: Once the cooled vanilla jelly mixture is at room temperature and still liquid, slowly pour it into the cream cheese and whipped cream mixture, folding gently until just combined.
- Layer the Vanilla: Carefully pour the vanilla layer mixture over the chilled strawberry layer. Gently spread it evenly to avoid disturbing the strawberry layer. Return the pan to the refrigerator for another 30-45 minutes, or until the vanilla layer is mostly set.
- Prepare the Chocolate Layer: In a medium bowl, whisk together the instant chocolate pudding mix and 2 cups of cold milk for 2 minutes, or until the mixture begins to thicken. Let it sit for 5 minutes to fully set.
- Final Chocolate Topping: Once the vanilla layer is set, carefully spread the thickened chocolate pudding evenly over the vanilla layer.
- Final Chill: Cover the pan loosely with plastic wrap and return it to the refrigerator for a minimum of 4-6 hours, or preferably overnight, to allow all layers to firm up completely.
- Serve: Once fully chilled and set, carefully remove the dessert from the springform pan (if using). If using a regular dish, you can slice and serve directly. For clean slices, dip a sharp knife in hot water and wipe it clean between each cut. Garnish as desired and serve cold.
Cooking Tips and Variations
Achieving perfectly smooth, distinct layers is key to the visual appeal of this No-Bake Neapolitan Dessert. To ensure your layers are pristine, make sure each preceding layer is adequately chilled and set before pouring on the next. This doesn’t mean rock-hard, but firm enough that the new liquid layer won’t mix in. If your jelly mixture is too warm when added to the cream cheese and whipped cream, it can cause the cream to “break” or become grainy, so always ensure it’s cooled to room temperature. When pouring a new layer, do so slowly and gently, perhaps over the back of a spoon, to prevent creating indentations or disturbing the layer below.
For customizing flavors, the possibilities are endless! While Neapolitan is classic, you could swap out the strawberry jelly for raspberry, cherry, or even lime for a different fruit profile. The vanilla layer could be enhanced with almond extract for a nutty twist, or even a hint of coconut extract. For the chocolate layer, consider using dark chocolate pudding for a more intense flavor, or adding a sprinkle of espresso powder to enhance the chocolate notes. You could also experiment with a different crust for the bottom, such as crushed Oreos or graham crackers mixed with melted butter, pressed firmly into the bottom of the pan before adding the first layer. This adds another textural dimension to the dessert.
Presentation is everything with a layered dessert. Before serving, you can garnish your No-Bake Neapolitan Dessert with fresh strawberries, chocolate shavings, a dusting of cocoa powder, or a dollop of extra whipped cream. For a more festive touch, consider piping small rosettes of whipped cream around the edges. If you’re using a springform pan, releasing the sides just before serving creates a dramatic reveal. When cutting, using a sharp knife dipped in hot water and wiped clean between each slice will give you beautifully neat pieces, showcasing those vibrant layers. Don’t be afraid to get creative and make this dessert truly your own!
Storage and Reheating
This No-Bake Neapolitan Dessert is a fantastic make-ahead option, as it requires significant chilling time and benefits from being fully set. To store any leftover dessert, cover the pan or individual slices tightly with plastic wrap. This prevents the dessert from absorbing any odors from the refrigerator and helps maintain its creamy texture. Store the dessert in the refrigerator for up to 3-4 days. Beyond this, the texture of the jelly layers might start to degrade slightly, becoming less firm, and the whipped cream can weep a bit, though it will still be safe to eat.
As this is a no-bake, chilled dessert, reheating is not applicable or recommended. It is designed to be served cold, directly from the refrigerator. The beauty of this dessert lies in its cool, refreshing nature and the delicate set of its layers, which would be compromised by any attempt to warm it. Simply take it out of the fridge, slice, and enjoy!
Frequently Asked Questions
What if my jelly layers aren’t setting properly?
There are a few common reasons why jelly layers might not set. First, ensure you used the correct ratio of boiling and cold water as per the package instructions. Second, make sure the jelly powder was completely dissolved in the boiling water before adding the cold water. Undissolved powder can lead to a weaker set. Lastly, and most importantly, ensure adequate chilling time. Each layer needs at least 30-45 minutes to become firm enough to support the next, and the final dessert requires a minimum of 4-6 hours, or preferably overnight, in the refrigerator to fully set. If your kitchen is very warm, it might take longer.
Can I make this dessert ahead of time for a party?
Absolutely! This No-Bake Neapolitan Dessert is an ideal make-ahead dessert. In fact, it tastes best when it’s had plenty of time to chill and firm up completely. You can comfortably prepare it a full day in advance of your event. Simply cover it tightly with plastic wrap once all layers are set and store it in the refrigerator. This allows all the flavors to meld beautifully and ensures a perfectly set and sliceable dessert when it’s time to serve.
Can I use sugar-free jelly or pudding mixes?
Yes, you can certainly substitute sugar-free jelly mixes and instant pudding mixes for a lower-sugar version of this dessert. Be aware that the texture might be slightly different, as sugar plays a role in the setting and mouthfeel of these products, but the overall concept and layering will work. You might also want to adjust the amount of added granulated sugar in the cream cheese and whipped cream layers to your preference, as sugar-free mixes can sometimes have a different sweetness profile. Always follow the package instructions for the sugar-free products regarding water/milk ratios.
My layers mixed together when I poured them. What went wrong?
This usually happens if the previous layer wasn’t sufficiently set before the next liquid layer was added. Each layer needs to be firm enough to withstand the gentle pouring of the subsequent one without disturbing it. Make sure you’re chilling each layer for the recommended time (30-45 minutes) until it’s firm to the touch. Also, pour the new layer very slowly and gently, perhaps over the back of a spoon held close to the surface of the set layer. This disperses the liquid and reduces its impact, preventing it from breaking through or mixing with the layer below.