Introduction
Imagine a dessert that’s effortlessly elegant, bursting with fresh fruit flavor, and so wonderfully creamy it melts in your mouth – all without ever needing to turn on your oven. Welcome to the world of No-Bake Strawberry Cheesecake! This isn’t just a recipe; it’s an invitation to create a show-stopping dessert with minimal fuss, perfect for those warm summer days when you want something cool and refreshing, or any time you crave a sweet treat that comes together like magic. Its vibrant red topping, snowy white filling, and crunchy biscuit crust make it a feast for both the eyes and the palate, promising a delightful experience with every single bite.
What makes this no-bake wonder so incredibly appealing? It’s the perfect trifecta of convenience, incredible taste, and stunning presentation. Forget the stress of water baths, cracked cheesecakes, or uneven baking; this recipe relies on simple chilling to achieve its luxurious texture. The smooth, tangy cream cheese filling, lightened with whipped heavy cream, provides the perfect canvas for the bright, sweet-tart strawberry topping. Resting on a buttery, crunchy digestive biscuit (or graham cracker) crust, each layer contributes to a symphony of flavors and textures that will have everyone asking for a second slice. It’s an ideal make-ahead dessert, allowing you to enjoy your guests without last-minute kitchen dashes.
Whether you’re a seasoned baker looking for an easy win or a complete novice eager to impress, this No-Bake Strawberry Cheesecake is your ticket to dessert success. It’s the ultimate expression of effortless elegance, proving that some of the most delicious creations are also the simplest. Get ready to dive into the blissful world of no-bake desserts and discover just how easy it is to create a masterpiece that tastes as good as it looks.
Nutritional Information
Per serving (approximate values):
- Calories: 550
- Protein: 7g
- Carbohydrates: 55g
- Fat: 35g
- Fiber: 2g
- Sodium: 250mg
Ingredients
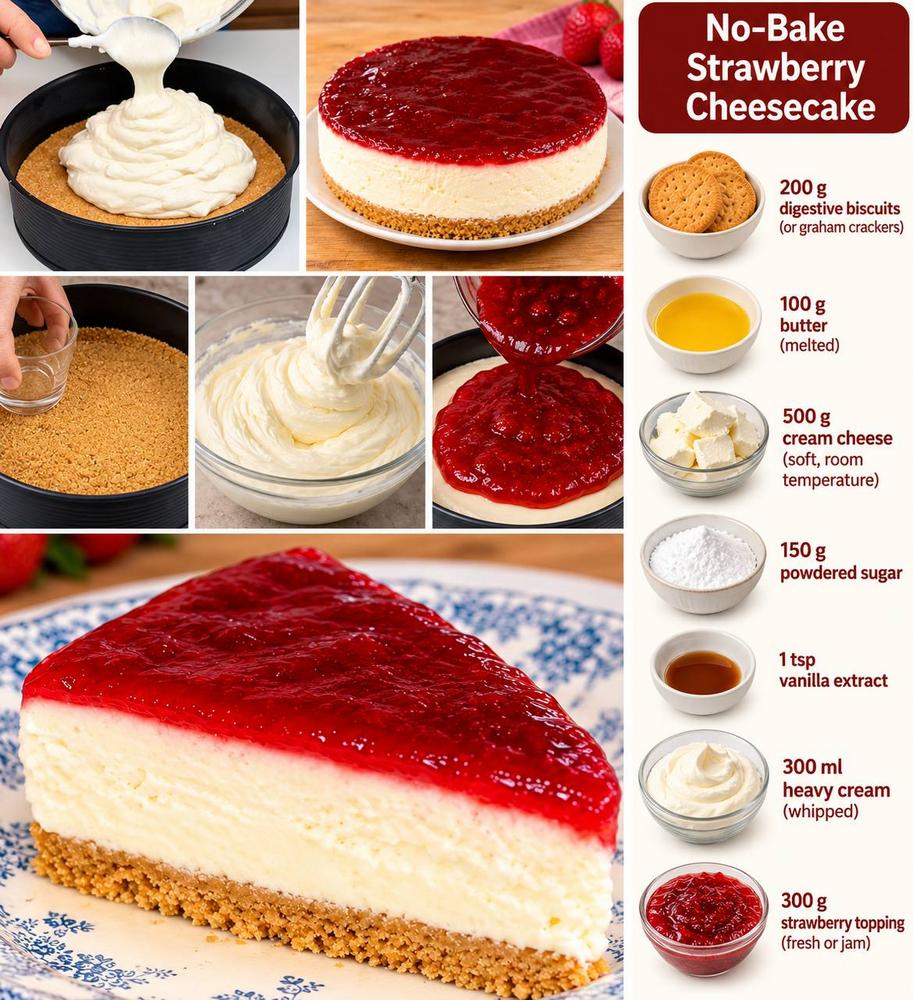
- 200 g digestive biscuits (or graham crackers)
- 100 g unsalted butter, melted
- 500 g full-fat cream cheese, softened at room temperature
- 150 g powdered sugar (confectioners’ sugar), sifted
- 1 tsp vanilla extract
- 300 ml heavy cream (whipping cream), very cold
- 300 g strawberry topping (store-bought jam or homemade compote)
Instructions
- Prepare the Crust: Begin by crushing the digestive biscuits (or graham crackers) into fine crumbs. You can do this by placing them in a Ziploc bag and crushing them with a rolling pin, or by pulsing them in a food processor until finely ground.
- Once the biscuits are crushed, transfer them to a medium bowl. Melt the unsalted butter in a microwave-safe bowl or small saucepan. Pour the melted butter over the biscuit crumbs and mix thoroughly with a spoon or spatula until all the crumbs are moistened and resemble wet sand.
- Lightly grease an 8-inch (20 cm) springform pan with a little butter or non-stick spray. Press the buttered biscuit mixture evenly into the bottom of the prepared springform pan. Use the back of a spoon or the bottom of a flat glass to press the crust down firmly and evenly. This creates a stable and compact base for your cheesecake. Place the crust in the refrigerator to chill while you prepare the filling, allowing it to firm up.
- Prepare the Cream Cheese Filling: In a large mixing bowl, add the softened cream cheese. It’s crucial that the cream cheese is at room temperature to ensure a smooth, lump-free filling. Beat the cream cheese with an electric mixer (handheld or stand mixer with a paddle attachment) on medium speed for 2-3 minutes until it’s light and fluffy.
- Gradually add the sifted powdered sugar to the cream cheese, beating on low speed until just combined, then increase to medium speed and beat for another 1-2 minutes until smooth and well incorporated. Sifting the sugar prevents lumps.
- Stir in the vanilla extract until fully mixed. Set this cream cheese mixture aside.
- In a separate, clean, and very cold mixing bowl (preferably chilled in the freezer for 10-15 minutes beforehand), pour the very cold heavy cream. Using an electric mixer with a whisk attachment, beat the heavy cream on medium-high speed until stiff peaks form. Be careful not to overbeat, as it can turn grainy.
- Gently fold about one-third of the whipped cream into the cream cheese mixture using a rubber spatula. This lightens the cream cheese mixture and makes it easier to incorporate the rest of the whipped cream.
- Add the remaining whipped cream to the cream cheese mixture and gently fold it in until no streaks of white cream are visible and the mixture is uniformly combined and airy. Be careful not to deflate the whipped cream by overmixing; the goal is to keep the filling light and fluffy.
- Assemble the Cheesecake: Retrieve the chilled crust from the refrigerator. Carefully spoon the prepared cream cheese filling over the biscuit crust in the springform pan.
- Using an offset spatula or the back of a spoon, gently spread the filling evenly across the crust, ensuring the top is smooth.
- Add the Strawberry Topping: Spoon the strawberry topping (jam or compote) over the cream cheese filling. Gently spread it to cover the entire surface of the cheesecake, leaving a small border if desired for a clean edge.
- Chill and Set: Cover the springform pan loosely with plastic wrap, being careful not to touch the topping. Place the cheesecake in the refrigerator to chill for a minimum of 6 hours, but preferably overnight (8-12 hours). This chilling time is absolutely crucial for the cheesecake to set properly and achieve its firm, sliceable texture.
- Serve: Once thoroughly chilled and set, remove the cheesecake from the refrigerator. Carefully unclip the springform pan and remove the sides. You can use a thin knife dipped in hot water and wiped clean to gently loosen the edges before removing the pan sides, if needed.
- Slice the cheesecake using a sharp knife that has been dipped in hot water and wiped clean between each slice for a perfectly clean cut. Garnish with fresh strawberries or a sprig of mint, if desired, before serving.
Cooking Tips and Variations
For the best No-Bake Strawberry Cheesecake experience, paying attention to a few key details can make all the difference. Firstly, ensure your cream cheese is at proper room temperature. This is non-negotiable for a smooth, lump-free filling. If it’s too cold, you’ll end up with a lumpy mixture that won’t be as pleasant. Similarly, your heavy cream must be very cold to whip successfully into stiff peaks. Consider chilling your mixing bowl and whisk attachment in the freezer for 10-15 minutes before whipping the cream; this helps it whip faster and achieve a better consistency.
Thorough chilling is the cornerstone of any successful no-bake cheesecake. While 6 hours is the minimum, allowing it to chill overnight (8-12 hours) is highly recommended. This extra time ensures the cheesecake is completely set, firm, and easy to slice, preventing any disheartening slumping. A springform pan is truly your best friend for this recipe, allowing for easy release and a beautifully presented cheesecake without any fuss. When pressing the crust, make sure it’s firm and even; this provides a stable foundation for your creamy filling. Also, when folding in the whipped cream, do so gently. Overmixing can deflate the airiness, leading to a denser filling rather than the light, melt-in-your-mouth texture you’re aiming for.
Flavor Variations:
- Other Fruit Toppings: Don’t limit yourself to strawberries! This recipe is incredibly versatile. Try a luscious blueberry compote, a tangy cherry topping, or a vibrant mixed berry reduction. A homemade mango puree or passion fruit curd would also be exquisite for a tropical twist.
- Citrus Zest: For a brighter, more zesty filling, add 1-2 teaspoons of fresh lemon or orange zest to the cream cheese mixture along with the vanilla extract. It provides a wonderful aromatic lift and cuts through the richness.
- Chocolate Lover’s Dream: Drizzle melted dark or white chocolate over the finished strawberry topping for an extra layer of decadence. You could also fold in some mini chocolate chips or finely chopped chocolate into the filling for a subtle crunch and chocolatey notes.
- Nutty Crust: Replace some of the biscuit crumbs with finely chopped nuts like almonds, pecans, or walnuts for an added layer of flavor and texture in the crust.
- Spiced Crust: Add a pinch of cinnamon or nutmeg to your biscuit crust mixture for a warm, comforting undertone.
- Boozy Kick: For an adult-friendly version, a tablespoon or two of a liqueur like Cointreau (orange), Kirsch (cherry), or Frangelico (hazelnut) can be folded into the cream cheese filling or brushed lightly onto the crust.
Serving Suggestions:
- Elevate the presentation by garnishing each slice with fresh whole strawberries, a few fresh mint leaves, or a dusting of powdered sugar just before serving.
- Pair this delightful dessert with a light, crisp sparkling wine, a glass of chilled rosé, or a freshly brewed cup of coffee or herbal tea for a perfect end to any meal.
- For a more elaborate dessert plate, serve a slice alongside a small scoop of vanilla bean ice cream or a dollop of extra whipped cream.
Storage and Reheating
Storing your No-Bake Strawberry Cheesecake properly is key to maintaining its freshness, texture, and flavor. Once assembled and chilled, the cheesecake should always be kept in the refrigerator. To store, cover the springform pan loosely with plastic wrap or transfer individual slices to an airtight container. This prevents the cheesecake from absorbing odors from other foods in the fridge and helps to keep the topping and filling from drying out. Stored correctly, the No-Bake Strawberry Cheesecake will remain fresh and delicious for up to 3-4 days in the refrigerator. Beyond this time, the crust may start to soften, and the fresh fruit topping might begin to weep a bit.
Freezing is also an excellent option for longer storage, especially if you want to make the cheesecake ahead of time or save leftovers. To freeze, ensure the cheesecake is fully set and chilled. You can freeze the entire cheesecake or individual slices. For the whole cheesecake, place it uncovered in the freezer for about 1-2 hours until firm. Once firm, wrap it tightly in several layers of plastic wrap, followed by a layer of aluminum foil. For individual slices, wrap each slice securely in plastic wrap and then foil. Frozen cheesecake can be stored for up to 1-2 months. When you’re ready to enjoy it, transfer the frozen cheesecake (or slices) to the refrigerator and allow it to thaw slowly overnight. Do not attempt to thaw at room temperature, as this can affect the texture and potentially cause the filling to separate. As this is a no-bake dessert, reheating is not applicable, nor is it recommended, as it would cause the delicate filling to melt and lose its structure.
Frequently Asked Questions
What kind of biscuits can I use for the crust?
While digestive biscuits are traditionally used and provide a fantastic buttery flavor and crumbly texture, graham crackers are an excellent alternative, especially common in North America. You can also experiment with shortbread cookies, vanilla wafers, or even chocolate cookies for a different twist. The key is to use a dry, crisp cookie that can be easily crushed and absorbs the melted butter well.
My cheesecake isn’t setting. What went wrong?
The most common reasons for a no-bake cheesecake not setting are insufficient chilling time or not whipping the heavy cream to stiff peaks. Ensure you’re chilling the cheesecake for at least 6 hours, but preferably overnight. Also, make sure your heavy cream is very cold before whipping, and beat it until it forms firm, distinct peaks. If the cream isn’t whipped enough, the filling won’t have the necessary structure to set.
Can I use fresh strawberries instead of jam for the topping?
Absolutely! Using fresh strawberries is a wonderful option for a more natural, less sweet topping. You can slice fresh strawberries and arrange them beautifully over the cream cheese filling. For a slightly glossy finish and to help them adhere, you can make a simple glaze by warming a few tablespoons of strawberry jam or apricot preserves with a teaspoon of water, then brushing it over the fresh fruit. Alternatively, you can make a homemade strawberry compote by simmering fresh strawberries with a little sugar and lemon juice until thickened.
Can I make this cheesecake ahead of time?
Yes, this no-bake cheesecake is an ideal make-ahead dessert! In fact, making it a day in advance allows for optimal chilling time, ensuring it sets perfectly and develops its full flavor and texture. Simply prepare the cheesecake, chill it overnight, and then store it covered in the refrigerator until you’re ready to serve. This makes it a fantastic option for parties, holidays, or any occasion where you want to minimize last-minute kitchen work.