Instructions
- Begin by preparing your pudding mixture. In a large mixing bowl, combine the sweetened condensed milk and the 1 1/2 cups of cold water. Whisk these two ingredients together thoroughly until they are well combined and the mixture is smooth. This step ensures an even distribution of sweetness and liquid before adding the pudding mix.
- Next, add the instant vanilla pudding mix to the sweetened condensed milk and water mixture. Using an electric mixer on medium speed, beat the mixture for approximately 2-3 minutes, or until the pudding begins to thicken considerably. The consistency should be smooth and lump-free. If you prefer a richer pudding, you can substitute 1/2 cup of the cold water with 1/2 cup of whole milk in the previous step.
- Once the pudding has thickened, gently fold in the thawed whipped topping. Use a rubber spatula to carefully incorporate the whipped topping into the pudding mixture until no streaks of white remain. Be careful not to overmix, as this can deflate the whipped topping and reduce the creaminess of the pudding. If using, stir in the 1 teaspoon of pure vanilla extract at this stage for an enhanced flavor profile.
- Now it’s time to assemble your banana pudding. Choose a 9×13-inch baking dish or a large trifle bowl for layering. Start by arranging a single layer of vanilla wafers on the bottom of the dish. Try to cover the bottom as completely as possible.
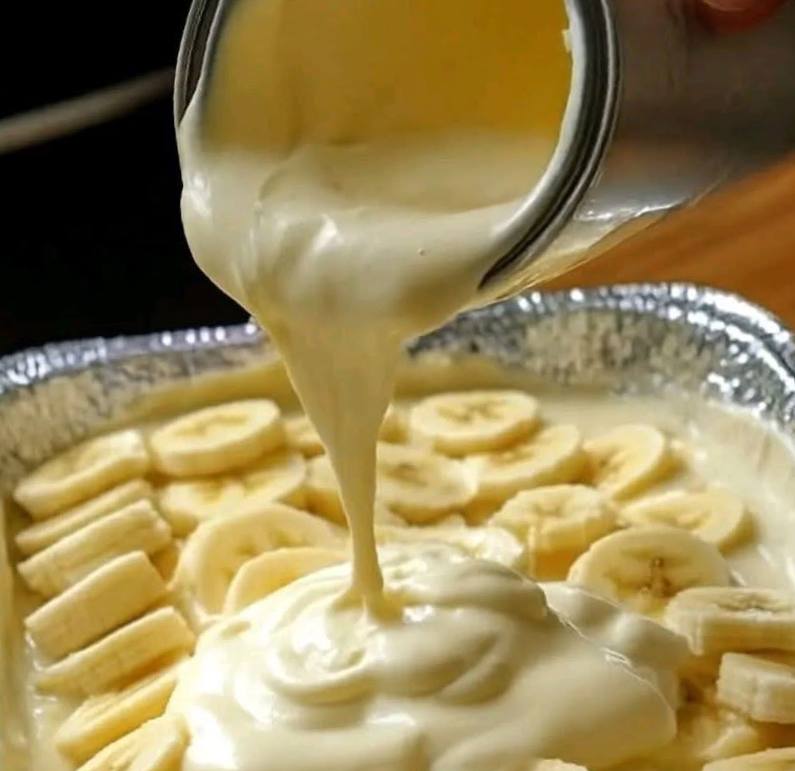
- Next, arrange an even layer of sliced bananas over the vanilla wafers. The bananas should be ripe but still firm, as overripe bananas can become mushy.
- Spoon about one-third of the pudding mixture over the layer of bananas and vanilla wafers. Use the back of the spoon or a spatula to gently spread the pudding evenly, ensuring it covers all the bananas and wafers.
- Repeat the layering process: add another layer of vanilla wafers, followed by a layer of sliced bananas, and then another one-third of the pudding mixture. Continue this pattern until you have used all the bananas and pudding, ending with a final layer of pudding on top. Ensure that the top layer of pudding is spread smoothly.
- For the best flavor and texture, cover the dish tightly with plastic wrap and refrigerate for at least 4 hours. Ideally, refrigerate overnight. This chilling time allows the vanilla wafers to soften, the flavors to meld beautifully, and the pudding to set completely, resulting in that perfectly creamy, comforting texture.
- Before serving, you can optionally garnish the top with a few extra vanilla wafers or fresh banana slices, if desired. Serve chilled and enjoy the delightful taste of Southern comfort!
Cooking Tips and Variations
For the absolute best Paula Deen’s Banana Pudding, banana ripeness is key. Use bananas that are ripe, with a few brown spots, but still firm. Overly green bananas lack sweetness, while overly brown, mushy bananas will break down too much in the pudding. To prevent your banana slices from browning too quickly, you can toss them gently in a tablespoon of lemon juice or a very light splash of pineapple juice before layering. This won’t affect the flavor significantly but will keep them looking fresh. When selecting your vanilla wafers, Nilla Wafers are the classic choice and provide that authentic taste and perfect texture once softened. However, don’t be afraid to experiment! For a different twist, try using shortbread cookies or even graham crackers. Just be aware that their absorption rate might differ slightly. The chilling time is crucial; do not rush it. Four hours is the minimum, but overnight truly allows the flavors to deepen and the wafers to achieve that perfectly soft, cake-like consistency.
Serving this delightful dessert is straightforward: always serve it chilled. For an extra touch of elegance, you can garnish individual servings with a dollop of fresh whipped cream, a sprinkle of cinnamon, or even a few chocolate shavings. The variations for banana pudding are endless and allow for personal customization. To make it even richer, you can use a homemade vanilla custard instead of instant pudding mix, though this will add to the preparation time. For a nutty crunch, consider adding a layer of chopped pecans or walnuts between the banana and wafer layers. If you’re a chocolate lover, a drizzle of chocolate sauce or a handful of mini chocolate chips can be folded into the pudding or layered within. Some people enjoy adding a touch of coconut flavor by incorporating shredded coconut into the pudding or as a garnish. You can also experiment with different extracts, like almond or banana extract, to subtly alter the flavor profile. For a holiday twist, consider adding a pinch of nutmeg or a dash of rum extract to the pudding mixture. Remember, the beauty of this recipe lies in its simplicity and its ability to be adapted to your personal taste.
Storage and Reheating
Storing Paula Deen’s Banana Pudding properly is essential to maintain its freshness and delicious flavor. Once assembled, the pudding should be covered tightly with plastic wrap or transferred to an airtight container. This prevents the bananas from browning excessively and keeps the pudding from absorbing odors from the refrigerator. Store the banana pudding in the refrigerator. It will stay fresh and delicious for 3 to 4 days. Beyond this timeframe, the bananas may start to become too soft and watery, and the texture of the pudding can change. It is generally not recommended to freeze banana pudding, as the bananas tend to become mushy and discolored upon thawing, and the creamy texture of the pudding can become grainy or separate. The beauty of this dessert lies in its fresh, creamy, and soft texture, which is best enjoyed straight from the refrigerator.
Banana pudding is a dessert that is always served chilled, so there is no need for reheating. In fact, reheating would negatively impact the texture of the pudding and the bananas, making them unappealing. Simply pull the dish from the refrigerator, uncover it, and serve. If you’ve made a very large batch, you might consider portioning it into smaller containers for easy access and to prevent the entire dish from being exposed to air multiple times. When serving, ensure you use a clean serving spoon each time to avoid introducing bacteria that could shorten its shelf life. If you notice any signs of spoilage, such as an off smell, mold, or a significantly altered texture, it’s best to discard the pudding. However, given its irresistible taste, it’s highly likely that your Paula Deen’s Banana Pudding will be devoured long before spoilage becomes a concern!
Frequently Asked Questions
Can I use homemade whipped cream instead of frozen whipped topping?
Absolutely! Using freshly whipped cream will elevate the richness and flavor of your banana pudding even further. Simply whip 1 1/2 to 2 cups of heavy cream with 1/4 cup of powdered sugar and 1 teaspoon of vanilla extract until stiff peaks form. Gently fold this into your pudding mixture as directed in the recipe. It’s a fantastic substitution for a more decadent dessert.
Why are my bananas turning brown in the pudding?
Bananas naturally oxidize and turn brown when exposed to air. While chilling the pudding helps slow this process, it won’t stop it entirely. To minimize browning, ensure your dish is tightly covered with plastic wrap, pressing it directly onto the surface of the pudding if possible. You can also lightly toss your banana slices in a tiny amount of lemon juice (about 1/2 teaspoon per banana) before layering; this acidic coating helps prevent oxidation without significantly altering the taste.
Can I make this banana pudding ahead of time for a party?
Yes, this banana pudding is an excellent make-ahead dessert! In fact, it tastes even better after it’s had at least 8 hours, or ideally overnight, to chill in the refrigerator. This allows the flavors to fully meld together and the vanilla wafers to soften to the perfect cake-like consistency. You can prepare it up to 24 hours in advance, ensuring it’s well-covered. For longer storage, up to 3-4 days, the bananas might start to become a bit softer, but it will still be delicious.
What if my pudding mixture isn’t thickening?
There are a few reasons why your pudding might not be thickening. First, ensure you are using instant vanilla pudding mix, not cook-and-serve. Instant pudding relies on specific ingredients to set quickly with cold liquids. Second, make sure your water (and milk, if using) is very cold. Cold temperatures are crucial for the instant pudding to set properly. Lastly, ensure you are whisking for the full 2-3 minutes as specified, or even a little longer if needed. If it’s still too thin after whisking, you can try refrigerating the pudding mixture for about 15-20 minutes before folding in the whipped topping, as chilling can help it set further.