Introduction
Are you constantly on the lookout for a snack that hits all the right notes? Something quick, easy, and genuinely energizing, without sacrificing on flavor? Look no further! Our Pistachio Chocolate Energy Squares are about to become your new go-to. Imagine the vibrant, earthy crunch of pistachios perfectly complemented by rich, decadent chocolate, all in a convenient, bite-sized square. These aren’t just any snack; they’re a power-packed delight designed to fuel your day, satisfy your cravings, and put a smile on your face with every chew. They embody the perfect balance of healthy indulgence, proving that you don’t need to compromise on taste to make wholesome choices.
What makes these squares truly special is their delightful simplicity and incredible versatility. They’re a no-bake wonder, meaning you can whip up a batch without ever turning on your oven – perfect for those hot days or when you’re simply short on time. Beyond their ease, these squares are a nutritional powerhouse, brimming with healthy fats, fiber, and protein from natural ingredients. Whether you need a pre-workout boost, a mid-afternoon pick-me-up at your desk, or a guilt-free sweet treat after dinner, these energy squares deliver. Plus, they’re incredibly adaptable, making them a fantastic option for various dietary needs, including vegan, gluten-free, and dairy-free lifestyles with just a few simple tweaks. Get ready to transform your snacking game with this irresistible recipe!
In this comprehensive guide, we’ll walk you through everything you need to know to create these phenomenal Pistachio Chocolate Energy Squares. From understanding the key ingredients that make them so delicious and nutritious, to a step-by-step preparation guide that guarantees perfect results every time, we’ve got you covered. We’ll also share invaluable tips for customization, storage, and answer your most frequently asked questions, ensuring your energy square journey is a resounding success. Prepare to discover your new favorite healthy indulgence – a snack that tastes amazing, fuels your body, and fits seamlessly into your busy life.
Nutritional Information
Per serving (approximate values):
- Calories: 180
- Protein: 5g
- Carbohydrates: 20g
- Fat: 10g
- Fiber: 4g
- Sodium: 20mg
Ingredients
- 1 ½ cups raw pistachios, shelled (plus extra for garnish, if desired)
- 1 cup pitted Medjool dates, packed
- ¼ cup unsweetened cocoa powder or cacao powder
- 2 tablespoons pure maple syrup (or agave nectar)
- 1 tablespoon coconut oil, melted
- ½ teaspoon vanilla extract
- ¼ teaspoon sea salt
- ¼ cup dark chocolate chips (60-70% cacao), for melting
- 1 teaspoon coconut oil, for melting with chocolate
Instructions
- Line an 8×8 inch square baking pan with parchment paper, leaving an overhang on the sides to easily lift the finished squares out later.
- Add the shelled pistachios to a food processor and pulse until they are finely chopped but not yet a paste. You want some texture, so avoid over-processing. Remove about ¼ cup of the chopped pistachios and set aside for garnish, if using.
- Add the pitted Medjool dates, cocoa powder, maple syrup, 1 tablespoon melted coconut oil, vanilla extract, and sea salt to the food processor with the remaining chopped pistachios.
- Process the mixture on high until it forms a sticky, cohesive dough. It might take a few minutes, and you may need to scrape down the sides of the food processor a couple of times. The mixture should stick together when pressed between your fingers.
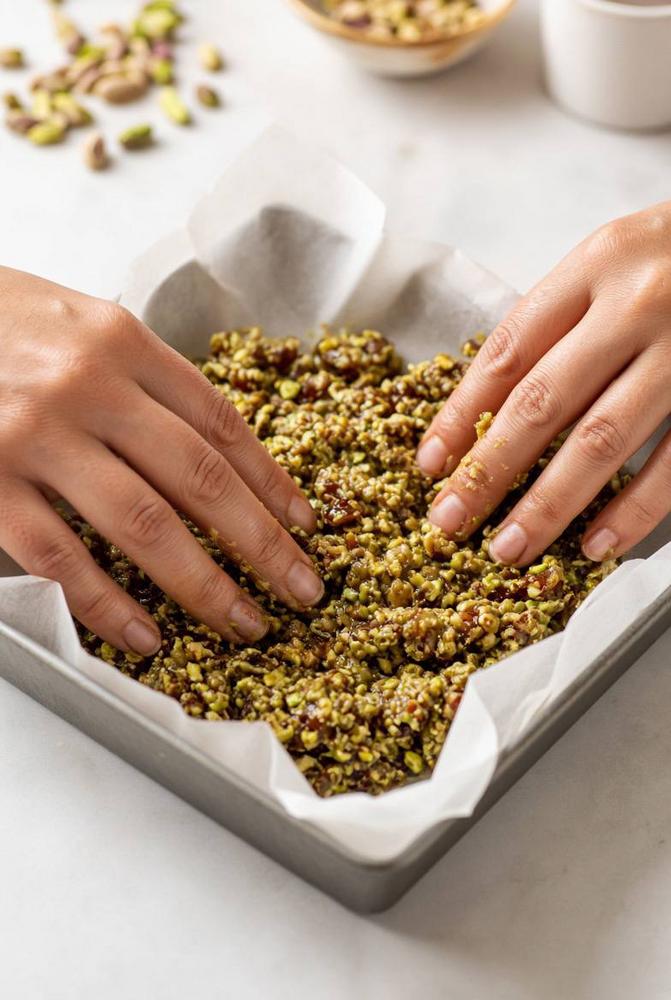
- Transfer the mixture to the prepared baking pan. Using your hands, a spatula, or the bottom of a flat glass, press the mixture down *very firmly* and evenly into the pan. This is a crucial step to ensure the squares hold together well. Make sure the layer is compact and smooth.
- Place the pan in the refrigerator or freezer for at least 30 minutes to chill and set. This will make it easier to cut the squares.
- While the base is chilling, prepare the chocolate topping. In a microwave-safe bowl, combine the dark chocolate chips and 1 teaspoon of coconut oil. Microwave in 30-second intervals, stirring well after each, until the chocolate is smooth and fully melted. Alternatively, melt over a double boiler.
- Once the base is firm, remove the pan from the refrigerator. Lift the entire slab out of the pan using the parchment paper overhang.
- Pour the melted chocolate evenly over the chilled pistachio base, spreading it with a spatula to create a smooth layer.
- If desired, sprinkle the reserved chopped pistachios over the melted chocolate immediately.
- Return the slab to the refrigerator for another 15-30 minutes, or until the chocolate topping has fully set.
- Once the chocolate is firm, use a sharp knife to cut the slab into 16 equal squares. For clean cuts, wipe your knife with a warm, damp cloth between each slice.
- Serve immediately or store for later enjoyment.
Cooking Tips and Variations
Achieving the perfect Pistachio Chocolate Energy Square is all about the details, and a little creativity can go a long way! Here are some essential tips and exciting variations to make these squares truly your own.
Tips for Best Results:
- Quality Ingredients Matter: Start with fresh, high-quality pistachios. Raw, unsalted pistachios are best for this recipe as they provide a pure, earthy flavor that pairs beautifully with chocolate and dates. Medjool dates are preferred for their soft, caramel-like texture and natural sweetness, which are key to the binding power of these squares.
- Don’t Skip the Pitting: Ensure all dates are pitted before adding them to the food processor. Accidentally leaving a pit can damage your processor blade and ruin your batch.
- Process Dates First (Optional but Recommended): If your dates aren’t super soft, or if your food processor isn’t very powerful, you might want to process the dates by themselves first until they form a sticky ball or paste. Then, add the pistachios and other ingredients. This ensures a smoother, more cohesive base.
- Finely Chop, Don’t Puree: When processing the pistachios, aim for a finely chopped texture rather than a paste. A little bit of crunch from the pistachios adds a wonderful textural contrast to the chewiness of the dates.
- Press FIRMLY: This is arguably the most crucial step for no-bake bars. Use all your strength to press the mixture down into an even, very compact layer. The harder you press, the better your squares will hold their shape. The bottom of a measuring cup or a flat spatula can be very helpful here.
- Adequate Chilling Time: Don’t rush the chilling process. The initial chill for the base helps it firm up for easier cutting and better texture. The second chill for the chocolate ensures a clean, set topping. At least 30 minutes for each stage is ideal, but an hour is even better.
- Sharp Knife for Cutting: Use a very sharp knife to cut the squares. For extra clean cuts, run the knife under hot water and wipe it dry between each slice. This helps prevent the chocolate from cracking and the base from crumbling.
- Parchment Paper Overhang: Always leave a generous overhang of parchment paper on the sides of your pan. This creates “handles” that allow you to easily lift the entire slab of squares out of the pan, making cutting a breeze and preventing sticking.
Customization & Variations:
- Nut Variations: Not a fan of pistachios, or just want to try something new? This recipe is incredibly versatile! You can easily substitute pistachios with other nuts like almonds, walnuts, cashews, or even pecans. Each will lend its unique flavor profile to the squares.
- Sweetener Alternatives: While maple syrup is recommended for its flavor and liquid consistency, you can use other liquid sweeteners like agave nectar, honey (if not vegan), or even a touch of brown rice syrup. Adjust the quantity to your preferred sweetness.
- Chocolate Options:
- White Chocolate Drizzle: Instead of a dark chocolate topping, or in addition to it, drizzle with melted white chocolate for a beautiful contrast and different flavor.
- Chocolate Chips in the Base: Stir in a handful of mini chocolate chips into the base mixture before pressing it into the pan for bursts of chocolate throughout.
- Cocoa Powder Boost: For an extra rich chocolate flavor in the base, you can increase the amount of cocoa powder slightly, or use a high-quality Dutch-processed cocoa powder.
- Add-Ins for Texture and Flavor:
- Dried Fruits: Mix in other finely chopped dried fruits like cranberries, cherries, or apricots into the base for added chewiness and flavor.
- Seeds: Chia seeds, flax seeds, or hemp seeds can be added to the base for an extra boost of omega-3s and fiber.
- Spices: A pinch of cinnamon, cardamom, or even a tiny dash of cayenne pepper can add a surprising warmth and complexity to the flavor profile.
- Orange Zest: A teaspoon of fresh orange zest processed with the base ingredients can brighten the flavors beautifully, especially with chocolate.
- Coconut Flakes: Add shredded coconut to the base or sprinkle toasted coconut flakes on top of the chocolate for a tropical twist.
- Protein Boost: For an extra protein punch, add a scoop of your favorite unflavored or vanilla protein powder to the base mixture. You might need to add an extra splash of liquid (water, plant milk, or more maple syrup) to maintain the desired consistency.
- Salted Caramel Swirl: After spreading the melted chocolate, drizzle a homemade or store-bought vegan caramel sauce over the chocolate and swirl gently with a toothpick for a gorgeous salted caramel effect.
Experiment with these tips and variations to create your signature Pistachio Chocolate Energy Squares. The possibilities are endless, and each batch can be a new adventure in flavor!
Storage and Reheating
Proper storage is key to maintaining the freshness, texture, and delicious flavor of your Pistachio Chocolate Energy Squares. Since these are no-bake and contain natural ingredients, they require refrigeration to keep them at their best.
Storage:
- Airtight Container: Once cut into squares, transfer them to an airtight container. This prevents them from drying out, absorbing odors from the refrigerator, and helps maintain their chewy texture.
- Refrigeration: Store the energy squares in the refrigerator for up to 1-2 weeks. The cool temperature keeps the chocolate firm and the date-nut base fresh.
- Layering: If stacking multiple layers of squares in a container, place a piece of parchment paper or wax paper between each layer to prevent them from sticking together.
- Freezing for Longer Storage: For extended freshness, these squares freeze beautifully! Place the cut squares in a single layer on a parchment-lined baking sheet and freeze until solid (about 1-2 hours). Once frozen, transfer them to a freezer-safe airtight container or a heavy-duty freezer bag. They can be stored in the freezer for up to 2-3 months.
Reheating (or rather, serving suggestions from frozen):
These energy squares are typically enjoyed chilled, straight from the refrigerator or freezer. They don’t require “reheating” in the traditional sense, but here’s how to enjoy them if they’ve been frozen:
- From the Refrigerator: Simply grab and enjoy! They are perfectly ready to eat cold.
- From the Freezer: If you’ve stored them in the freezer, you have a couple of options:
- Thaw at Room Temperature: Take out the desired number of squares and let them thaw at room temperature for about 10-15 minutes. They will soften slightly but retain a pleasant chewiness.
- Enjoy Frozen: Some people actually enjoy these squares straight from the freezer for a firmer, almost candy-like texture. They are still perfectly edible and delicious when frozen solid.
These squares are fantastic for meal prep, as you can make a large batch and have healthy, convenient snacks ready to go for weeks!
Frequently Asked Questions
Can I make these squares without a food processor?
While a food processor is highly recommended for achieving the best texture and making the process quick and easy, it is possible to make them without one. You would need to finely chop the pistachios by hand, ensuring they are very small and uniform. For the dates, you’d have to chop them extremely finely and then mash them thoroughly with a fork or potato masher until they form a sticky paste. Then, combine all ingredients in a large bowl and knead vigorously by hand until everything is well incorporated and forms a cohesive dough. This method requires more effort and time, but it’s certainly doable!
My mixture isn’t sticking together. What went wrong?
If your mixture isn’t sticking, it’s usually due to a lack of moisture or insufficient processing. First, ensure your Medjool dates are fresh and soft; older, drier dates won’t bind as well. You can try soaking them in warm water for 5-10 minutes (then draining well) before processing. Second, make sure you’ve processed the mixture long enough in the food processor. It needs to run until the dates break down completely and release their natural stickiness, forming a cohesive ball or very sticky dough. If it’s still too crumbly, add a tiny bit more maple syrup or a teaspoon of water or plant-based milk, one at a time, and process again until it comes together.
Are these energy squares suitable for special diets?
Yes, absolutely! As written, this recipe is naturally vegan (dairy-free and egg-free) and gluten-free. It’s also suitable for those looking for refined sugar-free options, as it uses dates and maple syrup as natural sweeteners. Always double-check your specific ingredients (like chocolate chips) to ensure they meet your dietary requirements, as some brands may contain hidden dairy or gluten. For nut allergies, you can try using sunflower seeds or pumpkin seeds, but the texture and flavor will be different.
How can I make these squares even more nutritious?
There are several ways to boost the nutritional profile of these energy squares! You can add a tablespoon or two of chia seeds, ground flax seeds, or hemp seeds to the base mixture for an extra dose of omega-3 fatty acids and fiber. A scoop of unflavored or vanilla plant-based protein powder can also be mixed into the base for increased protein content. Incorporating other nutrient-dense ingredients like goji berries, dried blueberries, or even a spoonful of spirulina powder (for a superfood boost and an even greener hue!) can further enhance their health benefits. Just be mindful that adding dry ingredients may require a touch more liquid binder.