Introduction
Imagine the warm, comforting aroma of freshly baked bread wafting through your kitchen. Now picture that bread, not just any bread, but a soft, tender flatbread, made from scratch and cooked to golden perfection right on your stovetop. That’s the magic of Soft Homemade Skillet Flatbread! This isn’t just a recipe; it’s an invitation to experience the simple joy of creating something truly delicious and satisfying with your own hands. Forget complicated techniques or long waiting times; this skillet flatbread is designed for ease and instant gratification, delivering an incredibly versatile and flavorful bread that will quickly become a staple in your home.
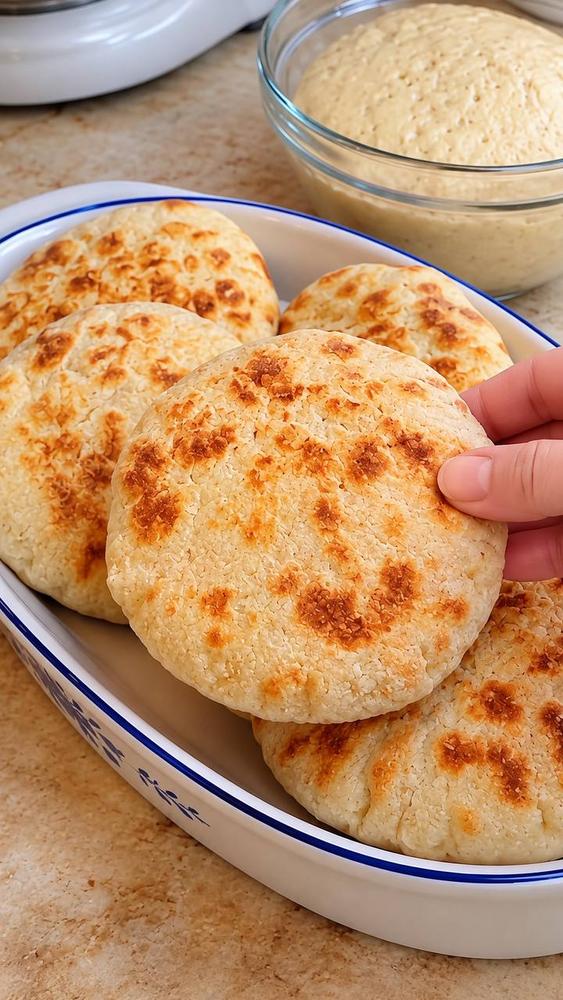
What makes this skillet flatbread so special? It’s the perfect blend of convenience and quality. Unlike traditional breads that demand an oven and often multiple rises, these flatbreads come together quickly and cook beautifully in a simple skillet. The result is a wonderfully soft, slightly chewy texture with those irresistible golden-brown spots that only pan-frying can achieve. It’s truly a no-fuss bread that tastes anything but. Whether you’re a seasoned baker or just starting your culinary journey, you’ll find immense satisfaction in transforming a few basic ingredients into these delightful rounds of goodness. They are perfect for soaking up rich sauces, cradling savory fillings, or simply enjoying on their own, still warm from the pan.
This recipe celebrates the beauty of homemade. You control every ingredient, ensuring no unwanted preservatives or additives, just pure, wholesome flavor. The process itself is incredibly rewarding, from watching the yeast come alive to kneading the dough until it’s smooth and elastic, and finally, seeing your flatbreads puff and brown in the hot skillet. It’s a sensory experience that culminates in a truly comforting and adaptable bread that can elevate any meal. Get ready to ditch the store-bought options and embrace the unparalleled taste and texture of your very own Soft Homemade Skillet Flatbread!
Nutritional Information
Per serving (approximate values):
- Calories: 210
- Protein: 7g
- Carbohydrates: 38g
- Fat: 4g
- Fiber: 2g
- Sodium: 300mg
Ingredients
- 1 cup (240ml) warm water (105-115°F / 40-46°C)
- 2 teaspoons active dry yeast
- 1 teaspoon granulated sugar
- 2 ½ cups (300g) all-purpose flour, plus more for dusting
- 1 teaspoon salt
- 2 tablespoons olive oil, plus more for the skillet
Instructions
- Activate the Yeast: In a large mixing bowl, combine the warm water, granulated sugar, and active dry yeast. Stir gently and let it sit for 5-10 minutes, until the mixture becomes foamy. This indicates the yeast is active and alive. If it doesn’t foam, your yeast may be old or the water temperature was off, and you should start again with fresh yeast.
- Combine Dry Ingredients: In a separate medium bowl, whisk together the all-purpose flour and salt. This ensures the salt is evenly distributed throughout the flour.
- Mix the Dough: Pour the activated yeast mixture into the bowl with the flour and salt. Add 2 tablespoons of olive oil. Using a wooden spoon or a sturdy spatula, mix until a shaggy dough forms and all the flour is incorporated.
- Knead the Dough: Transfer the dough to a lightly floured surface. Knead the dough for 5-7 minutes until it becomes smooth, elastic, and no longer sticky. If you have a stand mixer, you can use the dough hook attachment and knead on medium-low speed for 4-5 minutes. The dough should spring back when gently poked.
- First Rise (Proofing): Lightly grease the mixing bowl with a little olive oil. Place the dough ball in the bowl, turning it once to coat all sides with oil. Cover the bowl tightly with plastic wrap or a clean kitchen towel. Let the dough rise in a warm place for 60-90 minutes, or until it has doubled in size. The exact time will depend on the warmth of your kitchen.
- Divide and Shape: Once the dough has doubled, gently punch it down to release the air. Transfer the dough to a lightly floured surface. Divide the dough into 6-8 equal pieces. For uniform flatbreads, you can weigh them.
- Roll the Flatbreads: Take one piece of dough and flatten it slightly with your hands. Using a rolling pin, roll it out into a round or oval shape, about 6-8 inches (15-20 cm) in diameter and about 1/8 to 1/4 inch (3-6 mm) thick. Try to keep the thickness as even as possible for consistent cooking. Repeat with the remaining dough pieces. Place the rolled flatbreads on a lightly floured surface or baking sheet, making sure they don’t stick together.
- Preheat the Skillet: Heat a large, heavy-bottomed skillet (cast iron works wonderfully) over medium-high heat. Add about 1 teaspoon of olive oil to the skillet, swirling to coat the bottom. You want the skillet to be hot enough to cook the flatbread quickly without burning.
- Cook the Flatbreads: Carefully place one rolled flatbread into the hot skillet. Cook for 1-2 minutes per side, or until golden-brown spots appear and the flatbread puffs up. You might see some bubbles forming on the surface. Flip it with tongs or a spatula and cook the other side until it also has golden-brown spots. Adjust the heat as needed; if the flatbreads are browning too quickly, lower the heat slightly. If they aren’t browning, increase it.
- Keep Warm and Repeat: As each flatbread cooks, transfer it to a plate and cover it with a clean kitchen towel to keep it warm and soft. Continue with the remaining dough, adding a little more olive oil to the skillet between each flatbread if needed.
- Serve: Serve your Soft Homemade Skillet Flatbreads immediately, while they are still warm and tender. Enjoy!
Cooking Tips and Variations
Achieving perfectly soft and delicious skillet flatbreads every time is easier than you think with a few key tips and creative variations. First and foremost, pay attention to your dough consistency. The dough should be soft and slightly tacky, but not overly sticky. If it feels too wet during kneading, add a tablespoon of flour at a time until it reaches the right texture. Conversely, if it’s too dry and stiff, add a teaspoon of water. A well-hydrated dough leads to a tender flatbread.
Proper proofing is crucial for the soft, airy texture. Ensure your kitchen is warm enough for the dough to rise effectively. If your kitchen is cool, you can create a warm environment by placing the covered bowl in a slightly warm (but not hot) oven that has been turned off, or near a warm sunny window. Don’t rush the rise; let the dough double in size for optimal results. A longer, slower rise often develops more flavor.
When it comes to skillet heat, consistency is key. Preheat your skillet thoroughly over medium-high heat before adding the first flatbread. This initial heat creates those beautiful golden-brown spots. However, keep an eye on it; if the flatbreads are browning too quickly on the outside before cooking through, reduce the heat slightly. Conversely, if they aren’t browning, increase the heat. A good test is to flick a few drops of water into the hot pan; if they sizzle and evaporate quickly, it’s ready. Don’t overcrowd the pan; cook one or two flatbreads at a time to maintain consistent heat.
For flavor variations, the possibilities are endless! Before cooking, sprinkle the rolled-out dough with dried herbs like oregano, thyme, or rosemary for an aromatic twist. You can also press in some minced garlic or finely chopped green onions. For a cheesy delight, sprinkle a little shredded mozzarella or feta onto the flatbread after flipping it to the second side, allowing the cheese to melt and get slightly crispy. For a hint of spice, a pinch of red pepper flakes can be kneaded into the dough or sprinkled on top. You can also experiment with different flours; a portion of whole wheat flour can add a nutty flavor and extra fiber, though it might result in a slightly denser flatbread. Don’t be afraid to get creative and tailor these flatbreads to your taste preferences!
Storage and Reheating
Storing your Soft Homemade Skillet Flatbreads properly is key to maintaining their delicious texture and freshness for as long as possible. Once cooked, allow any leftover flatbreads to cool completely to room temperature. Stacking them while warm can create condensation, leading to sogginess. Once cooled, place them in an airtight container or a resealable plastic bag. They will stay fresh at room temperature for up to 2-3 days. For longer storage, you can refrigerate them for up to a week.
For even longer preservation, these flatbreads freeze beautifully. Once completely cool, stack them with small pieces of parchment paper in between to prevent sticking, then wrap the stack tightly in plastic wrap and place in a freezer-safe bag or container. They can be frozen for up to 2-3 months. Thaw frozen flatbreads overnight in the refrigerator or at room temperature for a few hours before reheating.
Reheating is simple and helps restore their soft, fresh-from-the-skillet taste. The best method is to reheat them in a dry skillet over medium heat for 30-60 seconds per side, or until warmed through and slightly pliable again. You can also lightly brush them with a little water or olive oil before reheating to help them stay moist. Alternatively, you can warm them in a toaster oven or a regular oven at 300°F (150°C) for a few minutes. Avoid microwaving them for too long, as this can make them chewy or tough; a very short burst (10-15 seconds) might work for a single flatbread, but the skillet method is preferred for texture.
Frequently Asked Questions
What makes these flatbreads “soft”?
The softness of these flatbreads comes from a few key factors: proper hydration of the dough, adequate kneading to develop gluten without overworking it, and sufficient proofing (rising time) which creates an airy structure. The quick cooking in a hot skillet also prevents them from drying out, contributing to their tender texture. Using a small amount of oil in the dough and during cooking also helps tenderize the crumb.
Can I make these flatbreads without yeast?
While this specific recipe uses yeast for its characteristic soft, slightly chewy texture and gentle rise, you can make a quick, unleavened flatbread (like a tortilla or chapati) using just flour, water, salt, and oil. However, it will have a denser, chewier texture and won’t puff up in the same way as a yeast-leavened flatbread. For a similar soft texture without yeast, you could try a baking powder-leavened version, which would yield a slightly different crumb.
What’s the best way to prevent the flatbreads from sticking to the skillet?
To prevent sticking, ensure your skillet is adequately seasoned (if using cast iron) and properly preheated. Always add a small amount of olive oil (about 1 teaspoon per flatbread or less) to the hot skillet before placing the dough. The oil creates a non-stick barrier and also contributes to the beautiful browning. If you notice sticking, your skillet might not be hot enough, or you might need a tiny bit more oil.
Can I prepare the dough ahead of time?
Absolutely! This dough is quite forgiving. After the first rise, you can punch it down, place it in an oiled bowl, cover it tightly with plastic wrap, and refrigerate it for up to 24-48 hours. When you’re ready to cook, take the dough out of the refrigerator and let it come to room temperature for about 30-60 minutes before dividing, shaping, and cooking. This slow fermentation in the fridge can even enhance the flavor of the flatbreads.