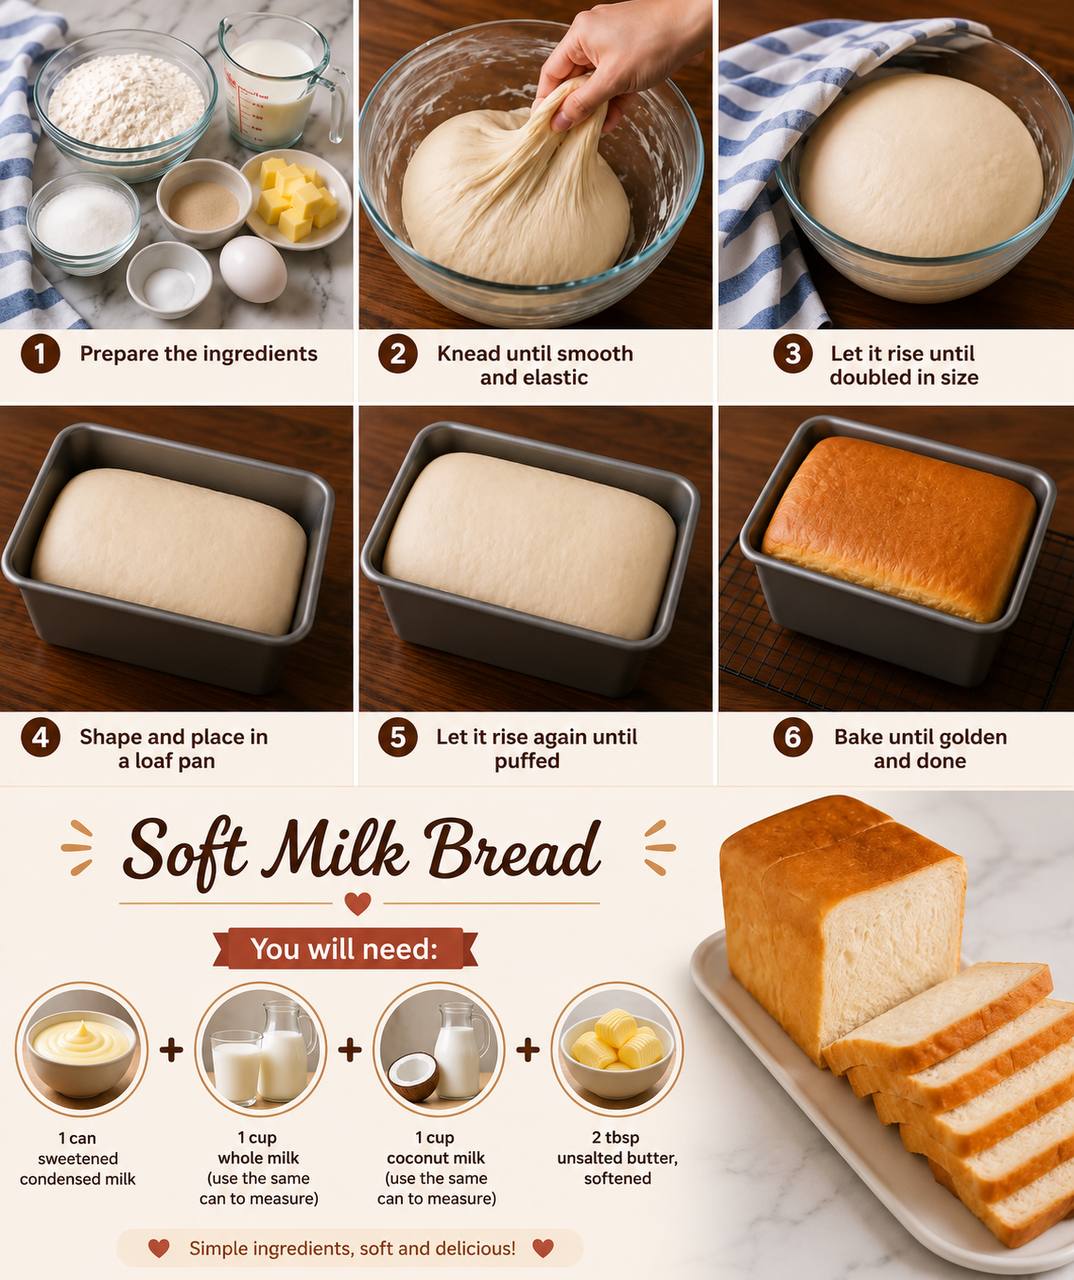
Instructions
- Activate the Yeast: In a small bowl, combine the warm whole milk (½ cup), 1 teaspoon of granulated sugar, and the active dry yeast. Stir gently and let it sit for 5-10 minutes, or until foamy. This indicates the yeast is active.
- Combine Dry Ingredients: In a large mixing bowl (or the bowl of a stand mixer fitted with the dough hook), whisk together the flour, remaining ¼ cup granulated sugar, and salt.
- Add Wet Ingredients: Create a well in the center of the dry ingredients. Pour in the activated yeast mixture, the 1 large egg, the entire can of sweetened condensed milk, 1 cup of whole milk, and 1 cup of coconut milk.
- Mix the Dough: Start mixing on low speed (or by hand with a sturdy spoon) until the ingredients are just combined and a shaggy dough forms.
- Incorporate Butter: Add the softened, cubed unsalted butter to the dough. Continue mixing on low speed until the butter is mostly incorporated.
- Knead the Dough: Increase the speed to medium-low and knead for 8-10 minutes, or until the dough is smooth, elastic, and passes the windowpane test (you should be able to stretch a small piece of dough thinly enough to see light through it without it tearing). If kneading by hand, turn the dough out onto a lightly floured surface and knead vigorously for 12-15 minutes. The dough will be sticky at first but will become smoother as you knead.
- First Rise (Bulk Fermentation): Lightly grease a clean large bowl with a little oil. Place the kneaded dough in the bowl, turning it once to coat. Cover the bowl tightly with plastic wrap or a clean kitchen towel. Let the dough rise in a warm, draft-free place for 1 to 1 ½ hours, or until it has doubled in size.
- Punch Down and Divide: Once the dough has doubled, gently punch it down to release the air. Turn the dough out onto a lightly floured surface. Divide the dough into 3 equal pieces.
- Shape the Loaf: Take one piece of dough and flatten it into a rectangle. Fold the top edge down to the center, then fold the bottom edge up to meet the top, pressing to seal. Turn the dough seam-side down and gently roll it into a cylinder. Repeat with the remaining two pieces of dough.
- Second Rise (Proofing in Pan): Lightly grease a standard 9×5-inch loaf pan. Arrange the three shaped dough cylinders side-by-side in the prepared loaf pan. Cover the loaf pan loosely with plastic wrap or a clean kitchen towel. Let the dough rise in a warm, draft-free place for another 45-60 minutes, or until it has puffed up significantly and nearly doubled in size again. It should dome slightly over the top of the pan.
- Preheat Oven: About 15-20 minutes before the second rise is complete, preheat your oven to 350°F (175°C).
- Bake the Bread: Once the dough has finished its second rise, place the loaf pan in the preheated oven. Bake for 30-35 minutes, or until the top is golden brown and the internal temperature reaches 190-200°F (88-93°C) when measured with an instant-read thermometer.
- Cooling: Once baked, immediately remove the bread from the oven. Brush the top with the 2 tablespoons of melted unsalted butter for a softer crust and added flavor. Let the bread cool in the pan for 10-15 minutes before carefully transferring it to a wire rack to cool completely. Cooling completely is crucial before slicing to prevent a gummy texture.
Cooking Tips and Variations
Achieving that perfect soft sandwich bread is all about a few key techniques and considerations. First and foremost, pay attention to ingredient temperatures. Warm milk (not hot!) is essential for activating your yeast without killing it, so aim for that 105-115°F range. Similarly, using room temperature eggs and softened butter ensures they integrate smoothly into the dough, leading to a more uniform and tender crumb. Cold ingredients can stiffen the dough and make kneading more challenging.
Kneading is where the magic happens for gluten development, which gives your bread its structure and elasticity. If you’re using a stand mixer, don’t be afraid to let it work for the full 8-10 minutes. If kneading by hand, embrace the process – it’s a fantastic arm workout! The “windowpane test” is your best friend here: take a small piece of dough, gently stretch it between your fingers. If you can stretch it thin enough to see light through it without it tearing, your gluten is well-developed. If it tears easily, keep kneading. Don’t be tempted to add too much extra flour during hand kneading; a slightly sticky dough is often a sign of proper hydration, and adding too much flour will result in a dry, dense loaf.
The proofing environment plays a significant role in how well your bread rises. Yeast thrives in warm, draft-free conditions. If your kitchen is cool, you can create a warm proofing environment by preheating your oven to its lowest setting for a few minutes, then turning it off and placing the covered dough inside. Alternatively, you can place the bowl in a warm water bath. Just ensure it’s not too hot, as excessive heat can overproof the dough or kill the yeast. Look for the dough to double in size for the first rise and significantly puff up for the second rise – these visual cues are more important than strict timings.
For variations, while the recipe specifies all-purpose flour, you can experiment with bread flour for a slightly chewier texture, though it might absorb a bit more liquid, so be mindful of the dough’s consistency. If you don’t have coconut milk, you can substitute it with an equal amount of whole milk for a still-delicious, though slightly less rich, loaf. For a touch more sweetness, you can sprinkle a little extra granulated sugar or even some coarse sugar on top before baking. If you prefer a savory bread, you can reduce the sugar slightly and add herbs like dried rosemary or thyme to the dough. Remember, cooling the bread completely on a wire rack after baking is non-negotiable. Slicing too early traps steam, leading to a gummy texture.
Storage and Reheating
Proper storage is key to maintaining the incredible softness and freshness of your homemade milk bread. Once the bread has completely cooled (this is crucial!), store it at room temperature in an airtight container, a bread box, or a large resealable plastic bag. This will protect it from drying out and keep it fresh for 3-4 days. Avoid refrigerating homemade bread, as the cold temperature can actually accelerate staling, making it dry and hard much faster.
For longer storage, this bread freezes beautifully. Once cooled completely, slice the loaf and place the slices in a freezer-safe bag or wrap the entire loaf tightly in plastic wrap, then an additional layer of aluminum foil. It can be frozen for up to 2-3 months. To enjoy frozen bread, you can either thaw individual slices in the toaster or microwave directly, or thaw the entire loaf at room temperature overnight. Thawed bread will taste almost as fresh as the day it was baked.
When it comes to reheating, individual slices are best warmed in a toaster to regain a slight crispness on the outside while keeping the inside soft. For a whole loaf that has gone slightly stale, you can revive it by lightly misting it with water and warming it in a preheated oven at 300°F (150°C) for about 10-15 minutes, or until warmed through. This will help to re-soften the crust and interior, making it enjoyable once more. However, nothing quite beats the freshness of a newly baked or properly thawed slice of this delightful bread.
Frequently Asked Questions
What makes this bread so soft compared to other sandwich breads?
The incredible softness of this bread comes primarily from the generous use of dairy products: whole milk, coconut milk, and especially sweetened condensed milk. These ingredients contribute fat and sugars, which interfere with gluten development just enough to keep the crumb tender, moist, and incredibly soft. The condensed milk also adds a unique richness and subtle sweetness that enhances the overall texture and flavor.
Can I make this recipe in a bread machine?
Yes, you can adapt this recipe for a bread machine. Add the wet ingredients first (milk, condensed milk, coconut milk, egg), followed by the dry ingredients (flour, sugar, salt, yeast). Place the softened butter in last. Use the “Dough” cycle. Once the cycle is complete, remove the dough, punch it down, shape it, let it complete its second rise in a loaf pan, and then bake it in a conventional oven as directed in the recipe.
My dough isn’t rising. What went wrong?
The most common reasons for dough not rising are inactive yeast, liquid that was too hot (killing the yeast), or a proofing environment that is too cold. Ensure your warm milk is between 105-115°F (40-46°C) when activating the yeast. If your yeast didn’t get foamy after 5-10 minutes, it’s likely inactive, and you’ll need to start with fresh yeast. Also, make sure your proofing area is warm and draft-free to encourage proper rising.
How can I tell if the bread is fully baked?
Visually, the bread should have a deep golden-brown crust. For a more accurate measure, use an instant-read thermometer. Insert it into the center of the loaf; it should read between 190-200°F (88-93°C). If it’s lower, continue baking for a few more minutes. Tapping the bottom of the loaf should also produce a hollow sound, indicating it’s done.