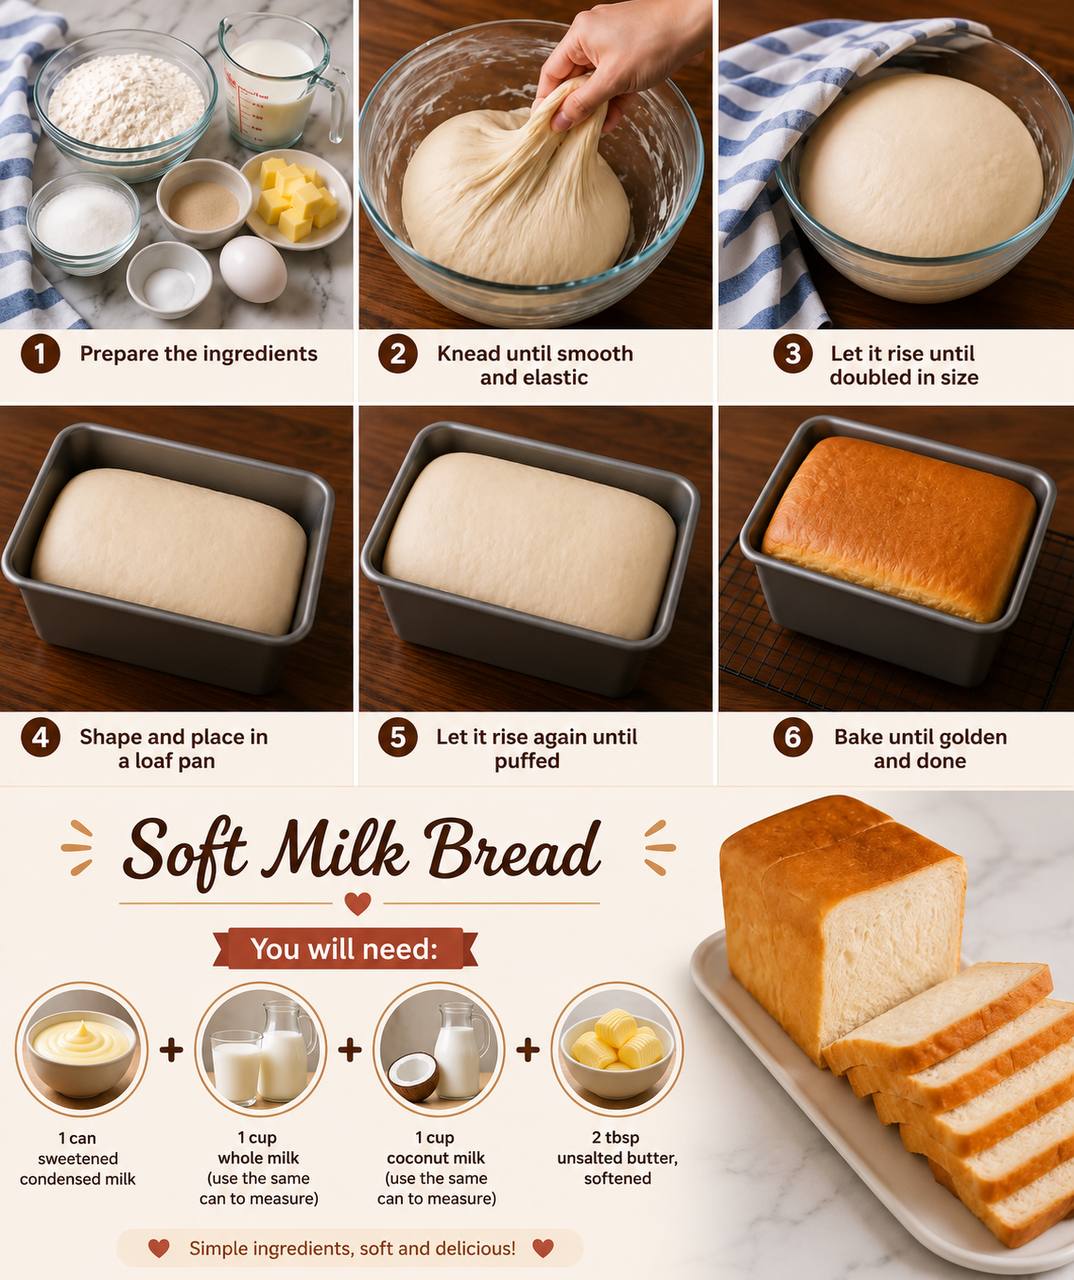
Instructions
- In a large mixing bowl, combine the warm whole milk, sweetened condensed milk, and coconut milk. Sprinkle the active dry yeast over the top and let it sit for 5-10 minutes, or until foamy. This indicates the yeast is active. If using instant yeast, you can proceed directly to the next step without waiting for foam.
- Add the granulated sugar, salt, and egg to the yeast mixture. Whisk well to combine.
- Gradually add the all-purpose flour, about 1 cup at a time, mixing with a wooden spoon or spatula until a shaggy dough forms.
- Turn the dough out onto a lightly floured surface. Begin to knead the dough. If kneading by hand, push the dough away from you with the heels of your hands, fold it back, and rotate. Continue kneading for about 10-12 minutes, or until the dough is smooth and elastic. If using a stand mixer with a dough hook, knead on low speed for 8-10 minutes.
- Once the dough is somewhat smooth, add the softened unsalted butter, one tablespoon at a time, incorporating each piece fully before adding the next. The dough will become quite sticky at this stage, but keep kneading. Continue kneading for another 5-7 minutes (or 3-5 minutes in a stand mixer) until the butter is fully incorporated and the dough is very smooth, elastic, and passes the “windowpane test” (you should be able to stretch a small piece of dough thin enough to see light through it without it tearing).
- Lightly grease a clean large bowl with a little oil. Place the dough in the bowl, turning it once to coat. Cover the bowl tightly with plastic wrap or a clean kitchen towel.
- Allow the dough to rise in a warm, draft-free place for 1 to 1.5 hours, or until it has doubled in size. The exact time will depend on the temperature of your kitchen.
- Once the dough has doubled, gently punch it down to release the air. Turn the dough out onto a lightly floured surface.
- Divide the dough into 3 equal pieces. Roll each piece into a smooth ball.
- Take one ball of dough and, using a rolling pin, roll it into an oval shape, about 8-9 inches long. Fold the top third of the oval down towards the center, then fold the bottom third up over the center, creating a rectangle.
- Rotate the dough 90 degrees. Roll the dough again into a rectangle, about 8-9 inches long. Starting from one of the shorter ends, tightly roll the dough into a log. Pinch the seam closed. Repeat this shaping process with the remaining two pieces of dough.
- Grease a 9×5-inch loaf pan. Place the three shaped dough logs side-by-side in the prepared loaf pan.
- Cover the loaf pan loosely with plastic wrap or a clean kitchen towel. Allow the dough to rise again in a warm place for 45-60 minutes, or until it has risen about 1 inch above the rim of the pan.
- Preheat your oven to 350°F (175°C) during the last 15-20 minutes of the second rise.
- Once the dough has risen sufficiently, place the loaf pan in the preheated oven.
- Bake for 30-35 minutes, or until the top is golden brown and the internal temperature reaches 200-210°F (93-99°C) when measured with an instant-read thermometer. If the top starts to brown too quickly, you can loosely tent it with aluminum foil.
- Remove the loaf from the oven. If desired, brush the top with melted butter for a softer crust and added shine.
- Immediately remove the bread from the loaf pan and transfer it to a wire rack to cool completely before slicing. Slicing warm bread can compact the crumb and make it gummy.
Cooking Tips and Variations
Achieving that perfect, cloud-like softness in your milk bread often comes down to a few key techniques and considerations. First and foremost, pay close attention to your yeast. Ensure your milk is warm, but not hot – between 105-115°F (40-46°C) is ideal for active dry yeast. Too cold, and the yeast won’t activate; too hot, and it will die. If your yeast doesn’t foam after 5-10 minutes, it’s best to start over with fresh yeast. Kneading is another critical step. Don’t skimp on it! The prolonged kneading, especially after adding the butter, is what develops the gluten structure that gives the bread its elasticity and signature soft, chewy texture. The “windowpane test” is your best friend here – if you can stretch a small piece of dough thin enough to see light through it without it tearing, your gluten is well developed. If you’re kneading by hand, it can be a workout, but it’s incredibly rewarding. For stand mixer users, a dough hook makes this process much easier. Don’t be afraid if the dough seems sticky; resist the urge to add too much extra flour, as this can lead to a dry loaf. A little flour for dusting your work surface is fine, but excessive flour will alter the hydration balance of the dough.
The rising environment also plays a significant role. A warm, draft-free spot is ideal for both the first and second rises. If your kitchen is cool, you can create a makeshift proofing box. One method is to preheat your oven to its lowest setting (around 150°F or 65°C) for a few minutes, then turn it off and place your covered dough inside. Alternatively, you can place the bowl of dough in a larger bowl of warm water. Always cover your dough with plastic wrap or a damp kitchen towel to prevent it from drying out and forming a crust, which can inhibit rising. The second rise, or proofing, in the loaf pan is just as important as the first. It allows the shaped dough to relax and develop its final structure before baking. Don’t rush this step; the dough should look visibly puffed and feel light when gently poked. Under-proofed bread will be dense, while over-proofed bread can collapse in the oven.
For variations, this Soft Milk Bread is a fantastic canvas. For a richer flavor, you can substitute some of the whole milk with heavy cream. If you prefer a less sweet bread, you can slightly reduce the amount of granulated sugar, though it does contribute to the bread’s tenderness and browning. To add a hint of spice, a pinch of cardamom or cinnamon can be incorporated with the dry ingredients. For a savory twist, consider adding some dried herbs like rosemary or thyme, or even some grated Parmesan cheese to the dough during the last few minutes of kneading, though this will change the overall character from a classic “milk bread.” You can also experiment with different types of milk. Almond milk or oat milk can be used for a dairy-free version, though the texture might be slightly different due to varying fat contents. For an even more decadent bread, consider brushing the top with an egg wash (one egg yolk mixed with a tablespoon of water) before baking for a shinier, richer crust. This bread also makes an excellent base for sweet fillings after baking, such as a swirl of cinnamon sugar or a cream cheese filling, turning it into a delightful treat.
Storage and Reheating
Proper storage is key to maintaining the incredible softness and freshness of your homemade Soft Milk Bread. Once the bread has cooled completely on a wire rack – and this is crucial, as trapping steam will make the crust soggy – it should be stored at room temperature. The best way to store it is in an airtight container or a large, sealable plastic bag. You can also wrap the loaf tightly in plastic wrap, then place it in a bread box. Stored this way, your Soft Milk Bread will remain wonderfully soft and fresh for 3-4 days. Avoid storing homemade bread in the refrigerator, as the cool temperatures can actually accelerate the staling process, making the bread dry and hard much faster.
If you won’t be finishing the loaf within a few days, or if you want to always have fresh bread on hand, freezing is an excellent option. To freeze, ensure the bread is completely cool. You can freeze the entire loaf or slice it first, which makes it easier to grab just what you need. Wrap the loaf or individual slices tightly in plastic wrap, then place them in a freezer-safe bag or aluminum foil. This double layer of protection helps prevent freezer burn. Frozen Soft Milk Bread can last for up to 2-3 months. When you’re ready to enjoy it, simply thaw the bread at room temperature. Individual slices will thaw quickly, often in 15-30 minutes. A whole loaf might take several hours. For the best results, you can refresh thawed slices or a whole loaf by warming them in a preheated oven at 300°F (150°C) for 5-10 minutes, or until warmed through and soft. This brings back that amazing fresh-baked aroma and texture. You can also toast slices directly from frozen for a quick and delicious breakfast.
Frequently Asked Questions
Why is my homemade bread dense and not soft?
A dense loaf often points to a few common issues. The most frequent culprits are insufficient kneading, not enough proofing (rising), or using too much flour. Kneading is vital for developing gluten, which gives bread its structure and elasticity. If the dough isn’t kneaded enough, it won’t be able to trap the gases produced by the yeast, resulting in a heavy texture. Similarly, if the dough doesn’t rise sufficiently during both the first and second proofing stages, it won’t achieve that light, airy texture. Ensure your yeast is active and your rising environment is warm. Also, be careful not to add too much extra flour during kneading, as this lowers the dough’s hydration and can lead to a dry, dense crumb.
Can I make this bread without a stand mixer?
Absolutely! While a stand mixer with a dough hook makes the kneading process easier and quicker, this Soft Milk Bread recipe can certainly be made by hand. Be prepared for a good arm workout! Manual kneading typically takes a bit longer than machine kneading – expect around 15-20 minutes of continuous effort to achieve the necessary gluten development. The key is to keep pushing, folding, and rotating the dough until it becomes smooth, elastic, and passes the windowpane test. Don’t be discouraged if it feels sticky initially; resist the urge to add excessive flour and keep working it. The patience will pay off with a beautifully soft loaf.
What if I don’t have sweetened condensed milk or coconut milk?
While sweetened condensed milk and coconut milk contribute significantly to the unique flavor profile and exceptional softness of this particular recipe, you can make substitutions if necessary. For the sweetened condensed milk, you can increase the granulated sugar by 2-3 tablespoons and add an equivalent amount of whole milk to maintain the liquid content. This will result in a slightly less rich and sweet bread but will still be delicious. For the coconut milk, you can simply replace it with an equal amount of whole milk or even heavy cream for added richness. The combination of these specific milks is what gives this “Soft Milk Bread” its distinct character, so while substitutions are possible, the final product’s flavor and texture may vary slightly from the intended recipe.