Introduction
Imagine a dessert that’s as delightful to look at as it is to eat, yet requires absolutely no oven time. A sweet creation that comes together with minimal fuss, perfect for those moments when you crave something special but are short on time or just want to beat the heat. Welcome to the world of our Strawberry & Pineapple Layered Dessert – a no-bake wonder that promises quick preparation and a luxuriously creamy finish, making it an instant favorite for any occasion.
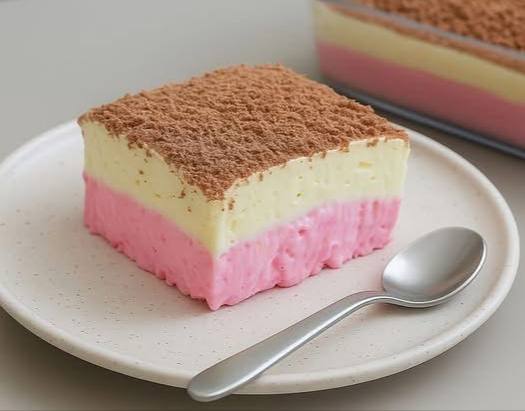
This dessert is a celebration of refreshing flavors and effortless elegance. The vibrant sweetness of strawberries perfectly harmonizes with the tropical tang of pineapple, creating a balanced and utterly irresistible taste experience. Each spoonful delivers a smooth, creamy texture that melts in your mouth, leaving a refreshing sensation that’s ideal for warm weather gatherings, casual family dinners, or simply satisfying a sudden sweet craving. Its stunning visual appeal, with distinct pink and yellow layers crowned by a delicate dusting of cocoa, ensures it will be the star of any dessert table.
Beyond its incredible taste and beautiful presentation, what truly sets this layered dessert apart is its sheer convenience. The “No-Bake Quick & Creamy” moniker isn’t just a catchy phrase; it’s a promise. Whether you’re a seasoned baker or a kitchen novice, you’ll find this recipe remarkably simple to follow, yielding professional-looking results every time. It’s the ultimate solution for busy individuals who want to impress without the stress, offering a sophisticated dessert that feels gourmet but is surprisingly easy to achieve.
Nutritional Information
Per serving (approximate values):
- Calories: 320
- Protein: 5g
- Carbohydrates: 48g
- Fat: 13g
- Fiber: 2g
- Sodium: 180mg
Ingredients
- 1 ½ cups fresh strawberries, hulled and roughly chopped
- ¼ cup granulated sugar (for strawberry layer, adjust to taste)
- 1 tablespoon unflavored gelatin powder
- ¼ cup cold water
- 8 ounces cream cheese, softened
- 1 (14-ounce) can sweetened condensed milk
- 1 teaspoon vanilla extract
- 1 (20-ounce) can crushed pineapple, well drained
- 1 (8-ounce) container frozen whipped topping, thawed (like Cool Whip)
- 1 tablespoon unsweetened cocoa powder, for dusting
- Pinch of salt
Instructions
- Prepare the Strawberry Layer: In a medium saucepan, combine the chopped strawberries and ¼ cup granulated sugar. Cook over medium heat, stirring occasionally, until strawberries soften and release their juices, about 5-7 minutes. Mash the strawberries with a fork or potato masher to create a chunky sauce. Remove from heat and let cool slightly.
- Dissolve Gelatin: In a small bowl, sprinkle the gelatin powder over ¼ cup cold water. Let it sit for 5 minutes to bloom (thicken).
- Combine Strawberry Mixture with Gelatin: While the gelatin is blooming, transfer the slightly cooled strawberry mixture to a blender or food processor. Blend until smooth. Add the bloomed gelatin mixture to the warm strawberry puree and blend again until fully incorporated.
- Prepare the Pan: Line an 8×8 inch square baking dish or a 9-inch round springform pan with parchment paper, leaving an overhang on the sides for easy removal. Lightly grease the parchment paper if desired.
- Assemble the First Layer: In a large mixing bowl, beat the softened cream cheese with an electric mixer until smooth and creamy, about 2-3 minutes. Gradually beat in the sweetened condensed milk and vanilla extract until well combined.
- Fold in Whipped Topping (First Half): Gently fold half of the thawed whipped topping into the cream cheese mixture until no streaks remain.
- Create Strawberry Cream Base: Take about 1 ½ cups of the cream cheese/whipped topping mixture and gently fold it into the strawberry puree until just combined. This will be your pink layer.
- Pour and Chill Strawberry Layer: Pour the strawberry layer mixture into the prepared pan and spread evenly. Refrigerate for at least 30-45 minutes, or until just set but still slightly tacky. This ensures the next layer won’t sink.
- Prepare the Pineapple Layer: Ensure the crushed pineapple is very well drained. You can press it against a sieve or use paper towels to remove excess liquid.
- Combine Pineapple with Remaining Cream Mixture: To the remaining half of the cream cheese/whipped topping mixture (from step 6), gently fold in the well-drained crushed pineapple and a pinch of salt until just combined.
- Pour and Chill Pineapple Layer: Carefully spoon or pour the pineapple layer over the chilled strawberry layer. Use the back of a spoon to gently spread it evenly across the surface.
- Final Chill: Cover the pan loosely with plastic wrap and refrigerate for a minimum of 4 hours, or preferably overnight, until the dessert is completely firm and set.
- Serve: Once fully chilled, use the parchment paper overhang to lift the dessert out of the pan. Place it on a cutting board and carefully remove the parchment. Use a sharp knife (wiping it clean between cuts for neat slices) to cut into squares or desired portions.
- Garnish: Just before serving, use a fine-mesh sieve to dust the top generously with unsweetened cocoa powder. Serve immediately and enjoy!
Cooking Tips and Variations
Achieving clean, distinct layers is key to this dessert’s visual appeal. To ensure your strawberry layer is fully set before adding the pineapple, gently touch the surface with your fingertip. If it feels firm and doesn’t stick to your finger, it’s ready. When pouring the second layer, don’t just dump it in; instead, spoon small dollops evenly over the first layer and then gently spread it with an offset spatula or the back of a spoon. This technique prevents the heavier second layer from breaking through the first, ensuring those beautiful, crisp lines.
If you’re using fresh pineapple, it’s crucial to briefly cook it before adding it to the dessert. Fresh pineapple contains an enzyme called bromelain, which can prevent gelatin from setting properly, leading to a runny dessert. A quick boil for about 5 minutes will inactivate this enzyme. Canned pineapple, however, has already been processed, so its enzymes are inactive, making it a convenient choice for this no-bake recipe. Always make sure your crushed pineapple is thoroughly drained to avoid adding excess moisture to your creamy layers.
Customization is one of the joys of this recipe! You can easily swap out the fruits to create new flavor profiles. Consider a peach and raspberry combination, or perhaps a mango and passion fruit for a more exotic twist. Just remember to adjust the sugar content based on the sweetness of your chosen fruits. For an extra touch of indulgence, you could incorporate a thin layer of crushed graham crackers or vanilla wafers as a crust at the bottom of the pan before adding the strawberry layer. This adds a lovely textural contrast and a hint of buttery flavor.
For an even richer creaminess, consider folding in 2 tablespoons of mascarpone cheese with the softened cream cheese. This adds a subtle tang and a silkier texture. If you prefer a less sweet dessert, you can reduce the amount of sweetened condensed milk slightly, or use unsweetened crushed pineapple. Always taste your fruit layers before chilling and adjust the sugar as needed. Remember, the chill time is not just a suggestion; it’s vital for the dessert to set properly and be easily sliceable. Rushing this step will result in a messy presentation and a less enjoyable texture. For the best results, an overnight chill is always recommended.
Storage and Reheating
This Strawberry & Pineapple Layered Dessert is best enjoyed chilled and fresh. To store any leftovers, place them in an airtight container. This will protect the dessert from absorbing odors from the refrigerator and prevent it from drying out. Properly stored, the dessert will maintain its quality and texture for up to 3-4 days in the refrigerator. It’s important to keep it well-covered to preserve its creamy consistency and prevent the cocoa dusting from becoming soggy.
Due to its no-bake, creamy, and gelatin-set nature, this dessert does not lend itself well to reheating. Reheating would cause the gelatin to melt and the creamy layers to separate, resulting in a runny and unappetizing consistency. It is designed to be served and consumed cold, directly from the refrigerator. If you anticipate having leftovers, it’s best to cut only the portions you intend to serve immediately and keep the rest of the dessert whole in the pan, covered, in the refrigerator.
When serving leftovers, simply take them out of the refrigerator, dust with a fresh sprinkle of cocoa powder if desired, and serve immediately. Freezing this dessert is also not recommended. Freezing and thawing would significantly alter the texture of the cream cheese, whipped topping, and gelatin, making it watery and grainy. For the best experience, always store it in the refrigerator and enjoy it cold.
Frequently Asked Questions
What if my gelatin doesn’t set properly?
There are a few common reasons why gelatin might not set. The most frequent culprit is not using enough gelatin for the amount of liquid, or not allowing it enough time to bloom (thicken in cold water) before dissolving. Another reason, especially with fresh pineapple, is the bromelain enzyme preventing it from setting; ensure you briefly cook fresh pineapple to inactivate this enzyme. Finally, make sure your dessert has ample chilling time – at least 4 hours, but overnight is always best for a firm set.
Can I make this dessert ahead of time for a party?
Absolutely! This is an ideal make-ahead dessert. In fact, preparing it the day before and allowing it to chill overnight ensures the layers are perfectly set and firm, making for cleaner cuts and a more stable dessert. Just be sure to dust with cocoa powder right before serving to keep it fresh and visually appealing.
Can I substitute other fruits for strawberry and pineapple?
Yes, this recipe is quite versatile! You can experiment with other fruit purees for the bottom layer, such as raspberries, peaches, or mango. For the top layer, well-drained canned mandarins or diced fresh mango could work beautifully. Remember to adjust sugar levels based on the sweetness of your chosen fruits. If using fresh fruits with enzymes (like kiwi or papaya), they will also need to be briefly cooked to ensure the gelatin sets.
How can I get really clean cuts when serving?
To achieve perfectly neat slices, ensure the dessert is thoroughly chilled and firm. Use a sharp, thin-bladed knife. For each cut, dip the knife into hot water, wipe it clean, and then make a single, decisive pass through the dessert. Repeat this process for every cut – hot water, wipe, cut. This prevents the creamy layers from sticking to the knife and dragging, resulting in beautifully defined portions.