Instructions
- Preheat your oven to 350°F (175°C). Grease and flour two 8-inch round cake pans, or line with parchment paper circles.
- In a medium bowl, whisk together the sifted all-purpose flour, baking powder, baking soda, and salt. Set aside.
- In a large bowl, using an electric mixer, cream together the softened unsalted butter and granulated sugar on medium-high speed until light and fluffy, about 3-5 minutes.
- Add the eggs one at a time, beating well after each addition. Scrape down the sides of the bowl as needed. Beat in the vanilla extract until just combined.
- With the mixer on low speed, gradually add the dry ingredients to the wet ingredients in three additions, alternating with the buttermilk in two additions. Begin and end with the dry ingredients. Mix until just combined; be careful not to overmix. A few small lumps are okay.
- Gently fold in the rainbow sprinkles by hand using a spatula until evenly distributed throughout the batter.
- Divide the batter evenly between the prepared cake pans.
- Bake for 30-35 minutes, or until a wooden skewer inserted into the center of the cakes comes out clean.
- Remove the cakes from the oven and let them cool in the pans for 10-15 minutes before inverting them onto a wire rack to cool completely. Ensure cakes are completely cool before frosting.
- While the cakes are cooling, prepare the Vanilla Buttercream Frosting. In a large bowl, beat the softened unsalted butter with an electric mixer on medium speed until creamy, about 2 minutes.
- Gradually add the sifted powdered sugar, one cup at a time, beating on low speed until combined, then increasing to medium speed.
- Once all the powdered sugar is incorporated, add the heavy cream (or milk), vanilla extract, and pinch of salt. Beat on medium-high speed for another 3-5 minutes, until the frosting is light, fluffy, and smooth. If the frosting is too thick, add more cream a teaspoon at a time. If it’s too thin, add more powdered sugar.
- Once the cakes are completely cool, level the tops with a serrated knife if necessary. Place one cake layer on your serving plate or cake stand. Spread about 1 cup of frosting evenly over the top.
- Place the second cake layer on top. Apply a thin layer of frosting all over the cake (top and sides) for a “crumb coat.” This traps any loose crumbs.
- Chill the cake in the refrigerator for 15-20 minutes to set the crumb coat.
- Once the crumb coat is set, apply the remaining frosting to the top and sides of the cake, spreading it evenly with an offset spatula or knife.
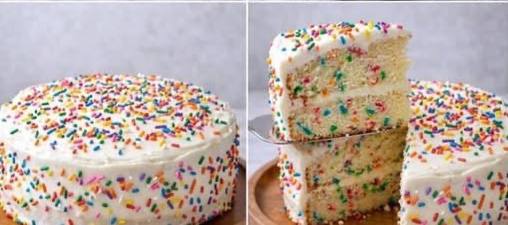
- Decorate the cake with additional rainbow sprinkles as desired. Slice and serve!
Cooking Tips and Variations
For the perfect Vanilla Funfetti Cake, attention to detail makes all the difference. Firstly, ensure all your cold ingredients, especially the butter, eggs, and buttermilk, are at room temperature. This allows them to emulsify properly, creating a smoother batter and a more tender cake. Overmixing is the enemy of a tender cake; once you add the dry ingredients, mix only until just combined. A few small lumps are preferable to a tough, dense cake. When it comes to sprinkles, quality matters. Opt for jimmies (the rod-shaped sprinkles) or quins (flat, disc-shaped sprinkles) as they hold their color and shape better in the batter. Avoid nonpareils, as their colors tend to bleed, turning your beautiful cake batter into a murky mess. To ensure even baking and flat cake layers, you can use baking strips around your cake pans. These insulate the sides of the pan, making the cakes bake more evenly and preventing doming.
If you’re looking to add variations, the possibilities are endless. For a citrusy twist, add 1 tablespoon of lemon or orange zest to the batter. You could also swap out a portion of the vanilla extract for almond extract for a different flavor profile. For the frosting, while vanilla buttercream is classic, feel free to experiment. A cream cheese frosting would provide a lovely tang, or you could infuse your buttercream with other flavors, like strawberry or raspberry, by adding a small amount of fruit puree or extract. To make individual treats, this recipe can easily be adapted for cupcakes; simply reduce the baking time to 18-22 minutes. For a truly decadent experience, consider adding a layer of raspberry jam or lemon curd between the cake layers before frosting. Always remember to chill your cake layers thoroughly before frosting; this makes them much easier to handle and reduces the risk of tearing. A crumb coat is also essential for a clean, professional finish, trapping any loose crumbs before the final layer of frosting is applied.
Storage and Reheating
Proper storage is key to keeping your Vanilla Funfetti Cake fresh and delicious. If you have leftover slices or a whole cake, the best way to store it is in an airtight cake carrier or container at room temperature for up to 2-3 days. If your kitchen is particularly warm, or if your frosting contains perishable ingredients like fresh cream cheese, it’s best to store the cake in the refrigerator. When refrigerating, ensure the cake is well-covered to prevent it from drying out or absorbing refrigerator odors. Before serving a refrigerated cake, allow it to sit at room temperature for at least 30 minutes to an hour. This allows the cake and frosting to soften, bringing them back to their optimal texture and flavor. Cold cake and frosting can be firm and less flavorful.
For longer storage, Funfetti cake freezes beautifully. To freeze, first chill the cake until the frosting is firm. Then, wrap individual slices or the entire cake (if unfrosted, wrap layers separately) tightly in plastic wrap, followed by a layer of aluminum foil. This double-layer protection helps prevent freezer burn. Frozen cake can be stored for up to 2-3 months. To thaw, transfer the wrapped cake from the freezer to the refrigerator overnight. Once thawed, unwrap and allow it to come to room temperature before serving. Avoid thawing at room temperature directly, as this can cause condensation and make the cake soggy. Reheating is generally not recommended for frosted cakes, as it can melt the frosting and alter the cake’s texture. Enjoy your cake at room temperature for the best experience!
Frequently Asked Questions
Can I use milk instead of buttermilk?
Yes, you can easily make a buttermilk substitute at home. For 1 ¼ cups of buttermilk, simply measure out 1 ¼ cups of regular milk (whole milk works best) and stir in 1 tablespoon of white vinegar or lemon juice. Let it sit for 5-10 minutes until it slightly curdles. This acidified milk will act similarly to buttermilk in the recipe, providing moisture and helping activate the baking soda for a tender crumb.
Why did my sprinkles bleed color into the cake?
The most common reason for sprinkles bleeding color is using the wrong type. Nonpareils (the tiny, round, crunchy sprinkles) are notorious for bleeding when baked. For best results, always use “jimmies” (the cylindrical, rod-shaped sprinkles) or quins (flat, disc-shaped sprinkles). These are designed to hold their color better during baking. Additionally, overmixing the batter after adding the sprinkles can sometimes contribute to color bleeding, so fold them in gently and quickly.
How can I make sure my cake layers are flat?
To achieve flat cake layers without a domed top, there are a few tricks. You can use specialized “baking strips” (wet fabric strips wrapped around the outside of the cake pan) which help the cakes bake more evenly by insulating the edges. Alternatively, you can reduce the oven temperature by 25°F (about 15°C) and bake for a slightly longer time. This slower baking process allows the cake to rise more gradually and evenly. If your cakes still dome, you can easily level them with a serrated knife once completely cooled.