Introduction
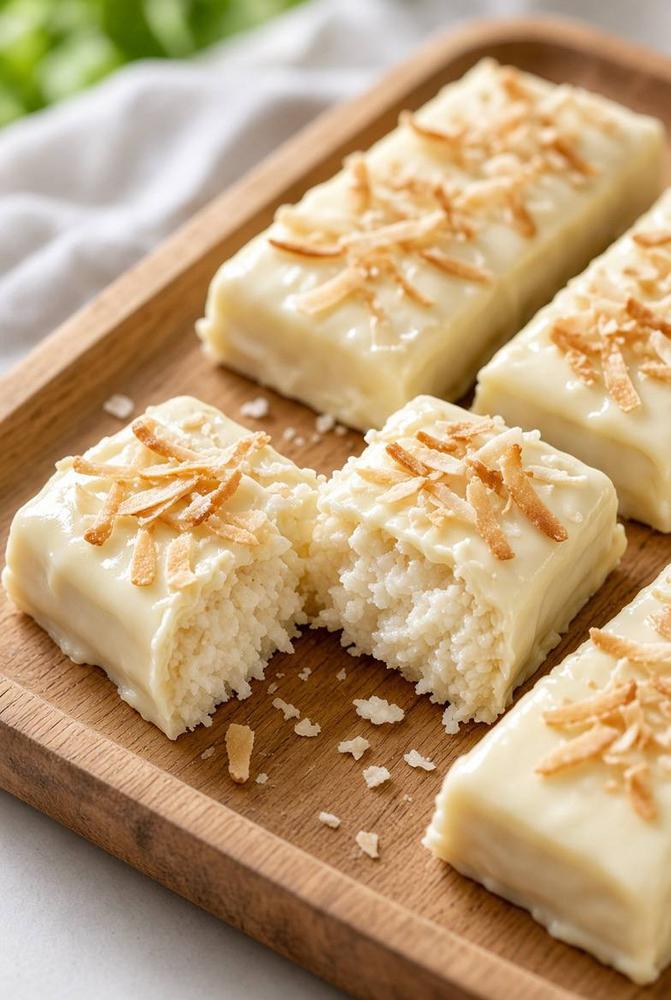
Get ready to embark on a sweet, tropical escape right in your own kitchen! Today, we’re diving into the delightful world of White Chocolate Coconut Bars – a truly irresistible treat that promises to transport your taste buds to a sun-drenched paradise with every single bite. Imagine a rich, tender, and intensely coconutty base, perfectly sweetened and oh-so-moist, enrobed in a smooth, creamy blanket of luxurious white chocolate. As if that weren’t enough, a generous sprinkle of golden, toasted coconut flakes crowns each bar, adding a delightful crunch and an extra layer of tropical aroma. These bars aren’t just a dessert; they’re an experience – a harmonious blend of textures and flavors that will have everyone asking for more.
What makes these White Chocolate Coconut Bars so incredibly special? For starters, they are remarkably easy to make, often requiring no baking at all, which means less time hovering over a hot oven and more time enjoying the delicious results. Their simplicity belies their sophisticated taste and elegant appearance, making them perfect for any occasion. Whether you’re looking for a quick pick-me-up, a crowd-pleasing dessert for a potluck, a thoughtful homemade gift, or a festive addition to your holiday spread, these bars fit the bill perfectly. They strike that coveted balance between comforting familiarity and exotic indulgence, appealing to both coconut lovers and white chocolate aficionados alike. Prepare to fall head over heels for their creamy texture, vibrant coconut flavor, and the satisfying snap of the chocolate coating.
These bars are more than just a recipe; they are a celebration of simplicity and decadence. The magic truly lies in the balance: the intense sweetness of the white chocolate is beautifully complemented by the natural, slightly nutty sweetness of the coconut, creating a symphony of flavors that isn’t cloyingly sweet, but perfectly satisfying. The interior is a tender, moist, and chewy dream, while the exterior provides that irresistible smooth, firm, and slightly crisp chocolate shell. Topped with those perfectly toasted flakes, each bar is a miniature masterpiece, promising a moment of pure bliss. Let’s gather our ingredients and create some culinary magic that will brighten any day.
Nutritional Information
Per serving (approximate values):
- Calories: 320
- Protein: 3g
- Carbohydrates: 35g
- Fat: 20g
- Fiber: 2g
- Sodium: 50mg
Ingredients
- 1 (14-ounce) can sweetened condensed milk
- 4 cups (about 12 ounces) shredded sweetened coconut
- 1 teaspoon vanilla extract
- 1/4 teaspoon salt
- 16 ounces high-quality white chocolate, chopped or in chip form
- 1/2 cup shredded sweetened coconut, toasted, for garnish
Instructions
- Line an 8×8-inch or 9×9-inch baking pan with parchment paper, leaving an overhang on two sides to easily lift the bars out later. Lightly grease the parchment paper if desired, though it’s often not necessary.
- In a large mixing bowl, combine the sweetened condensed milk, 4 cups of shredded sweetened coconut, vanilla extract, and salt. Mix thoroughly with a sturdy spatula or spoon until all the coconut is evenly coated and the mixture is well combined and sticky.
- Transfer the coconut mixture to the prepared baking pan. Press the mixture down very firmly and evenly into the pan. Use the back of a spoon, a flat bottomed glass, or your hands (lightly greased if sticking) to compact the mixture as tightly as possible. This step is crucial for ensuring the bars hold together well and have a good, firm texture.
- Place the pan in the refrigerator for at least 30 minutes to chill and firm up the coconut base. This chilling time helps the base set and prevents it from melting when the warm white chocolate is poured over it.
- While the coconut base is chilling, prepare the toasted coconut garnish. Spread the 1/2 cup of shredded sweetened coconut in a single layer on a dry skillet over medium-low heat or on a baking sheet. If using a skillet, stir frequently to prevent burning. If using a baking sheet, bake in a preheated oven at 300°F (150°C) for 5-10 minutes, stirring once or twice, until golden brown and fragrant. Watch carefully as coconut can burn quickly. Remove from heat and set aside to cool.
- Once the coconut base is chilled, prepare the white chocolate coating. Place the chopped white chocolate (or chips) in a heatproof bowl. You can melt the chocolate using one of two methods:
- Double Boiler Method: Set the bowl over a saucepan of simmering water, ensuring the bottom of the bowl does not touch the water. Stir occasionally until the chocolate is completely melted and smooth.
- Microwave Method: Microwave the chocolate in 30-second intervals, stirring well after each interval, until melted and smooth. Be very careful not to overheat the white chocolate, as it can seize and become grainy quickly.
Ensure the melted white chocolate is smooth and free of lumps.
- Remove the chilled coconut base from the refrigerator. Pour the melted white chocolate evenly over the top of the coconut base, spreading it gently with an offset spatula or the back of a spoon to create a smooth, even layer that covers the entire surface.
- Immediately after spreading the white chocolate, sprinkle the toasted coconut flakes generously over the top of the white chocolate layer. Gently press them down slightly so they adhere to the setting chocolate.
- Return the pan to the refrigerator for at least 2-3 hours, or until the white chocolate coating is completely firm and set. For best results, chill overnight.
- Once fully set, use the parchment paper overhangs to carefully lift the entire slab of bars out of the pan and onto a cutting board.
- Using a sharp knife, cut the slab into individual bars. For the cleanest cuts, you can run your knife under hot water and wipe it dry between each cut, especially if the chocolate is very firm. Cut into 16-25 bars, depending on desired size.
- Serve chilled or at room temperature. Enjoy your homemade White Chocolate Coconut Bars!
Cooking Tips and Variations
To achieve the absolute best White Chocolate Coconut Bars every time, paying attention to a few key details can make all the difference. Firstly, the quality of your white chocolate is paramount. Opt for a good-quality baking white chocolate (often found in bars or wafers) rather than inexpensive white chocolate chips, which sometimes contain stabilizers that prevent them from melting smoothly. High-quality white chocolate will yield a far superior taste and a beautifully smooth, glossy coating. When melting white chocolate, always use gentle heat. Overheating can cause it to seize, becoming thick, grainy, and unusable. If using a microwave, stir frequently and heat in short bursts. For the coconut base, ensuring it is pressed firmly into the pan is critical. The tighter you compact it, the less likely your bars are to crumble when cut. You can even place another piece of parchment paper on top and use the bottom of another pan to press down evenly and firmly. Chilling times are also non-negotiable; don’t rush the setting process for either the coconut base or the chocolate coating, as proper chilling ensures clean cuts and a firm texture.
Now, let’s talk about exciting variations! While these bars are perfect as they are, there’s always room for customization. For an extra flavor dimension in the coconut base, consider adding a touch of almond extract (1/2 teaspoon) alongside the vanilla, which beautifully complements coconut. A hint of lime or orange zest (1 teaspoon) can also brighten the tropical notes. If you’re not a fan of white chocolate or want to offer a variety, you can easily swap the white chocolate coating for milk chocolate or dark chocolate for a richer, more intense flavor profile. For an added textural contrast, sprinkle a few mini chocolate chips or finely chopped nuts (like pecans or macadamias) into the coconut base before pressing it into the pan. You could also drizzle the finished bars with melted caramel or a contrasting chocolate (dark chocolate over white chocolate, for example) for an elegant swirl. For a festive touch, a few drops of food coloring can be added to the melted white chocolate to create pastel-colored bars, perfect for holidays like Easter or baby showers. The possibilities are endless, so feel free to experiment and make these bars uniquely yours!
Storage and Reheating
These White Chocolate Coconut Bars are best stored in an airtight container in the refrigerator. Due to the sweetened condensed milk and white chocolate, they hold up very well when chilled. Stored properly, they will maintain their freshness and texture for up to 1 week. If you need to store them for longer, they can also be frozen. To freeze, arrange the cut bars in a single layer on a baking sheet and freeze until solid (about 1-2 hours). Once solid, transfer them to an airtight freezer-safe container or a heavy-duty freezer bag, separating layers with parchment paper to prevent sticking. They can be stored in the freezer for up to 2-3 months. Thaw frozen bars in the refrigerator overnight or at room temperature for a few hours before serving. Reheating is generally not recommended for these bars, as they are meant to be enjoyed chilled or at room temperature. Heating them would melt the chocolate coating and alter the delicate texture of the coconut base. Simply bring them to your desired serving temperature – slightly chilled for a firmer bite or closer to room temperature for a softer, chewier experience – and enjoy!
Frequently Asked Questions
Can I use unsweetened shredded coconut instead of sweetened?
While you can use unsweetened shredded coconut, the recipe is designed with sweetened coconut in mind, which provides additional moisture and sweetness, contributing to the bars’ rich flavor and texture. If you opt for unsweetened, you might find the bars less sweet and slightly drier. To compensate, you could add an extra tablespoon or two of sweetened condensed milk or a touch of granulated sugar to the coconut base, adjusting to your taste.
Why did my white chocolate seize or become grainy when melting?
White chocolate is particularly sensitive to heat. Seizing (becoming thick and clumpy) or graininess often occurs when it’s overheated or comes into contact with even a tiny amount of water or steam. Always melt white chocolate slowly and gently, either using a double boiler with no water touching the bowl, or in the microwave in short bursts, stirring frequently. Ensure all your equipment is completely dry before melting.
How can I get clean cuts when slicing the bars?
For the cleanest cuts, ensure the bars are thoroughly chilled and the white chocolate coating is completely firm. Use a very sharp knife. For even better results, you can run your knife under hot water for a few seconds, wipe it completely dry, and then make a cut. Repeat this process for each cut. This slight warmth helps the knife glide through the chocolate without cracking it, resulting in smooth, neat edges.
Can I make these bars ahead of time for an event?
Absolutely! These White Chocolate Coconut Bars are an excellent make-ahead dessert. In fact, they often taste even better the day after they’re made, as the flavors have more time to meld and the texture fully sets. You can prepare them up to 3-4 days in advance and store them in an airtight container in the refrigerator until ready to serve. This makes them perfect for parties, holidays, or any occasion where you want to minimize last-minute prep.