Introduction
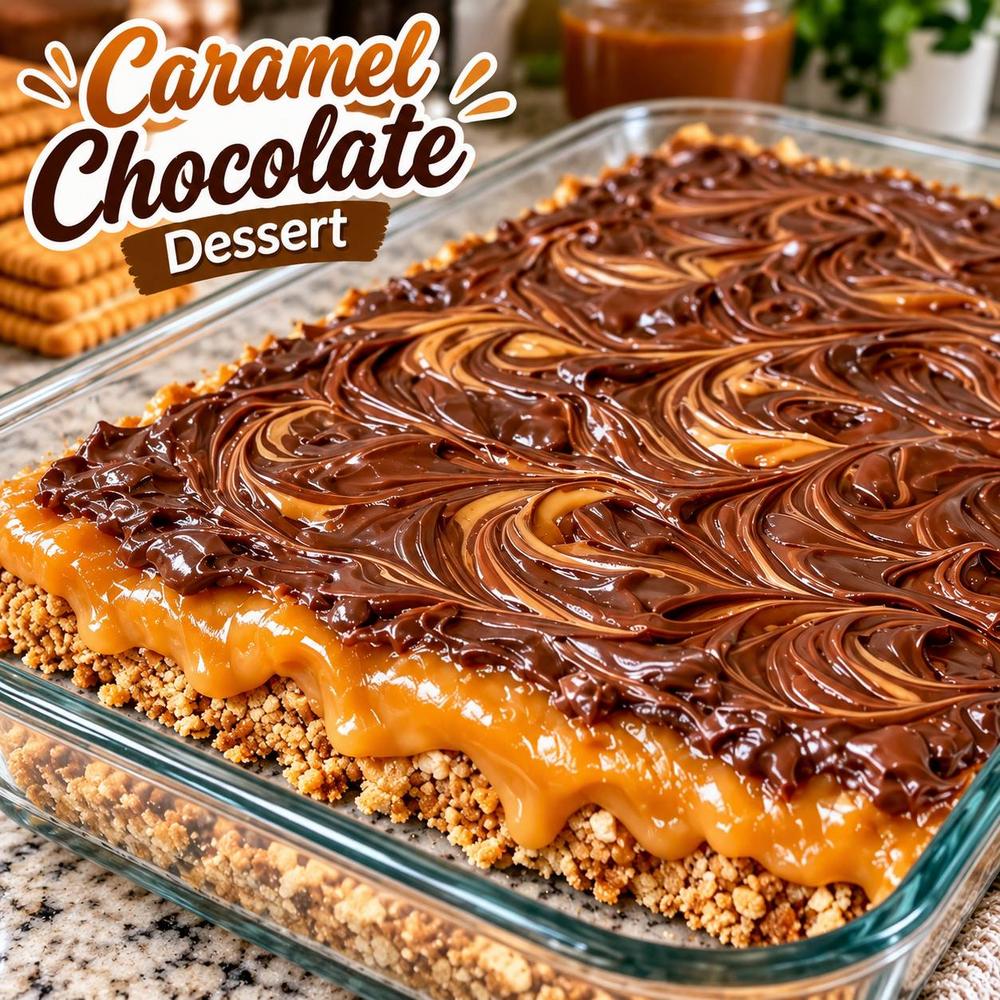
Prepare to meet your new favorite dessert: the 4-Ingredient Chocolate Caramel! This isn’t just any sweet treat; it’s a testament to how incredible flavors can come together with minimal effort. Imagine a crunchy, buttery biscuit base providing the perfect foundation for a luscious, gooey layer of rich caramel. Then, to top it all off, a smooth, decadent swirl of chocolate that melts in your mouth with every bite. The combination of textures – the crisp bottom, the soft chewiness of the caramel, and the creamy chocolate – creates an experience that’s truly irresistible.
What makes this dessert truly special, beyond its utterly delicious taste, is its astonishing simplicity. As the title suggests, you only need four ingredients to bring this masterpiece to life. This makes it an absolute lifesaver for busy weeknights, last-minute cravings, or when you need an impressive dessert without spending hours in the kitchen. It’s a no-bake wonder, meaning no oven time is required, just a bit of chilling to allow all those glorious layers to set perfectly. Whether you’re a seasoned baker or just starting your culinary journey, this recipe is incredibly beginner-friendly and guarantees spectacular results every single time.
The 4-Ingredient Chocolate Caramel is more than just a recipe; it’s an invitation to indulge in pure, unadulterated sweetness without the fuss. It’s the kind of dessert that disappears quickly from any gathering, leaving everyone asking for the recipe. So, get ready to gather your few simple ingredients and prepare to create a dessert that will earn you rave reviews and satisfy every chocolate and caramel craving imaginable!
Nutritional Information
Per serving (approximate values):
- Calories: 380
- Protein: 4g
- Carbohydrates: 55g
- Fat: 18g
- Fiber: 2g
- Sodium: 180mg
Ingredients
- 250g digestive biscuits (or graham crackers)
- 100g unsalted butter, melted
- 400g can of dulce de leche or thick caramel sauce
- 200g milk chocolate chips or chopped milk chocolate bar
Instructions
- Prepare the Baking Dish: Lightly grease an 8×8 inch (20×20 cm) square baking dish with butter or line it with parchment paper, leaving an overhang on two sides for easy removal.
- Crush the Biscuits: Place the digestive biscuits into a large Ziploc bag and crush them into fine crumbs using a rolling pin, or pulse them in a food processor until finely ground.
- Make the Biscuit Base: In a medium bowl, combine the crushed biscuit crumbs with the melted butter. Stir until the crumbs are evenly coated and resemble wet sand.
- Press the Base: Pour the biscuit mixture into the prepared baking dish. Using the back of a spoon or your knuckles, press the crumbs down firmly and evenly to create a compact base. Make sure it’s tight and flat. Place the dish in the refrigerator to chill for at least 15-20 minutes while you prepare the next layer.
- Spread the Caramel Layer: Remove the chilled biscuit base from the refrigerator. Spoon the dulce de leche or thick caramel sauce evenly over the biscuit base. Use an offset spatula or the back of a spoon to spread it smoothly to all edges. If your caramel is very stiff, you can gently warm it in a microwave-safe bowl for 15-30 seconds to make it more spreadable, but be careful not to overheat it.
- Melt the Chocolate: Place the milk chocolate chips or chopped milk chocolate into a microwave-safe bowl. Microwave in 30-second intervals, stirring well after each interval, until the chocolate is fully melted and smooth. Alternatively, you can melt the chocolate over a double boiler.
- Add the Chocolate Topping: Pour the melted chocolate evenly over the caramel layer. Gently spread it with an offset spatula to cover the entire surface.
- Create the Swirl (Optional but Recommended): While the chocolate is still wet, take a skewer, toothpick, or the tip of a small knife and gently drag it through the chocolate and into the caramel layer in swirling motions. Create an attractive marbled pattern. Be careful not to overmix, or the colors will blend too much.
- Chill to Set: Place the baking dish back into the refrigerator and chill for a minimum of 2-4 hours, or preferably overnight, until the chocolate and caramel layers are completely set and firm. This is crucial for clean slicing.
- Slice and Serve: Once fully set, remove the dish from the refrigerator. If you used parchment paper, lift the dessert out by the overhang. Place it on a cutting board. For clean cuts, heat a sharp knife under hot water, wipe it dry, and then slice the dessert into desired squares or bars. Reheat the knife between cuts as needed. Serve and enjoy!
Cooking Tips and Variations
To ensure your 4-Ingredient Chocolate Caramel turns out perfectly every time, here are some essential tips and exciting variations to try. Firstly, for the biscuit base, precision in crushing is key. Use a food processor for the finest, most consistent crumbs, which will result in a firmer, more stable base. If using a Ziploc bag and rolling pin, ensure there are no large chunks left, as these can make the base crumbly. When pressing the base into the dish, apply firm, even pressure. This compaction is vital for preventing the base from falling apart when sliced. You can even use the bottom of a flat-bottomed glass to help create a super smooth and compact layer.
For the caramel layer, if your dulce de leche or caramel sauce is too stiff straight from the can or jar, a quick gentle warm-up is your friend. Microwave it in 15-second bursts, stirring in between, until it reaches a spreadable consistency. Be careful not to overheat it, as it can become too runny and messy. An offset spatula is incredibly helpful for spreading both the caramel and chocolate layers smoothly and evenly without disturbing the layers underneath. If you don’t have one, the back of a spoon works just as well.
When melting the chocolate, do so gently. Overheating chocolate can cause it to seize and become grainy. The microwave method is quick, but constant stirring and short bursts are crucial. Alternatively, a double boiler offers a more controlled melting process. For the signature swirl, don’t overthink it! Drizzle the melted chocolate over the caramel, then use a skewer or toothpick to create a few gentle S-shapes or figure-eights. Less is often more for a beautiful marbled effect.
Now, let’s talk variations! While this recipe shines with just four ingredients, you can easily adapt it to suit your taste. For the base, consider using other types of biscuits or cookies. Graham crackers are a classic choice, but OREO cookies (crushed with their cream filling) can create a delightful chocolatey base, or even shortbread cookies for a buttery twist. If you use OREOs, you might need slightly less butter as their filling adds moisture. For the chocolate, feel free to experiment with dark chocolate for a richer, less sweet flavor, or even white chocolate for a different aesthetic and taste profile. A sprinkle of flaky sea salt over the top of the finished chocolate layer before chilling will transform this into a delectable “salted caramel chocolate” bar, adding a sophisticated contrast to the sweetness.
You can also add a layer of chopped nuts (like pecans or walnuts) between the caramel and chocolate layers for an added crunch and nutty flavor. For a festive touch, a sprinkle of holiday sprinkles on top of the chocolate before it sets can make it perfect for celebrations. Don’t be afraid to get creative with your swirls either; you could try creating patterns with different colored chocolates or adding a few drops of food coloring to a small portion of white chocolate for vibrant designs. Remember, the beauty of this simple recipe is its adaptability, allowing you to personalize it to your heart’s content!
Storage and Reheating
This 4-Ingredient Chocolate Caramel dessert is best enjoyed chilled, and proper storage is key to maintaining its delicious texture and flavor. Once the dessert has fully set and been sliced, transfer the bars to an airtight container. Arrange them in a single layer if possible, or separate layers with parchment paper to prevent them from sticking together. Store the container in the refrigerator. When stored correctly, these chocolate caramel bars will remain fresh and delightful for up to 5-7 days. The biscuit base will retain its crunch, the caramel will stay gooey, and the chocolate will remain firm.
Freezing is also an option if you want to prepare them further in advance or save some for later. Once the bars are completely set and sliced, place them on a baking sheet lined with parchment paper and freeze for about 1-2 hours, or until solid. This “flash freezing” prevents them from sticking together. Once firm, transfer the frozen bars to an airtight freezer-safe container or a heavy-duty freezer bag, again separating layers with parchment paper. They can be stored in the freezer for up to 2-3 months. When you’re ready to enjoy them, simply take them out of the freezer and let them thaw in the refrigerator for a few hours, or at room temperature for about 30-60 minutes, until they reach your desired consistency. There is no need for reheating, as this dessert is designed to be served cold or at cool room temperature.
Frequently Asked Questions
Can I use homemade caramel instead of store-bought dulce de leche?
Absolutely! If you have a favorite homemade caramel recipe, it will work wonderfully in this dessert. Just ensure it’s a thick, spreadable caramel that will set firmly when chilled. Allow your homemade caramel to cool slightly to a thick, spreadable consistency before layering it over the biscuit base to prevent it from soaking into the crumbs too much.
What if my biscuit base isn’t firm enough?
A crumbly base usually means there wasn’t enough butter to bind the crumbs, or it wasn’t pressed firmly enough into the dish. Ensure you use the specified amount of melted butter and really pack the crumbs down tightly with the back of a spoon or a flat-bottomed glass. Chilling the base for at least 15-20 minutes before adding the caramel also helps it firm up and hold its shape.
Can I use different types of chocolate for the topping?
Yes, you can! While milk chocolate offers a classic sweet flavor, feel free to experiment. Dark chocolate (around 60-70% cacao) will give a richer, less sweet contrast to the caramel, while white chocolate would create a visually stunning dessert with a different flavor profile. Just be aware that white chocolate can be a bit trickier to melt smoothly, so melt it gently and avoid overheating.
How do I get clean slices without the chocolate cracking?
The key to clean slices is a well-chilled dessert and a hot, sharp knife. Ensure the dessert has been refrigerated for at least 4 hours, or preferably overnight, to allow all layers to set completely. Before each cut, dip a sharp, thin-bladed knife into hot water, wipe it dry, and then make a swift, firm cut. Reheat and wipe the knife before each subsequent slice. This technique helps the knife glide through the chocolate and caramel without sticking or cracking.