Introduction
Imagine a dessert that’s effortlessly creamy, wonderfully refreshing, and bursts with your favorite flavors – all while being incredibly simple to make. Today, we’re diving into the delightful world of homemade frozen treats, known by many names around the globe: sacolés, dindins, chup-chups, or simply, flavor pops. These aren’t your average icy poles; their secret lies in a rich, smooth base that transforms into a luxurious, melt-in-your-mouth experience perfect for beating the heat or satisfying a sweet craving any time of year. This versatile recipe offers a delightful escape, turning basic ingredients into an extraordinary frozen delight that’s far superior to anything store-bought.
What makes these creamy delights so special is their incredible adaptability. From vibrant fruit purées to decadent chocolate swirls, the possibilities for flavor combinations are truly endless. The magic begins with a handful of accessible ingredients that, when blended and frozen, create a texture that’s more akin to soft-serve ice cream than a traditional ice pop. They require no fancy equipment, just a blender and some simple plastic sleeves or molds, making them an ideal project for home cooks of all skill levels, including those looking for a fun activity with kids. Prepare to impress your taste buds and your guests with this customizable, refreshing, and utterly delicious dessert that promises pure delight in every frozen bite.
Whether you’re hosting a summer barbecue, looking for a light after-dinner treat, or simply want to stock your freezer with a guilt-free indulgence, these creamy flavor pops are your answer. Their refreshing quality makes them an instant hit on warm days, while their customizable nature ensures there’s a flavor profile to please every palate. Get ready to explore the joy of crafting your own frozen masterpieces, transforming simple ingredients into a symphony of taste and texture that’s both convenient and incredibly satisfying. Let’s unlock the secrets to creating these delightful, creamy, and flavorful frozen treats!
Nutritional Information
Per serving (approximate values):
- Calories: 180
- Protein: 4g
- Carbohydrates: 28g
- Fat: 7g
- Fiber: 1g
- Sodium: 60mg
Ingredients
- 1 can (14 ounces) sweetened condensed milk
- 2 cups whole milk (or 1.5 cups evaporated milk + 0.5 cup water for extra creaminess)
- 1/2 cup heavy cream (optional, for extra richness)
- 1 teaspoon pure vanilla extract
- 1/4 cup granulated sugar (adjust to taste, especially with tart fruits)
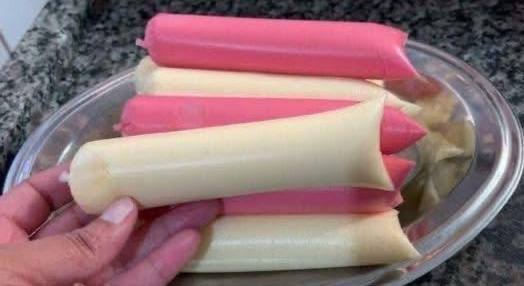
- For Pink Flavor (Strawberry): 1 cup fresh or frozen strawberries, hulled
- For Creamy White/Yellowish Flavor (Passion Fruit): 1/2 cup passion fruit pulp (with seeds, or strained for smooth)
- For Creamy White/Yellowish Flavor (Coconut): 1/2 cup unsweetened shredded coconut + 1/4 cup coconut milk (for extra coconut flavor)
- Additional flavor options: 1/4 cup cocoa powder, 1 cup mango chunks, 1 ripe banana, 2 tablespoons instant coffee powder
Instructions
- In a large blender, combine the sweetened condensed milk, whole milk (or evaporated milk and water mixture), heavy cream (if using), vanilla extract, and granulated sugar. Blend on medium speed until all ingredients are thoroughly combined and smooth, about 30-60 seconds. This forms your creamy base.
- Divide the creamy base into separate bowls if you plan to make multiple flavors. For example, if making two flavors, pour half of the base into one bowl and leave the other half in the blender.
- To create the Pink (Strawberry) flavor: Add the hulled strawberries to one portion of the creamy base (either in the blender or a separate bowl if you divided the base). Blend until completely smooth and no strawberry chunks remain. Taste and add more sugar if desired, especially if your strawberries are tart.
- To create the Creamy White/Yellowish (Passion Fruit) flavor: Add the passion fruit pulp to another portion of the creamy base. Blend briefly if you want a smoother texture, or stir gently if you prefer visible seeds. Taste and adjust sweetness.
- To create the Creamy White/Yellowish (Coconut) flavor: Add the shredded coconut and coconut milk to another portion of the creamy base. Blend until the coconut is finely incorporated. Taste and adjust sweetness.
- For other flavors: If using cocoa powder, add it to a portion of the base and blend until smooth. For mango or banana, add the fruit chunks and blend until creamy. For coffee, dissolve the instant coffee powder in a tablespoon of hot water before adding to the base and blending.
- Prepare your plastic sleeves or molds. If using plastic sleeves, hold one open, perhaps using a funnel for easier pouring.
- Carefully pour each flavored mixture into the plastic sleeves or molds, leaving about 1 inch of space at the top for tying (for sleeves) or expansion during freezing (for molds).
- If using plastic sleeves, tie a tight knot at the open end of each sleeve, ensuring no liquid can escape. For molds, place the lids or sticks securely.
- Arrange the filled sleeves or molds flat on a baking tray or in a freezer-safe container. This helps them freeze evenly and prevents leaks if knots aren’t perfectly secure.
- Transfer the tray to the freezer and freeze for a minimum of 4-6 hours, or preferably overnight, until the pops are completely solid and firm.
- Once frozen, remove from the freezer. To serve, simply snip the top of the plastic sleeve or unmold from pop molds. Enjoy your homemade creamy and refreshing flavor pops!
Cooking Tips and Variations
To achieve the ultimate creamy texture, rather than an icy one, the secret lies in your ingredients and blending technique. Using full-fat dairy like whole milk and heavy cream, along with sweetened condensed milk, significantly contributes to richness. For an even creamier, less icy result, some home cooks swear by adding a small amount of cream cheese (about 2 tablespoons per batch) or a ripe avocado to the base for a healthy fat boost that inhibits ice crystal formation. Blending your mixture thoroughly is also key; the more finely emulsified your ingredients are, the smoother the final frozen product will be. If you’re an adult and feeling adventurous, a tiny splash (about 1 teaspoon per batch) of clear alcohol like vodka can also lower the freezing point, making the pops softer and less icy, without imparting any noticeable flavor.
The beauty of this recipe is its almost limitless potential for flavor customization. Beyond the strawberry, passion fruit, and coconut suggestions, consider a rich chocolate pop by blending in 1/4 cup of good quality cocoa powder and a tablespoon of chocolate syrup. For a tropical twist, blend in 1 cup of ripe mango chunks with a squeeze of lime. A coffee-flavored delight can be made by dissolving 2 tablespoons of instant coffee in a little hot water before adding it to the base. You can also experiment with extracts like almond, mint, or even a touch of rose water for unique profiles. For a vibrant green option, blend in a handful of fresh spinach (surprisingly, you won’t taste it!) with some pineapple for a “green smoothie” pop. Don’t be afraid to mix and match fruits – strawberry-banana, mango-coconut, or raspberry-lime are all fantastic combinations.
For added texture, consider stirring in small pieces of fruit, mini chocolate chips, or finely chopped nuts into the mixture just before pouring into the sleeves. This provides a delightful contrast to the smooth creaminess. If you don’t have the specific plastic sleeves, ice pop molds work perfectly well, or you can even use small paper cups with wooden sticks inserted once the mixture has partially frozen (after about an hour). When filling the sleeves, a funnel is your best friend for a mess-free process. Always tie the knots as tightly as possible to prevent leaks and arrange them flat in the freezer initially. For dietary adaptations, coconut cream or full-fat coconut milk can be substituted for dairy for a delicious dairy-free version, and alternative sweeteners like erythritol or stevia can be used, though you may need to adjust the amount of liquid slightly to maintain consistency. Remember to taste and adjust sweetness before freezing, as flavors tend to be less pronounced when frozen.
Storage and Reheating
These creamy frozen pops are designed to be enjoyed directly from the freezer, so traditional “reheating” isn’t applicable. Proper storage is crucial to maintain their creamy texture and prevent freezer burn. Once the pops are completely frozen and solid, they can be stored in the plastic sleeves or molds. For sleeves, it’s best to transfer them from the initial flat freezing tray into a large, airtight freezer-safe bag or container. This extra layer of protection helps shield them from air exposure, which is the primary cause of freezer burn and ice crystal formation.
Store the flavor pops in the coldest part of your freezer, typically towards the back, for optimal freshness. When stored correctly, these delightful treats will maintain their quality and creamy texture for up to 2-3 weeks. While they might still be safe to eat after this period, their texture may start to degrade, becoming icier or developing a slightly stale flavor due to prolonged freezer exposure. If you find your pops have become too hard, simply let them sit at room temperature for 5-10 minutes before serving. This brief thaw will soften them slightly, bringing back some of that desirable creamy consistency.
Avoid repeatedly thawing and refreezing the pops, as this will severely compromise their texture, making them very icy and losing their characteristic creaminess. It’s best to take out only as many as you plan to consume at one time. If you’re making a large batch, consider labeling the storage container with the date of preparation so you can easily keep track of their freshness. Enjoying them within the recommended timeframe ensures you experience these creamy, refreshing delights at their absolute best!
Frequently Asked Questions
Why are my homemade pops icy instead of creamy?
The iciness usually comes from a higher water content or insufficient fat in the mixture. To combat this, ensure you’re using full-fat dairy products like whole milk and heavy cream, and definitely include sweetened condensed milk. Blending the mixture very well helps emulsify fats and sugars, which prevents large ice crystals from forming. Adding a small amount of a stabilizer like a ripe banana, avocado, or even a tablespoon of corn syrup can also significantly improve creaminess by inhibiting ice crystal growth.
Can I make these dairy-free or vegan?
Absolutely! For a dairy-free version, substitute the whole milk and heavy cream with full-fat coconut milk or a creamy plant-based milk like oat milk. For the sweetened condensed milk, you can find dairy-free versions made from coconut or oat milk, or make your own by reducing canned full-fat coconut milk with a sweetener. The key is to maintain a good fat content to ensure creaminess. Adjust sweetness as plant-based milks can vary in sugar content.
What’s the best way to fill the plastic sleeves without making a mess?
A funnel is your best friend here! Place the funnel into the opening of the plastic sleeve, then slowly pour the mixture into the funnel. If you don’t have a funnel, you can carefully snip a small corner off a sturdy freezer bag, pour your mixture into the bag, and then use it like a piping bag to fill the sleeves. This method gives you more control and minimizes spills, especially with thinner mixtures. Ensure you don’t overfill the sleeves, leaving about an inch of space at the top for tying and expansion.