Introduction
As the festive season twinkles into full swing, there’s nothing quite like the aroma of freshly baked cookies wafting through your home to truly capture the spirit of Christmas. And when it comes to holiday baking, few treats are as universally beloved and visually charming as the classic thumbprint cookie. But we’re not just making any thumbprints today; we’re crafting a batch of Christmas Chocolate Thumbprint Cookies that are destined to become the star of your holiday dessert spread, cookie exchange, or simply a delightful indulgence with a warm mug of cocoa.
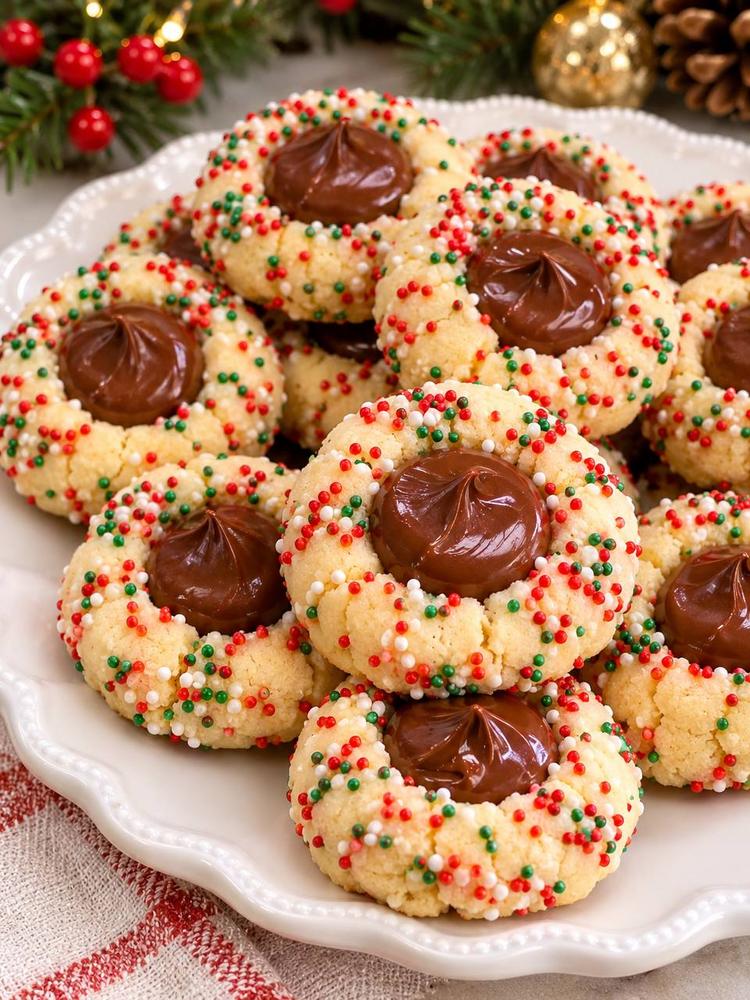
Imagine a tender, buttery cookie base, so delicate it practically melts in your mouth, its edges kissed with a light golden hue. Each cookie is playfully adorned with a vibrant confetti of red, green, and white Christmas sprinkles, adding that undeniable festive flair. And then, the grand finale: a generous dollop of rich, silky smooth dark chocolate ganache nestled perfectly in the cookie’s center, creating a delectable contrast of textures and flavors. These cookies are not just a treat for the taste buds; they’re a feast for the eyes, embodying all the joy and magic of the season in every single bite. They’re simple enough for most home bakers, yet impressive enough to wow your guests, making them an ideal project for a cozy afternoon of holiday baking.
This recipe is designed to bring you pure holiday cheer, transforming simple ingredients into a festive masterpiece. The combination of the crumbly, buttery cookie and the creamy, intense chocolate filling is simply irresistible. Whether you’re making them for Santa, gifting them to loved ones, or simply enjoying them with your family, these Christmas Chocolate Thumbprint Cookies are guaranteed to spread happiness and make your holiday celebrations even sweeter. Let’s get baking and infuse our kitchens with the wonderful scents and tastes of Christmas!
Nutritional Information
Per serving (approximate values, based on 36 cookies per batch):
- Calories: 185 kcal
- Protein: 2g
- Carbohydrates: 22g
- Fat: 10g
- Fiber: 1g
- Sodium: 45mg
Ingredients
- For the Cookie Base:
- 2 ½ cups (300g) all-purpose flour
- 1 cup (226g) unsalted butter, softened
- ¾ cup (150g) granulated sugar
- 2 large egg yolks
- 1 teaspoon pure vanilla extract
- ½ teaspoon salt
- For the Christmas Sprinkles:
- 1 large egg white, lightly beaten (or 2 tablespoons milk)
- ½ cup Christmas sprinkles (red, green, and white nonpareils or jimmies)
- For the Chocolate Ganache Filling:
- 1 cup (170g) semi-sweet chocolate chips or finely chopped chocolate
- ½ cup (120ml) heavy cream
- 1 tablespoon unsalted butter (optional, for extra shine and richness)
- ½ teaspoon pure vanilla extract (optional)
Instructions
- Prepare the Cookie Dough: In a large mixing bowl, using an electric mixer, cream together the softened unsalted butter and granulated sugar on medium speed until light and fluffy, about 2-3 minutes.
- Scrape down the sides of the bowl. Add the egg yolks one at a time, mixing well after each addition. Stir in the vanilla extract.
- In a separate bowl, whisk together the all-purpose flour and salt. Gradually add the dry ingredients to the wet ingredients, mixing on low speed until just combined and a soft dough forms. Be careful not to overmix.
- Divide the dough into two equal portions, flatten each into a disc, wrap tightly in plastic wrap, and chill in the refrigerator for at least 30 minutes, or up to 2 hours. Chilling is crucial for preventing the cookies from spreading too much during baking.
- Preheat Oven and Prepare Baking Sheets: Preheat your oven to 350°F (175°C). Line two baking sheets with parchment paper or silicone baking mats.
- Form and Decorate Cookies: Remove one disc of chilled dough from the refrigerator. Roll the dough into small balls, about 1-inch (2.5 cm) in diameter. For uniform size, a small cookie scoop works wonderfully.
- Place the lightly beaten egg white (or milk) in a small shallow bowl and the Christmas sprinkles in another shallow bowl. Dip each dough ball first into the egg white, allowing any excess to drip off, then roll it gently in the Christmas sprinkles until fully coated.
- Place the sprinkle-coated dough balls about 2 inches apart on the prepared baking sheets.
- Using your thumb, the back of a rounded measuring spoon (like a ½ teaspoon or 1 teaspoon), or a small round object, gently press an indentation into the center of each cookie ball. Be careful not to press all the way through the dough. If the edges crack, gently smooth them back together.
- Bake the Cookies: Bake for 10-12 minutes, or until the edges are lightly golden brown. The centers may still look slightly soft.
- Remove the baking sheets from the oven and let the cookies cool on the sheets for 5 minutes before carefully transferring them to a wire rack to cool completely. It’s essential that the cookies are fully cooled before filling.
- Prepare the Chocolate Ganache Filling: While the cookies are cooling, prepare the ganache. Place the semi-sweet chocolate chips (or chopped chocolate) in a medium heatproof bowl.
- In a small saucepan, heat the heavy cream over medium heat until it just begins to simmer around the edges (do not bring to a rolling boil).
- Pour the hot cream over the chocolate chips. Let it sit undisturbed for 5 minutes to allow the chocolate to melt.
- After 5 minutes, stir gently with a whisk or rubber spatula, starting from the center and working your way out, until the ganache is completely smooth and shiny. If using, stir in the optional butter and vanilla extract until fully incorporated.
- Allow the ganache to cool slightly at room temperature, stirring occasionally, for about 15-20 minutes, until it thickens to a spoonable or pipeable consistency. It should not be too runny.
- Fill the Cookies: Once the cookies are completely cool and the ganache has thickened, spoon or pipe the chocolate ganache into the indentations of each cookie. For a neat finish, you can transfer the ganache to a piping bag with a small round tip.
- Allow the filled cookies to sit at room temperature for at least 30 minutes, or refrigerate for 15-20 minutes, to allow the chocolate ganache to set.
- Serve and enjoy your beautiful Christmas Chocolate Thumbprint Cookies!
Cooking Tips and Variations
Dough Chilling is Key: Do not skip the chilling step for the cookie dough. This prevents the butter from melting too quickly in the oven, which can cause the cookies to spread excessively and lose their shape. A well-chilled dough ensures tender, perfectly shaped thumbprints.
Uniform Indentations: For perfectly uniform indentations, use the back of a rounded measuring spoon (like a ½ teaspoon or 1 teaspoon) instead of your thumb. Lightly flour the spoon if the dough is sticking. If the edges crack when you make the indentation, gently pinch them back together.
Sprinkle Adhesion: The egg white wash is ideal for helping the sprinkles adhere beautifully to the dough. If you prefer not to use egg white, a tiny brush of milk or even water will also work, though egg white typically provides the best “glue.” Ensure the dough balls are lightly coated, not drenched.
Perfect Ganache Consistency: If your ganache is too thick to pipe or spoon, gently warm it over a double boiler or in the microwave for a few seconds, stirring until it reaches the desired consistency. If it’s too thin, let it cool longer at room temperature or pop it in the refrigerator for 10-15 minutes, stirring every few minutes, until it thickens up. The optional butter in the ganache not only adds richness but also gives it a beautiful, glossy shine.
Cool Completely Before Filling: Patience is a virtue here! Ensure your cookies are entirely cool before adding the warm ganache. Filling warm cookies will cause the ganache to melt and run, making for a messy and less appealing final product.
Baking Sheet Rotation: For even baking, especially if your oven has hot spots, rotate your baking sheets halfway through the baking time.
Variations:
- Other Holiday Sprinkles: While red, green, and white are perfect for Christmas, feel free to change the sprinkle colors for other occasions! Pastel sprinkles for Easter, orange and black for Halloween, or school colors for a graduation party.
- Flavorful Fillings: Don’t limit yourself to chocolate! These thumbprints are fantastic with other fillings. Try raspberry jam, apricot preserves, caramel sauce, lemon curd, or even a dollop of peanut butter before baking (then add a chocolate drizzle after).
- Mint Chocolate Twist: Add ¼ to ½ teaspoon of peppermint extract to your chocolate ganache for a festive mint chocolate flavor that perfectly complements the holiday season.
- White Chocolate Dream: Substitute white chocolate for the semi-sweet chocolate in the ganache. You might need slightly less heavy cream as white chocolate ganache can be softer.
- Nutty Base: For a different texture and flavor, you can replace ¼ cup of the all-purpose flour with finely ground almonds or pecans. This adds a lovely nutty depth to the cookie base.
Storage and Reheating
Storage: These Christmas Chocolate Thumbprint Cookies are best stored in an airtight container at room temperature for up to 3-4 days. If your kitchen is particularly warm, or if you prefer a firmer ganache, you can store them in the refrigerator for up to a week. If refrigerated, allow them to come to room temperature for about 15-20 minutes before serving for the best texture and flavor.
Freezing Baked Cookies: You can freeze the baked and filled cookies! Once the ganache is fully set, arrange them in a single layer on a baking sheet and freeze until solid. Then transfer them to an airtight freezer-safe container or bag, separating layers with parchment paper. They can be frozen for up to 2-3 months. Thaw at room temperature for several hours before serving.
Freezing Cookie Dough: The unbaked cookie dough balls can also be frozen. Roll the dough into balls, coat in sprinkles, and make the indentation. Freeze them on a baking sheet until solid, then transfer to a freezer-safe bag. When ready to bake, place frozen dough balls on a prepared baking sheet and bake for an additional 2-3 minutes, or until golden. Fill with ganache as usual after cooling.
Reheating: These cookies are generally enjoyed at room temperature and do not require reheating. If they have been refrigerated, letting them sit out for a short while will allow the cookie to soften slightly and the ganache to return to its creamy texture.
Frequently Asked Questions
What if my cookie dough is too sticky to roll?
If your cookie dough feels too sticky to roll into balls, it likely needs more chilling time. Wrap it tightly in plastic wrap and refrigerate for another 30-60 minutes. A slightly sticky dough is normal, but it shouldn’t be unmanageable. You can also lightly flour your hands if needed, but avoid adding too much extra flour to the dough itself, as this can make the cookies tough.
Can I use milk chocolate for the ganache instead of semi-sweet?
Absolutely! You can use milk chocolate for the ganache if you prefer a sweeter, milder chocolate flavor. However, milk chocolate has a higher sugar and milk content, which makes it softer. You might need to adjust the amount of heavy cream slightly, using a little less (start with ¼ cup and add more if needed) to achieve the desired thickness for your ganache. White chocolate can also be used, following similar adjustments.
My sprinkles aren’t sticking to the cookies. What went wrong?
The key to sprinkles sticking is a light adhesive layer. Ensure you’re dipping the dough balls into the lightly beaten egg white (or milk) before rolling them in sprinkles. Don’t let them sit in the liquid too long, just a quick dip to moisten the surface. Also, make sure your sprinkles are fresh; old sprinkles can sometimes be less adherent. If you’re still having trouble, you can gently press the sprinkles onto the dough balls after dipping.
How can I make sure my ganache sets properly?
The ratio of chocolate to cream is crucial for ganache consistency. For a semi-sweet chocolate ganache, a 2:1 chocolate to cream ratio (by weight) typically results in a firm, sliceable ganache, while a 1:1 ratio yields a pourable or soft ganache. Our recipe uses about a 1.5:1 ratio by volume for a good spoonable/pipeable consistency. If your ganache is too runny, let it cool longer at room temperature or chill it in the refrigerator, stirring every 10-15 minutes, until it thickens. If it’s too thick, gently warm it until it loosens up. Adding the optional butter also helps with a smooth, stable set.