Introduction
Prepare your taste buds for an experience that truly lives up to its name: Heaven In A Bowl! This isn’t just a dessert; it’s a symphony of textures and flavors, a decadent celebration of the universally adored pairing of chocolate and peanut butter. Imagine diving your spoon into a luscious creation where each layer offers a new sensation – a satisfying crunch, a velvety smoothness, and a cloud-like lightness, all culminating in a rich, sweet, and perfectly balanced treat. This no-bake marvel is designed to impress with its stunning visual appeal and delight with its irresistible taste, making it the ultimate crowd-pleaser for any occasion or simply a well-deserved indulgence.
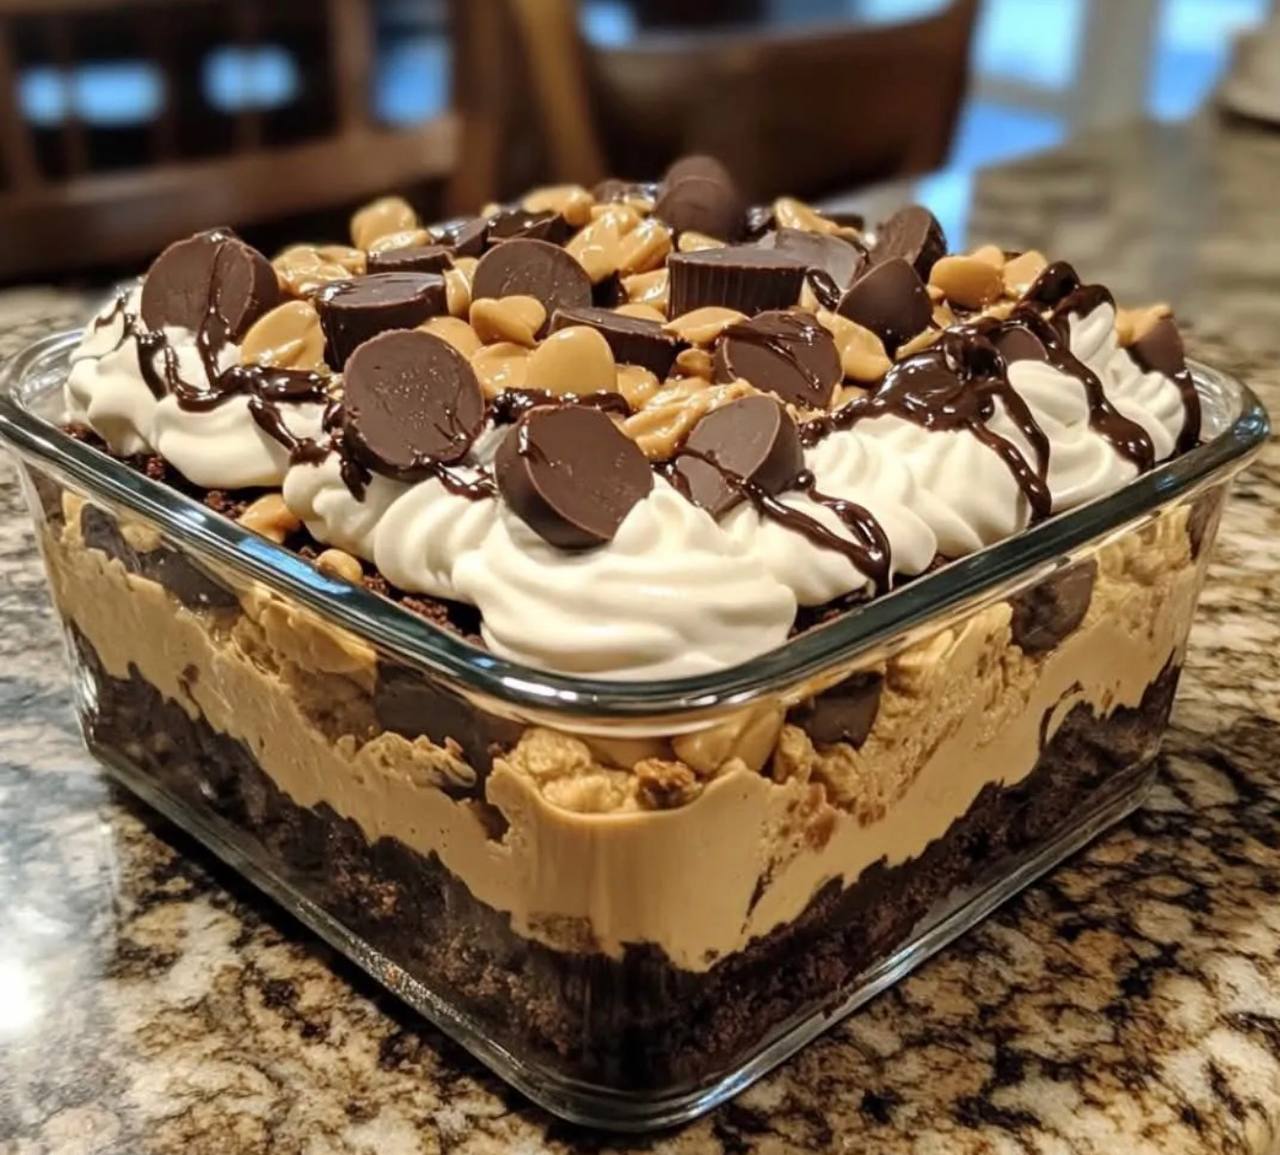
What makes this “Heaven In A Bowl” so utterly divine? It’s the thoughtful construction of distinct layers, each playing a crucial role in the overall masterpiece. We start with a robust, dark chocolate base that provides a delightful crunch and deep cocoa notes. This foundation perfectly cradles the star of the show: a thick, creamy, and wonderfully rich peanut butter filling that strikes an exquisite balance between sweet and savory. Capping it all off is a generous, airy cloud of whipped topping, offering a refreshing contrast that prevents the dessert from being overly heavy. But we don’t stop there – a vibrant array of garnishes adds both visual flair and an extra burst of flavor and texture, transforming a simple dessert into an unforgettable experience. The best part? No oven required, making this a perfect stress-free option for busy schedules or hot summer days.
This recipe is more than just a dessert; it’s an invitation to create joy. Whether you’re a seasoned baker or a kitchen novice, the straightforward steps and accessible ingredients mean you can achieve spectacular results with minimal effort. It’s the ultimate comfort food, a showstopper for potlucks, a delightful end to a family meal, or a secret indulgence for one. Get ready to embark on a culinary journey that promises pure bliss with every single spoonful. Are you ready to discover your own slice of Heaven In A Bowl?
Nutritional Information
Per serving (approximate values):
- Calories: 580 kcal
- Protein: 12g
- Carbohydrates: 55g
- Fat: 37g
- Fiber: 4g
- Sodium: 390mg
Ingredients
- For the Chocolate Base:
- 24 chocolate sandwich cookies (like Oreos), finely crushed (about 2 ½ cups crumbs)
- ½ cup (1 stick) unsalted butter, melted
- For the Peanut Butter Layer:
- 1 (8-ounce) package cream cheese, softened
- 1 cup creamy peanut butter
- 1 cup powdered sugar, sifted
- ½ cup milk (whole or 2%)
- 1 teaspoon vanilla extract
- For the Whipped Topping:
- 1 (8-ounce) container frozen whipped topping (like Cool Whip), thawed, or 2 cups heavy cream, whipped with 2 tablespoons powdered sugar and ½ teaspoon vanilla extract
- For the Garnish:
- ½ cup mini peanut butter cups, chopped
- ¼ cup roasted peanuts, chopped
- 2 tablespoons chocolate syrup or melted chocolate for drizzling
Instructions
- Prepare the Chocolate Base: In a medium bowl, combine the finely crushed chocolate sandwich cookies with the melted butter. Stir until the crumbs are thoroughly moistened and resemble wet sand. Press this mixture firmly and evenly into the bottom of a 9×13-inch baking dish or a 9-inch square dish for thicker layers. Place the dish in the refrigerator to chill while you prepare the next layer, allowing the base to set for at least 15 minutes.
- Make the Peanut Butter Layer: In a large mixing bowl, using an electric mixer, beat the softened cream cheese until it is smooth and creamy, about 1-2 minutes. Add the creamy peanut butter to the bowl and continue beating until well combined and fluffy, scraping down the sides of the bowl as needed.
- Gradually add the sifted powdered sugar to the peanut butter mixture, beating on low speed until incorporated, then increase speed to medium and beat until light and fluffy. Pour in the milk and vanilla extract, continuing to beat until the mixture is smooth, thoroughly combined, and has a spreadable consistency. Be careful not to overmix.
- Assemble the Dessert: Retrieve the chilled dish with the chocolate base from the refrigerator. Carefully and evenly spread the entire peanut butter mixture over the set chocolate crust. Use an offset spatula or the back of a spoon to ensure the layer is smooth and extends to all edges of the pan. Return the dish to the refrigerator for at least 30 minutes to allow the peanut butter layer to firm up slightly. This step is crucial for clean layers.
- Add the Whipped Topping and Garnish: Once the peanut butter layer has firmed, spoon or pipe the thawed whipped topping over it. If using homemade whipped cream, gently spread it over the peanut butter layer. For a decorative touch, you can pipe the whipped topping using a large star tip.
- Generously sprinkle the chopped mini peanut butter cups and chopped roasted peanuts over the whipped topping. For the final touch, drizzle chocolate syrup or melted chocolate in a decorative pattern over the entire surface.
- Chill Thoroughly: Cover the dish loosely with plastic wrap and refrigerate for at least 4 hours, or preferably overnight, before serving. This chilling time allows all the layers to set completely and the flavors to meld beautifully, ensuring clean slices and a truly heavenly experience.
Cooking Tips and Variations
For the best results, ensure your cream cheese is at room temperature before mixing; this prevents lumps and ensures a silky-smooth peanut butter layer. Sifting your powdered sugar is also a small step that makes a big difference in achieving that smooth texture. Don’t rush the chilling times between layers; they are essential for the dessert to set properly and for a beautiful presentation. If you’re short on time, you can freeze the dessert for an hour or two to speed up the setting process.
Feel free to get creative with your “Heaven In A Bowl”! For the base, instead of chocolate sandwich cookies, you could use graham cracker crumbs for a lighter flavor, or even a pre-made brownie sheet for an extra fudgy foundation. If you’re not a fan of peanut butter cups, consider using chopped chocolate bars, mini chocolate chips, or even a sprinkle of cocoa powder for garnish. For those with nut allergies, sunflower seed butter can be an excellent substitute for peanut butter, though the flavor profile will, of course, change. You can also experiment with different extracts in the peanut butter layer, like a hint of almond or coffee. For individual servings, assemble this dessert in small ramekins or clear glasses for a stunning presentation at dinner parties.
Storage and Reheating
This “Heaven In A Bowl” dessert is best enjoyed chilled. Store any leftovers tightly covered with plastic wrap in the refrigerator for up to 3-4 days. While it technically doesn’t require reheating, it’s meant to be served cold, straight from the fridge. In fact, the flavors often deepen and meld even more beautifully after a day or two in the refrigerator. If you prefer a slightly softer texture, you can let it sit at room temperature for about 10-15 minutes before serving, but be careful not to leave it out too long, especially if your kitchen is warm, as the whipped topping and peanut butter layer can soften quickly.
Frequently Asked Questions
Can I make this dessert ahead of time?
Absolutely! This is an excellent make-ahead dessert. In fact, it tastes even better the next day once all the flavors have had ample time to meld and the layers have fully set. You can prepare it up to 2 days in advance and keep it covered in the refrigerator.
What if I don’t have an electric mixer?
While an electric mixer makes the peanut butter layer much quicker and fluffier, you can certainly make this by hand. Just be prepared for a bit of an arm workout! Ensure your cream cheese is very soft, and use a sturdy whisk or a wooden spoon to beat the ingredients until smooth and well combined.
Can I use regular whipped cream instead of frozen whipped topping?
Yes, you can! If you prefer homemade whipped cream, whip 2 cups of heavy cream with 2 tablespoons of powdered sugar and ½ teaspoon of vanilla extract until stiff peaks form. This will give you a fresher, less sweet topping than the frozen variety. Be aware that homemade whipped cream might not hold its shape quite as long as stabilized frozen whipped topping, especially if left out at room temperature for extended periods.