Diabetic Soft & Fluffy Homemade Milk Cake
Imagine a slice of pure comfort – a cake so tender it practically melts in your mouth, yet so light and airy it feels like a cloud. Now, imagine that same heavenly experience, but crafted with your health in mind. That’s exactly what our Diabetic Soft & Fluffy Homemade Milk Cake delivers! Traditional milk cakes, often called “tres leches” or simply “milk cake,” are beloved for their incredible moisture and delicate crumb, usually achieved through a rich milk soak. We’ve captured that essence, adapting it to be wonderfully diabetic-friendly without sacrificing an ounce of flavor or that coveted soft, fluffy texture. This isn’t just a dessert; it’s a guilt-free indulgence, a testament to the fact that healthy eating doesn’t mean compromising on deliciousness.
This recipe is a game-changer for anyone managing their sugar intake or simply looking for a healthier dessert option. We’ve meticulously chosen ingredients that contribute to a balanced nutritional profile while ensuring the cake remains incredibly satisfying. Forget dry, bland “diet” cakes – this milk cake is vibrant, flavorful, and incredibly moist, making it perfect for family gatherings, special occasions, or just a delightful treat with your afternoon tea. The secret lies in smart sugar substitutes and careful preparation that unlocks the cake’s natural tenderness and airy rise.
Prepare to be amazed at how simple it is to create such a show-stopping dessert from scratch. With clear, step-by-step instructions and helpful tips, even novice bakers will achieve perfect results. Get ready to bake a cake that not only tastes incredible but also aligns with your health goals, proving that a little creativity in the kitchen can lead to truly joyful and guilt-free indulgence. Let’s dive into making this extraordinary Diabetic Soft & Fluffy Homemade Milk Cake!
Nutritional Information
Per serving (approximate values):
- Calories: 220
- Protein: 7g
- Carbohydrates: 25g
- Fat: 12g
- Fiber: 3g
- Sodium: 180mg
Ingredients
- 1 ½ cups (180g) all-purpose flour (or a 1:1 gluten-free baking flour blend with xanthan gum)
- ½ cup (60g) almond flour
- 1 ½ teaspoons baking powder
- ½ teaspoon baking soda
- ¼ teaspoon salt
- ½ cup (113g) unsalted butter, softened to room temperature
- ¾ cup (150g) erythritol or a monk fruit/erythritol blend (equivalent to 1 ½ cups sugar in sweetness)
- 2 large eggs, room temperature
- 1 teaspoon vanilla extract
- 1 cup (240ml) unsweetened almond milk (or any unsweetened milk of choice), room temperature
- ¼ cup (60ml) heavy cream (for the milk soak, optional but recommended for richness)
- ¼ cup (60ml) unsweetened almond milk (for the milk soak)
- 1 tablespoon erythritol (for the milk soak)
- Optional garnish: a sprinkle of cinnamon or a few fresh berries
Instructions
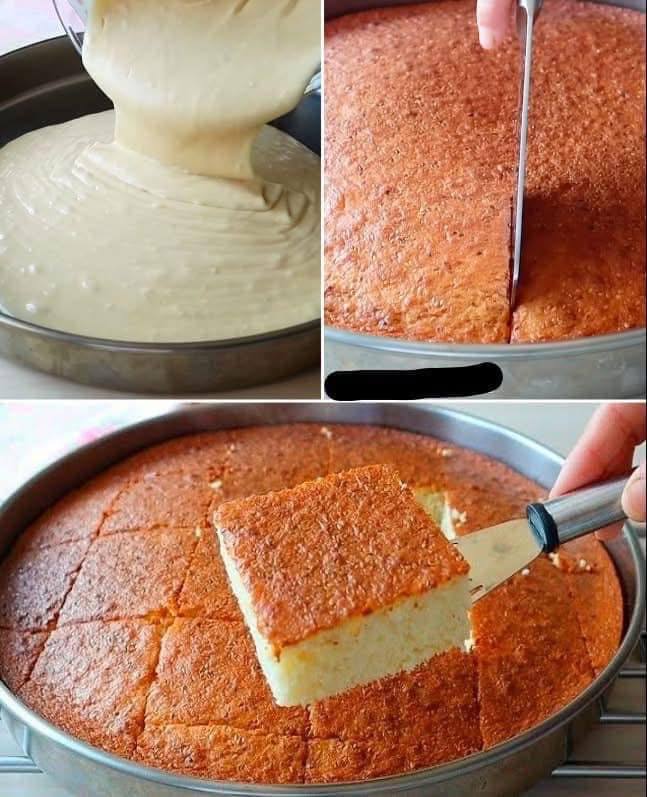
- Preheat your oven to 350°F (175°C). Grease and flour a 9×9 inch square baking pan or a 9-inch round cake pan. You can also line the bottom with parchment paper for easier removal.
- In a medium bowl, whisk together the all-purpose flour, almond flour, baking powder, baking soda, and salt. Set aside.
- In a large bowl, using an electric mixer, cream together the softened butter and ¾ cup erythritol until light and fluffy, about 2-3 minutes. Scrape down the sides of the bowl as needed.
- Add the eggs one at a time, beating well after each addition until fully incorporated. Stir in the vanilla extract.
- Gradually add the dry ingredients to the wet ingredients, alternating with the 1 cup of unsweetened almond milk, beginning and ending with the dry ingredients. Mix on low speed until just combined. Be careful not to overmix, as this can lead to a tough cake. A few small lumps are fine.
- Pour the batter evenly into the prepared baking pan.
- Bake for 30-40 minutes, or until a wooden skewer or toothpick inserted into the center of the cake comes out clean. The top should be golden brown and spring back when lightly touched.
- While the cake is baking, prepare the optional milk soak (if using). In a small bowl, whisk together the ¼ cup heavy cream, ¼ cup unsweetened almond milk, and 1 tablespoon erythritol until the erythritol is dissolved.
- Once the cake is baked, remove it from the oven and let it cool in the pan for 10-15 minutes.
- Using a skewer or fork, poke holes all over the top of the warm cake.
- Slowly and evenly pour the milk soak mixture over the top of the cake, allowing it to absorb into the holes.
- Let the cake cool completely in the pan before slicing and serving. This allows the milk soak to fully absorb and the cake to set.
- Slice into squares or wedges and serve plain, or with an optional garnish of a sprinkle of cinnamon or fresh berries.
Cooking Tips and Variations
Achieving that perfect “soft and fluffy” texture in your Diabetic Milk Cake requires a few key techniques and considerations. First and foremost, ensure all your cold ingredients, especially the butter, eggs, and milk, are at room temperature. This allows them to emulsify properly, creating a smooth batter that traps air efficiently, leading to a lighter and more uniform crumb. Overmixing is the enemy of a tender cake; once you add the dry ingredients, mix only until just combined. Developing too much gluten will result in a tough, dense cake. Gently fold in the last bits of flour if necessary.
For diabetic-friendly swaps and variations, you have several options. While the recipe uses a blend of all-purpose and almond flour, you could experiment with a higher ratio of almond flour or even a sugar-free gluten-free flour blend for an even lower carb option, though this might slightly alter the texture. Always ensure your chosen flour blend includes xanthan gum for structure if it’s entirely gluten-free. Regarding sweeteners, erythritol or a monk fruit/erythritol blend are excellent choices as they bake well and have minimal impact on blood sugar. Avoid pure stevia in large quantities, as it can sometimes leave an aftertaste. For the milk soak, you can adjust the richness by using all unsweetened almond milk instead of a heavy cream blend, or conversely, increase the heavy cream for a richer, more decadent soak. Just remember to account for the nutritional impact of any changes.
Flavor variations can easily be incorporated without adding extra sugar. A teaspoon of lemon or orange zest added to the batter can brighten the flavor profile considerably. Spices like a pinch of cardamom or nutmeg can add warmth and complexity. For a subtle nutty flavor, you could toast the almond flour slightly before mixing it into the dry ingredients. If you’re not doing the milk soak, a sugar-free vanilla glaze (powdered erythritol mixed with a tiny bit of almond milk and vanilla) could be drizzled over the cooled cake. Always taste your batter before baking (if it doesn’t contain raw egg) to ensure the sweetness level is to your liking, as different sugar substitutes can vary in intensity. Remember that even with diabetic-friendly ingredients, portion control is key to managing blood sugar.
Storage and Reheating
To keep your Diabetic Soft & Fluffy Homemade Milk Cake fresh and delicious, proper storage is essential. Once the cake has completely cooled and absorbed the milk soak, cover the baking pan tightly with plastic wrap or transfer individual slices to an airtight container. Store the cake in the refrigerator for up to 3-4 days. The milk soak helps to keep the cake moist, but refrigeration is necessary due to the dairy content. If you’ve made a larger batch, you can also freeze individual slices. Wrap each slice tightly in plastic wrap, then place them in a freezer-safe bag or container. Frozen cake can last for up to 2-3 months.
When it comes to reheating, for refrigerated slices, you can simply bring them to room temperature for about 15-20 minutes before serving. This allows the flavors and texture to soften nicely. If you prefer a slightly warm cake, you can heat individual slices in the microwave for 15-30 seconds, or until just warm. Be careful not to overheat, as this can dry out the cake. For frozen slices, thaw them overnight in the refrigerator, then bring to room temperature or gently warm in the microwave as desired. Avoid thawing at room temperature for extended periods, especially if the cake contains dairy. Always ensure the cake is fully thawed before warming to prevent uneven heating and a rubbery texture.
Frequently Asked Questions
Can I make this cake gluten-free?
Yes, absolutely! The recipe already incorporates almond flour, but to make it fully gluten-free, you can replace the all-purpose flour with a 1:1 gluten-free baking flour blend. Ensure your chosen blend contains xanthan gum, or add ¼ teaspoon of xanthan gum per cup of gluten-free flour to provide the necessary structure and elasticity that gluten typically offers. This will help maintain the soft and fluffy texture.
What is the best sugar substitute to use for this recipe?
For this milk cake, erythritol or a monk fruit/erythritol blend are highly recommended. These sweeteners bake well, provide good bulk, and have a taste profile very similar to sugar with minimal aftertaste. They also have a low glycemic index, making them suitable for diabetic-friendly baking. Avoid using pure stevia in large quantities as it can sometimes leave a noticeable aftertaste and may not provide the same volume as erythritol.
Do I have to use the milk soak?
While the milk soak is optional, it is highly recommended as it’s a signature characteristic of a “milk cake” and contributes significantly to the cake’s incredible moisture and richness. If you choose to omit it, the cake will still be delicious and fluffy, but it will have a more traditional cake texture rather than the ultra-moist, almost pudding-like consistency that a milk-soaked cake offers. If omitting, the nutritional values will slightly change, primarily reducing the fat and carbohydrate content.
How can I prevent my cake from becoming dry?
Several factors contribute to a moist cake. Firstly, ensuring your ingredients are at room temperature helps create a well-emulsified batter. Secondly, avoid overmixing the batter once the dry ingredients are added; overmixing develops gluten, leading to a tough, dry cake. Thirdly, do not overbake! Use the toothpick test and remove the cake from the oven as soon as the toothpick comes out clean. Lastly, if you are using the milk soak, this is the primary way to infuse extra moisture and prevent dryness, so don’t skip it for the best results.